MazBook.ru
English Русский
Български
Беларускі
Український
Српски
Hrvatski
Română
Polski
Slovenský
Magyar
• Bookmark • Sitemap • Contacts •   
Cars Opel Cars Ford Cars Volkswagen Cars Audi Cars Kia Cars Renault Cars Peugeot


Familia Capella Mazda3 Mazda6 CX-? Others Articles
Familia 5 (1985-1989) Familia 6 (1989-1994)

Engine assembly (Mazda Familia BF)

  • Home
  • Mazda Familia
  • Familia BF (1985-1989)
  • Model «E» engine
  • Engine repair
  • Engine assembly
0
Contents: Checking the technical condition ⇓ Disassembly and assembly of the…⇓

Checking the technical condition


Installation clearances, wear limits and repair dimensions of parts are given in the subsection "Detailed technical specifications".

Never clean the mating surfaces of cast parts. Use solvents to clean the parts.

Disassembly and assembly of the connecting rod and piston group


Remove the piston rings.

Place the piston in a support with a cylindrical recess and use a mandrel to press out the pin.

Assemble the pistons with the connecting rods using the device 49 8134 040, which includes the mandrel 48 8134 042.

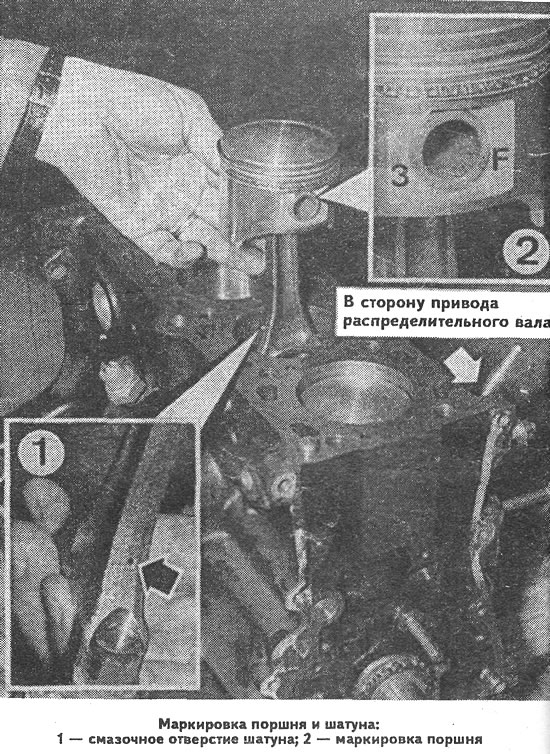
Connect the piston to the connecting rod so that the mark or arrow on the inner surface of the piston pin points in the direction opposite to the lubrication hole on the connecting rod.

To connect the piston to the connecting rod, perform the following operations:
  • lubricate the piston pin with engine oil;
  • place finger on mandrel 49 8134 042;
  • using a press, push the piston pin into the piston bore and into the upper connecting rod head so that guide 49 8134 044 rests against support 49 8134 041 of the device.

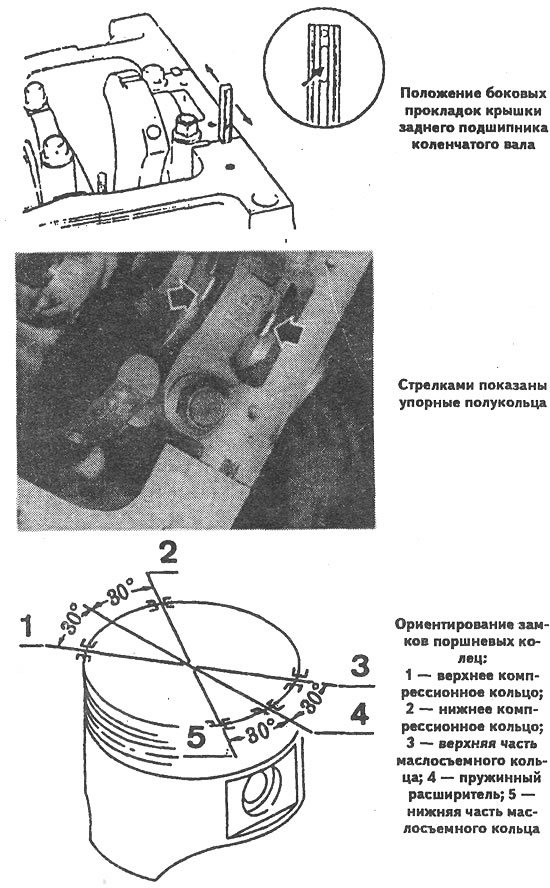
Lubricate the piston grooves and piston rings with engine oil and install the rings on the piston. Arrange the joints of the rings as shown in the figure. Install the compression rings with the marks facing up.

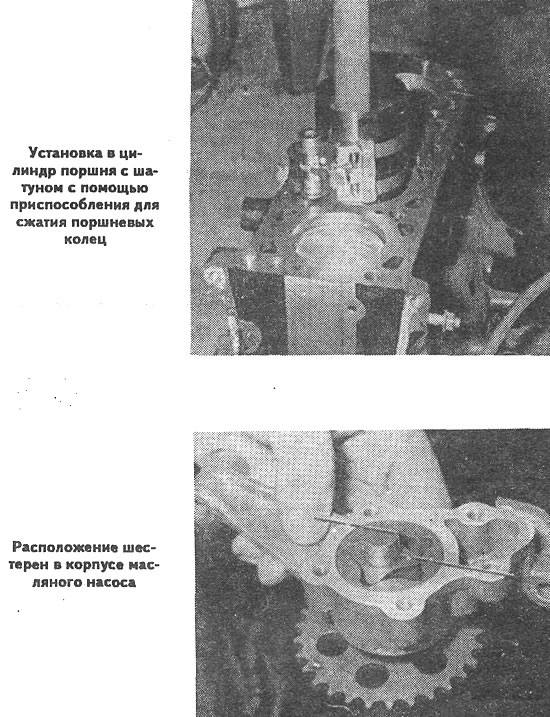
Using a piston ring compressor, insert the pistons with connecting rods into the cylinders, making sure that the "F" marks on the pistons are directed towards the camshaft drive. Install the connecting rod liners and connecting rod caps. Install the connecting rods and connecting rod caps on the crankshaft journals, tighten the connecting rod bolts. The connecting rod caps must be installed so that the mark on the cap is opposite the mark on the lower connecting rod head.


Then assemble the engine by performing disassembly operations in the reverse order of disassembly, taking into account the following:
  • lubricate the main bearing shells and thrust half rings with engine oil;
  • the thrust half rings must be facing the grooves towards the thrust surfaces of the crankshaft;
  • check and, if necessary, adjust the axial free play of the crankshaft;
  • make sure the crankshaft rotates freely;
  • install a new oil filter.

install a new oil filter.


install a new oil filter.


install a new oil filter.
This article is available at: russian, bulgarian, belarusian, ukrainian, serbian, croatian, romanian, polish, slovak, hungarian
This text was checked by: Yaroslav Odintsov
Share with friends on social networks:

Previous
Familia 5 » Engine repair
Next

Disassembling the engine
Installing the camshaft drive chain
Removal the camshaft drive chain
Timing mechanism parts
Powertrain suspension
Cylinder Block Parts
Crank mechanism parts
Model E engine layout
More articles on repairing other Mazda models
Starting and stopping the engine Mazda Capella 3 (1982-1992, petrol)
Engine number Mazda3 BK (2003-2009)
Engine number Mazda6 GG (2002-2008)
Emergency engine start Mazda CX-5KE (2012-2017)
Starting the engine from an auxiliary battery Mazda 121 (3) (1996-2003)
Link in different formats to this article
Comments and feedback from visitors
No comments yet


How much will 28 + 39 ?


Familia 6 (1989-1994) 
  • General information
  • Introduction to guide
  • User manual
  • Maintenance
  • Power unit
  • Petrol engines
  • Diesel engines
  • Lubrication system
  • Cooling system
  • Ignition system
  • Supply system
  • Carburetor
  • Injection system
  • Exhaust system
  • Transmission
  • Clutch
  • Car gearbox
  • Chassis
  • Front suspension
  • Rear suspension
  • Steering
  • Brake system
  • Wheels and tires
  • Body
  • Body elements
  • Doors and windows
  • Body Care
  • Electrical equipment
  • Equipment and devices
  • Power devices
  • Heating system
  • Lighting and headlights
  • Windshield wipers and washers
  • Wiring diagrams (since 1987)
  • Wiring diagrams (since 1991)
Familia 5 (1985-1989) 
  • General information
  • Vehicle data
  • Model «E» engine
  • Engine repair
  • Cooling and lubrication system
  • Power and ignition system
  • Model «B» engine
  • Engine repair
  • Cooling and lubrication system
  • Ignition system
  • Power system (carburetor)
  • Power system (injector)
  • Transmission
  • Clutch
  • Mechanical gearbox
  • Automatic gearbox
  • Front wheel drive
  • Chassis
  • Steering
  • Front suspension
  • Rear suspension
  • Brake system
  • Electrical equipment
  • Equipment and devices
  • Electrical circuits
  • Wiring diagrams (station wagon)
MazBook.ru © 2018–2026 · Mobile version · Articles and news · Sitemap: EN BG BY UA RS HR RO PL SK HU · Feedback · Site search · Add to bookmarks Familia 5 (BF) · Familia 6 (BG) · Capella 3 (GC) · Capella 3 and 4 (GC) · Capella 4 (GD) · Capella 5 (GE) · Capella 6 (GF) · Mazda3 BK · Mazda6 GG · CX-5KE · Mazda 121 (3) · Mazda BT-50 (1) ·
By continuing to use the site, you agree to the use of cookies 🔐