Main characteristics
The CAN system is used to transmit control signals for the input/output of the communication circuit of the instrument cluster, sensors, warning lights and indicator lights.
LEDs are used for all indicators installed in the instrument cluster.
The information display, which includes the clock, audio system and air conditioning system display, is located in the center of the instrument panel. It also includes a drive information system, depending on the vehicle's equipment.
A fanfare-type sound signal is used.
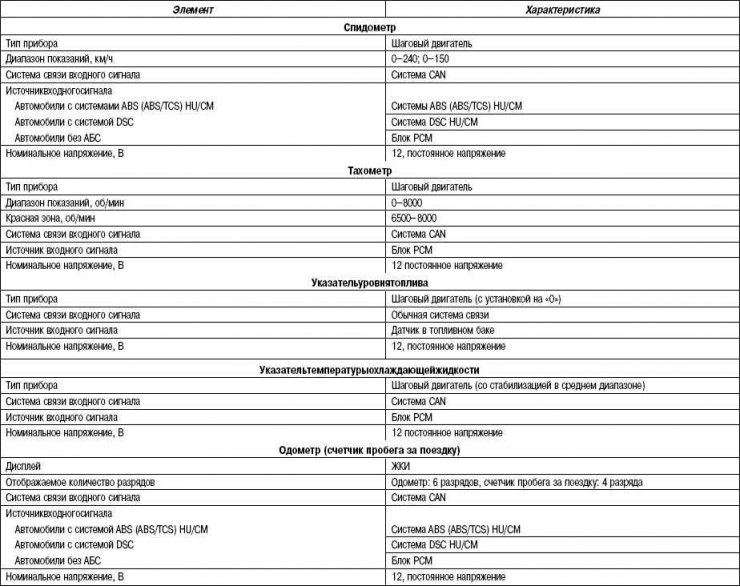
The control devices and emergency signal lamps are listed in Table 7.4, for the specification of the control devices see Table 7.5.
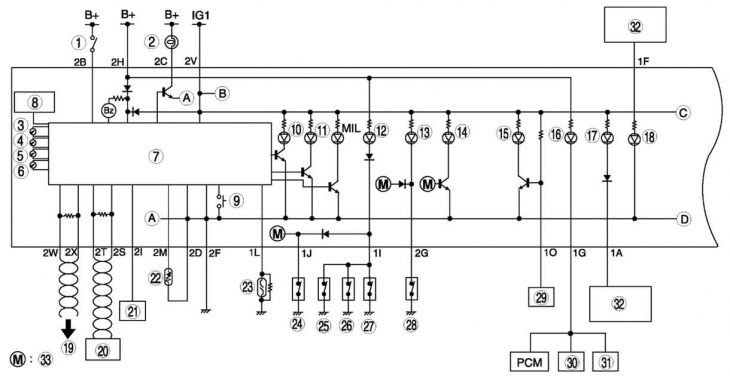
Fig. 7.94a. Instrument cluster wiring diagram (part 1): 1 – Ignition key left in the lock reminder switch; 2 – ignition switch illumination; 3 – speedometer; 4 – tachometer; 5 – fuel level indicator; 6 – coolant temperature indicator; 7 – microcomputer; 8 – odometer/trip counter; 9 – Odometer/trip counter switch; 10 – Low fuel level indicator lamp; 11 – Battery charge indicator lamp; 12 – open door indicator light; 13 – Seat belt warning light; 14 – HOLD mode indicator lamp; 15 – Airbag warning light; 16 – safety lamp; 17 – Cruise control system setting indicator lamp; 18 – Main cruise control system indicator lamp; 19 – to the PCM unit, anti-lock braking system (ABS/TCS) HU/CM (with (ABS/TCS)) or DSC HU/CM (with DSC); 20 – audio block; 21 – Control switch for lighting on the instrument panel; 22 – fuel level indicator sensor; 23 – brake fluid level sensor; 24 – door limit switch (driver side); 25 – door limit switch (passenger side); 26 – door limit switch (back left side); 27 – door limit switch (back right side); 28 – Seat belt buckle switch; 29 – SAS block; 30 – door lock timer unit; 31 – Security system control module; 32 – actuator of the automatic speed control system; 33 - to the microcomputer
Text taken from an online platform: www.MazBook.ru
The wiring diagram of the instrument cluster is shown in Fig. 7.94a, 7.94b.
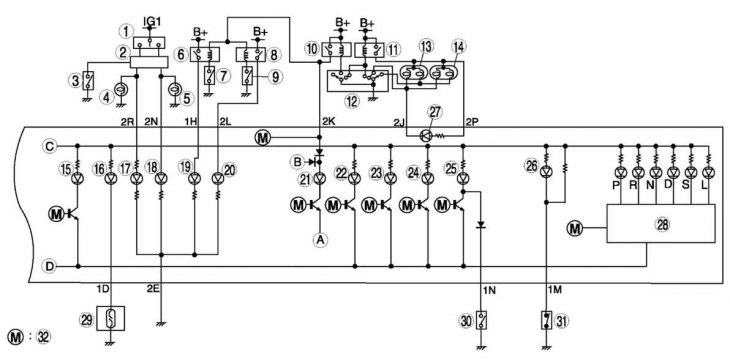
Fig. 7.94b. Instrument cluster wiring diagram (part 2): 1 – direction indicator switch; 2 – direction indicator and hazard warning light switch; 3 – hazard warning switch; 4 – direction indicator (left); 5 – direction indicator (right); 6 – Front fog light relay; 7 – Front fog light switch; 8 – Rear fog light relay; 9 – Rear fog light switch; 10 – TNS relay; 11 – headlight relay; 12 – headlight switch; 13 – headlight (left); 14 – headlight (right); 15 – TCS system shutdown indicator lamp; 16 – washer fluid reservoir level warning lamp; 17 – direction indicator (left); 18 – direction indicator (right); 19 – Front fog light indicator lamp; 20 – Rear fog light indicator lamp; 21 – Instrument cluster lighting; 22 – DSCATCS control lamp; 23 – DSC system deactivation indicator lamp; 24 – Anti-lock brake system warning light; 25 – brake system warning light; 26 – Low oil level indicator lamp; 27 – High beam indicator lamp; 28 – selector indicator control circuit; 29 – washer fluid level sensor; 30 – Parking brake switch; 31 – oil pressure sensor; 32 - on a microcomputer
Table 7.4. Control instruments and warning lamps
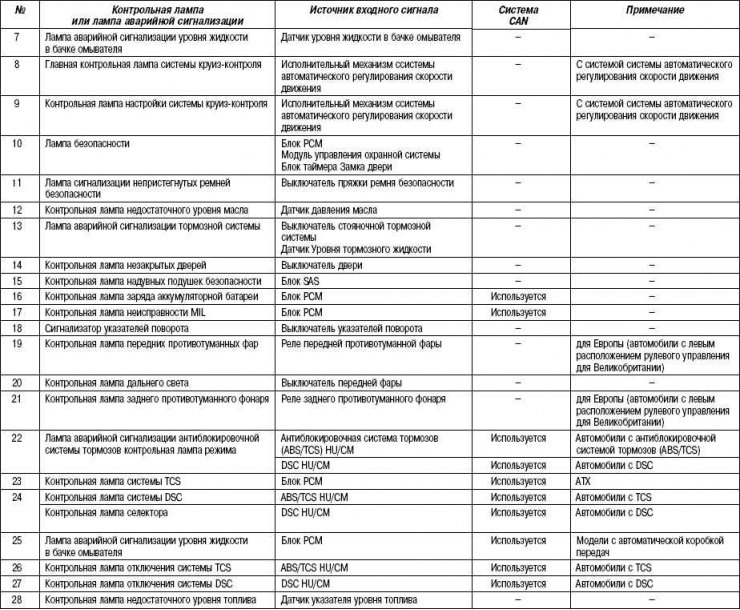
Table 7.5. Specification of control devices