


Attention: Observe safety precautions when working with the engine cooling system.
Note:
: replace the part with a new one after each removal.
- Do not disassemble the water pump as it is a precision component.
- Removal and installation of the water pump and its pulley is performed from underneath the vehicle.
Versions with petrol engines
Removal the water pump
1. Disconnect the negative battery terminal.
2. Remove the front protective pan of engine No.2.
3. Remove the right mudguard.
4. Drain the engine coolant.
5. Remove the drive belt from the water pump pulley and set it aside.
Caution: Be careful not to damage the groove and surface of the water pump pulley when using tools. Otherwise, it will cause wear or breakage of the drive belt, abnormal noise during operation, damage to the pulley and rust.
6. Align the hole of the water pump pulley with the hole in the water pump as shown in the figure.
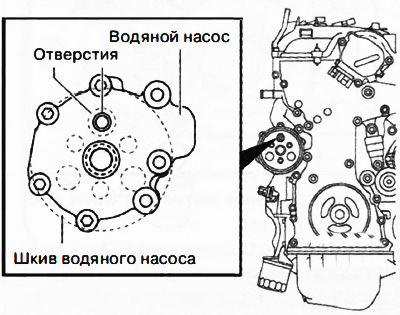
7. Insert a suitable bolt (length about 70 mm) into the hole of the water pump, as shown in the figure, thus fixing the water pump pulley from turning.
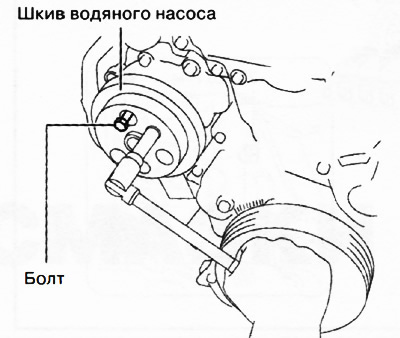
8. Loosen the mounting bolts and remove the water pump pulley.
9. Loosen the cooling system inlet pipe support bolt.
10. Place a suitable container under the engine to collect any coolant remaining in the engine.
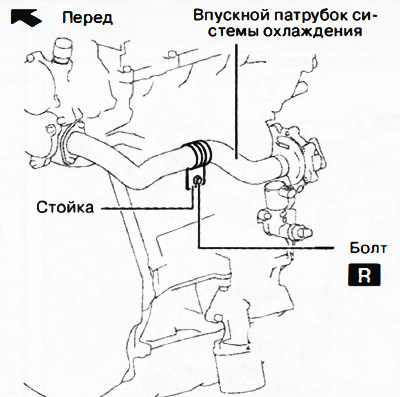
Note:: replace the part with a new one after each removal.
11. Loosen the three water pump assembly mounting bolts shown in the figure and collect the drained coolant in a previously prepared container.
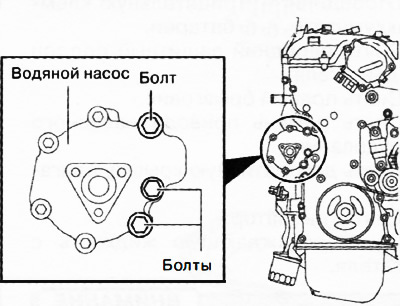
Caution: Do not remove the water pump assembly completely at once, as there is some coolant left in the engine that will leak out.
12. After the coolant stops draining, remove the water pump assembly from the engine.
13. Remove the gasket and O-ring from the water pump.
Installing a water pump
Caution: Do not apply oil (engine, transmission, etc.) on the O-rings of the water inlet pipe. Otherwise, the O-ring material may be damaged, which will lead to a loss of tightness.
1. Apply coolant to the new O-ring.
2. Install the O-ring onto the cooling system inlet pipe.
Caution: Install the water pump gasket in the correct direction as shown in the figure. Otherwise, coolant leakage and engine damage may occur.
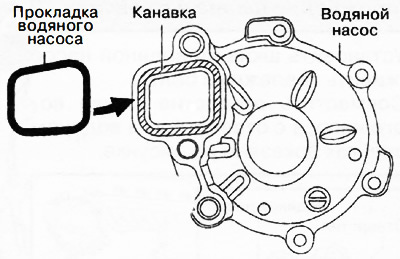
3. Insert a new gasket into the water pump groove.
4. Install the water pump on the engine.
5. Tighten the mounting bolts in the sequence shown in the figure to a torque of 20-26 Nm.
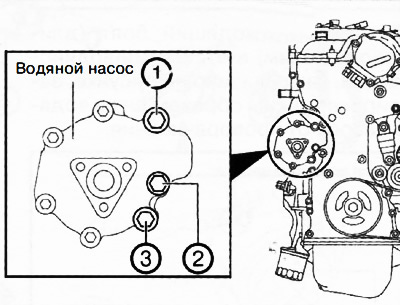
6. Remove any remaining sealant from the bolt holes in the cylinder block on the side of the cooling system intake manifold stand.
7. Remove the oil inlet solenoid valve to provide sufficient space to tighten the water inlet pipe stand bolt.
8. Install the cooling system inlet pipe stand and tighten the new mounting bolt.
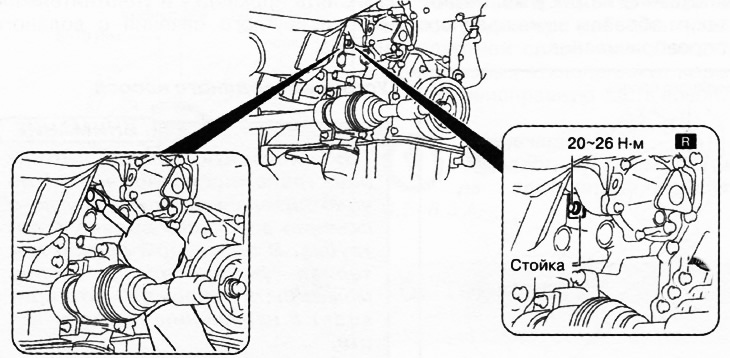
Note:: replace the part with a new one after each removal.
9. Install the oil supply solenoid valve.
Caution: Be careful not to damage the groove and surface of the water pump pulley when using tools. Otherwise, it will cause wear or breakage of the drive belt, abnormal noise during operation, damage to the pulley and rust.
10. Install the pulley onto the water pump and tighten the mounting bolt.
11. Align the hole of the water pump pulley with the hole in the water pump as shown in the figure.
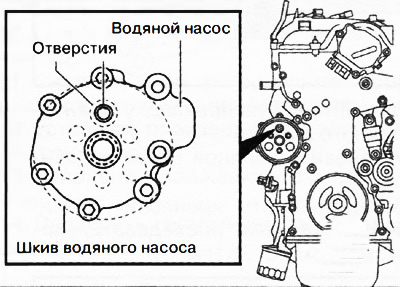
12. Insert a suitable bolt (length about 70 mm) into the hole of the water pump, as shown in the figure, thus fixing the water pump pulley from turning.
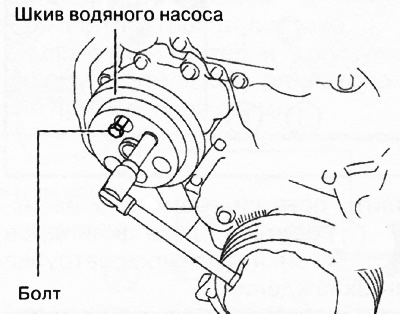
13. Fully tighten the water pump pulley bolt to a torque of 8-11 Nm.
14. Remove the bolt used to prevent the water pump pulley from turning.
15. Install the remaining parts in the reverse order of removal.
16. Fill the engine with coolant.
17. Check the cooling system for leaks.
Versions with diesel engines
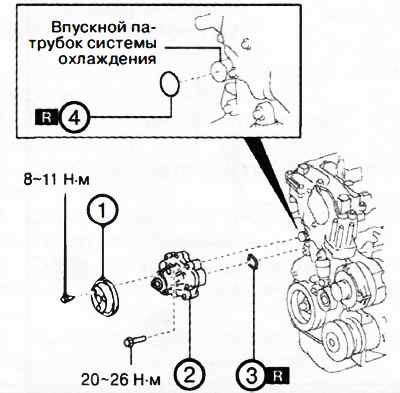
Versions with petrol engines:
1. Water pump pulley.
2. Water pump assembly.
3. Gasket.
4. O-ring with circular cross-section.
Removal the water pump
1. Disconnect the negative battery terminal.
2. Remove the front protective pan No.2 of the engine.
3. Remove the right mudguard.
4. Remove the accessory drive belt.
5. Remove the decorative engine cover.
6. Remove the generator.
7. Drain the coolant from the engine.
Caution: Be careful not to damage the groove and surface of the water pump pulley when using tools. Otherwise, it will cause wear or breakage of the drive belt, abnormal noise during operation, damage to the pulley and rust.
8. Loosen the seven water pump mounting bolts shown in the figure and collect any leaking coolant in a suitable container.
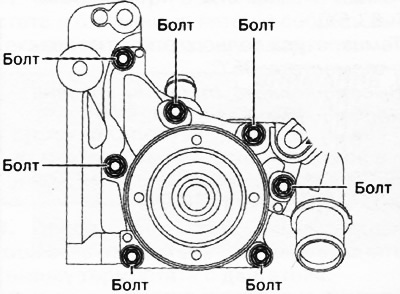
Caution: Do not remove the water pump assembly completely at once, as there is some coolant left in the engine that will leak out.
9. Remove the water pump gasket.
Installing a water pump
Caution: Be careful not to damage the groove and surface of the water pump pulley when using tools. Otherwise, it will cause wear or breakage of the drive belt, abnormal noise during operation, damage to the pulley and rust.
1. Install a new gasket on the water pump.
2. Install the water pump:
Tighten bolt A.
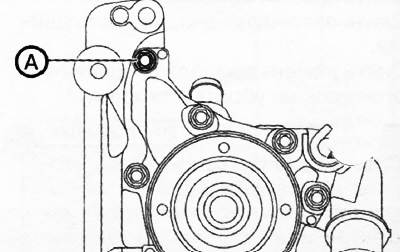
Tighten the bolts in the sequence shown in the figure to a torque of 9-12 Nm.
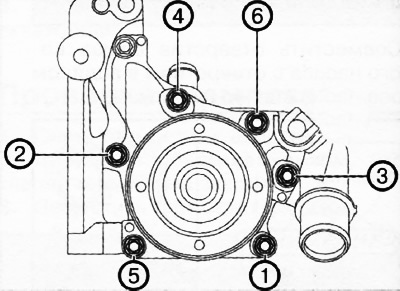
Finally, tighten bolt A to a torque of 9-12 Nm.
3. Install the remaining parts in the reverse order of removal.
4. Fill the engine with coolant.
5. Check the cooling system for leaks.