MazBook.ru
English Русский
Български
Беларускі
Український
Српски
Hrvatski
Română
Polski
Slovenský
Magyar
• Bookmark • Sitemap • Contacts •   
Cars Opel Cars Ford Cars Volkswagen Cars Audi Cars Kia Cars Renault Cars Peugeot


Familia Capella Mazda3 Mazda6 CX-? Others Articles
CX-5KE (2012-2017)

Removal and installation the brake pedal (Mazda CX-5KE)

  • Home
  • Mazda CX-?
  • CX 5 KE (2012-2017)
  • Chassis
  • Brake system
  • Removal and installation the brake pedal
0
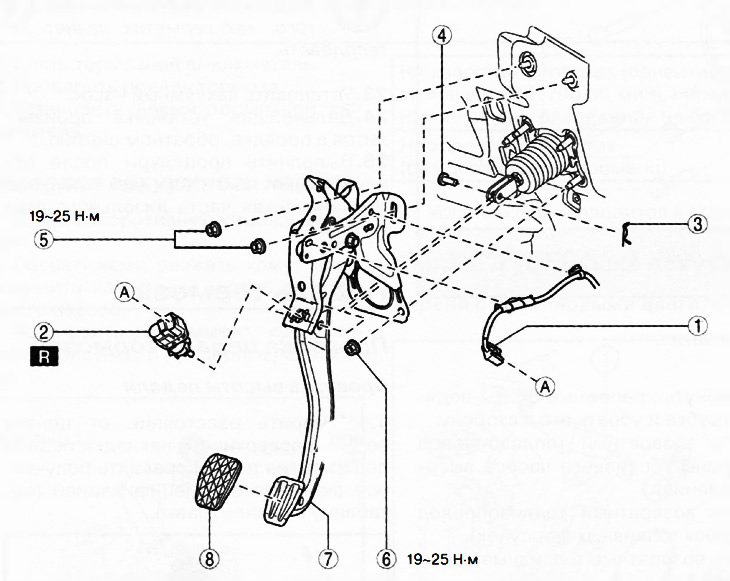
1. Brake switch connector and wiring.

1. Brake switch connector and wiring.
2. Brake switch.
3. Spring pin.
4. Connecting pin.
5. Upper nuts of the pedal block.
6. Lower nuts of the pedal block.
7. Brake pedal.
8. Brake pedal pad.


Note: replace the part with a new one after each removal.


Attention.
  • The gap between the brake switch and the brake pedal is automatically adjusted to the required value after inserting the switch into the installation hole on the brake pedal bracket and turning it to lock it. If the brake switch is not installed correctly, the gap may not be as specified, causing the brake lights to malfunction. Therefore, before installing the brake switch, be sure to check that the brake pedal is installed correctly and fully released.
  • Since the brake switch gap is automatically adjusted, re-adjustment is not required. In addition, when replacing the brake booster or pedal, or after performing any procedure that changes the brake pedal travel, the brake switch must be replaced with a new one.


1. Remove the battery from the shelf.

2. Disconnect the brake lines from the master cylinder.

3. Versions with manual transmission: Disconnect the reserve clutch hydraulic hose from the brake master cylinder.

4. Remove the side trim from the driver's side.

5. Remove the front left heater duct.

6. Disconnect the brake switch connector.

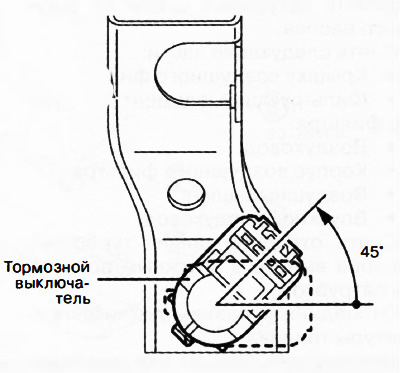
7. Remove the brake switch by turning it 45° clockwise.

8. Remove the spring pin and take out the brake booster fork connecting pin.

9. Loosen the pedal block mounting nuts.

10. Move the brake booster toward the front of the vehicle so that the brake booster fork does not touch the brake pedal lever.

11. Remove the brake pedal.

12. Installation is carried out in the reverse order of removal, taking into account the following:
  • Check the brake pedal.
  • With the pedal fully released, insert the new brake switch into the mounting hole in the pedal cluster bracket.
  • Lock the brake switch by turning it counterclockwise 45°.

Lock the brake switch by turning it counterclockwise 45°.


13. After installation, add brake fluid to the reservoir, remove air from the brake system and check the brake fluid level in the reservoir again.

Checking the brake switch


Caution: Check the brake switch without removing it from the brake pedal. Otherwise, the normal operation of the brake switch is not guaranteed. If the brake switch is removed from the brake pedal, replace it with a new one.


1. Remove the lower panel from the driver's side.

2. Remove the front heater duct.

3. Disconnect the brake switch connector.

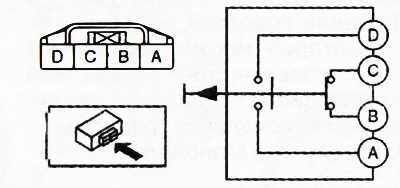
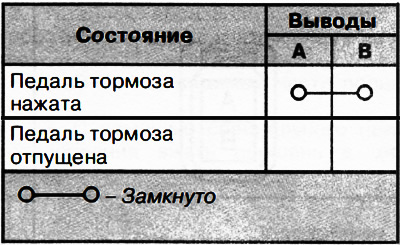
4. Check the continuity of the circuit between the terminals of the switch connector according to the table below.

4. Check the continuity of the circuit between the terminals of the switch connector according to…

5. If the test results do not match the values given in the table, replace the brake switch with a new one.
This article is available at: russian, bulgarian, belarusian, ukrainian, serbian, croatian, romanian, polish, slovak, hungarian
This text was checked by: Evgeny Mereshnikov
Share with friends on social networks:

Previous
CX-5KE » Brake system
Next

Checking the brake pedal
Removal and installation a vacuum pump
Removal and installation the brake booster
Checking the brake booster
Checking, removing and installing the vacuum hose
Master brake cylinder
Checking the front disc brakes
Removal and installation front brake components
Replacing the front brake pads
Disassembling and assembling the front brake caliper
More articles on repairing other Mazda models
Detailed technical characteristics of the brake system Mazda Familia 5 (1985-1989)
Brake pedal Mazda Capella 3 (1982-1992, petrol)
Trauma-safe brake pedal Mazda3 BK (2003-2009)
Checking the brake pedal height Mazda6 GG (2002-2008)
Brake pedal — checking and adjustment Mazda BT-50 (1) (2006-2011)
Link in different formats to this article
Comments and feedback from visitors
No comments yet


How much will 14 + 31 ?


CX-5KE (2012-2017) 
  • General information
  • Introduction to the guide
  • User manual
  • Maintenance
  • Power unit
  • Petrol engines 2.0 l
  • Petrol engines 2.5 l
  • Diesel engines 2.2 l
  • Cooling system
  • Lubrication system
  • Supply system
  • Control system
  • Intake and exhaust system
  • Engine electrical equipment
  • Transmission
  • Clutch
  • Mechanical gearbox
  • Automatic gearbox
  • Transfer case
  • Drive shafts and cardan
  • Chassis
  • Wheels and tires
  • Front suspension
  • Rear suspension
  • Brake system
  • Steering
  • Body
  • Exterior (external elements)
  • Interior (internal elements)
  • Security systems
  • Heating and air conditioning
  • Electrical equipment
  • Equipment and devices
  • Electrical circuits
MazBook.ru © 2018–2026 · Mobile version · Articles and news · Sitemap: EN BG BY UA RS HR RO PL SK HU · Feedback · Site search · Add to bookmarks Familia 5 (BF) · Familia 6 (BG) · Capella 3 (GC) · Capella 3 and 4 (GC) · Capella 4 (GD) · Capella 5 (GE) · Capella 6 (GF) · Mazda3 BK · Mazda6 GG · CX-5KE · Mazda 121 (3) · Mazda BT-50 (1) ·
By continuing to use the site, you agree to the use of cookies 🔐