
Note:
- The following test methods allow you to simply determine the performance of the vacuum brake booster.
- If any faults are found in the vacuum booster, replace the booster with a new one.
Checks without the use of special equipment
1. With the engine stopped, depress the brake pedal several times.
2. With the pedal depressed, start the engine.
3. If the brake pedal moves down slightly immediately after starting the engine, the brake booster is OK.
4. Start the engine.
5. Stop the engine after 1-2 minutes of operation.
6. Depress the brake pedal with normal force.
7. If the first stroke of the brake pedal is long enough, and with each subsequent pressing it becomes shorter and shorter, the brake booster is working. If faults are found, check for correct installation and for damage to the non-return valve and vacuum hose. After repair, check the amplifier again.
8. Start the engine.
9. Depress the brake pedal with normal force.
10. With the brake pedal depressed, stop the engine.
11. Keep the brake pedal depressed for approximately 30 seconds.
12. If the pedal height does not change over time, the vacuum booster is normal.
Checks using special equipment
Note:
- When performing a test using special equipment, check the brake pipes of the left and right front wheels.
- The following figures show the inspection procedures for the left front wheel brake line.
1. Remove the fasteners.
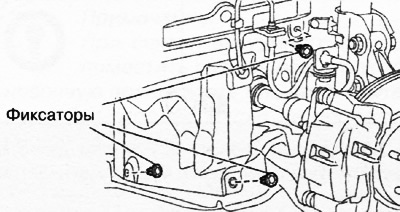
2. Remove the mudguard to the side.
3. Disconnect the brake line from the brake hose.
4. Remove clip.
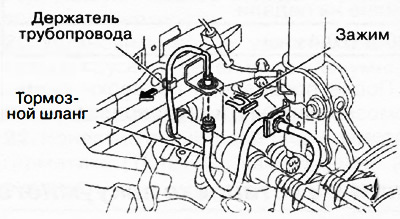
5. Remove the brake hose from the bracket.
6. Disconnect the brake pipe from the pipe holder.
7. Install the special equipment on the brake pipeline as shown in the figure.
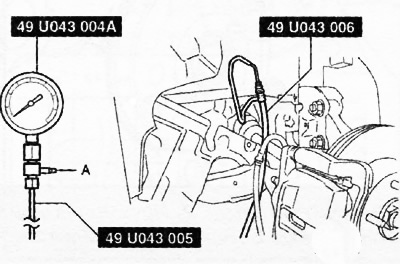
8. To remove air from the brake pipeline and the special equipment.
Note: Bleed special equipment through port A.
9. Install the force metering device on the brake pedal.
10. Connect a vacuum gauge to the vacuum line.
11. Start the engine.
12. Press the brake pedal with a force of 200 N (20.4 kgf).
13. Stop the engine when the gauge reading reaches 68 kPa (510 mmHg) while pressing the pedal.
14. With the engine off, follow the vacuum gauge for 15 seconds.
15. If the vacuum drops by 3.3 kPa (25 mmHg) or less, the amplifier is OK.
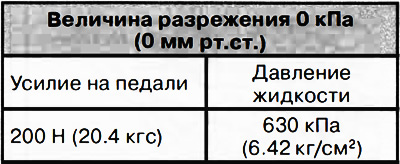
16. If the ratio of the effort on the brake pedal and the pressure of the brake fluid corresponds to the values \u200b\u200bgiven in the table with the engine stopped and the vacuum value 0 kPa (About mmHg), the system is correct.
17. Start the engine. When the vacuum reaches 66.7 kPa (500 mmHg), depress the brake pedal with a force of 200 N and check the value of the brake fluid pressure. If the results obtained are normal, the system is working.

18. After the check, remove the special equipment, install the brake hoses and pipelines in their places and bleed the air from the brake system.