
MazBook.ru
English Русский
Български
Беларускі
Український
Српски
Hrvatski
Română
Polski
Slovenský
Magyar
• Bookmark • Sitemap • Contacts •   
Cars Opel Cars Ford Cars Volkswagen Cars Audi Cars Kia Cars Renault Cars Peugeot


Familia Capella Mazda3 Mazda6 CX-? Others Articles
Mazda3 BK (2003-2009)

Checking the brake booster (Mazda 3 BK)

  • Home
  • Mazda 3
  • Mazda3 BK (2003-2009)
  • Chassis
  • Brake system
  • Checking the brake booster
0
Contents: Checking the operation of the vacuum…⇓ Checking for leaks ⇓ Checking and adjusting the length of…⇓
The brake booster, located on the firewall, operates using the vacuum in the intake manifold and atmospheric pressure. After completing each operation that involved removing any of the brake system components, perform a test drive to check the operation of the vehicle's brakes. Test the brakes while driving on a clean, dry, and level road. Other test conditions may result in inaccurate results. Test the brakes at various speeds, with both low and high brake loads. The vehicle should stop smoothly, without pulling to one side. Avoid locking the brakes, as this will damage the tires and reduce braking efficiency and control.

The operation of the brakes is also affected by the condition of the tires, the vehicle load and the alignment angles of the front wheels.

Checking the operation of the vacuum booster


Release any vacuum with the engine off by depressing the brake pedal several times at 5-second intervals. With the brake pedal fully depressed, start the engine. Make sure that the gap between the brake pedal and the floor panel decreases as the engine vacuum stabilizes.

Checking for leaks


Start the engine and let it idle for about 1 minute. Shut it off by applying vacuum to the booster. Press the brake pedal several times with normal force and release the existing vacuum. Make sure that when you press the brake pedal, the gap between the brake pedal and the floor panel gradually increases. Start the engine. Press the brake pedal and hold it down, then shut off the engine. Keep the pedal depressed for about 30 seconds or more and make sure that the pedal travel does not change.


Information copied from the portal [mazbook.ru]

Checking and adjusting the length of the protruding rod


Using a hand vacuum pump, create a vacuum in the brake booster of -66.7 kPa (-500 mm Hg).
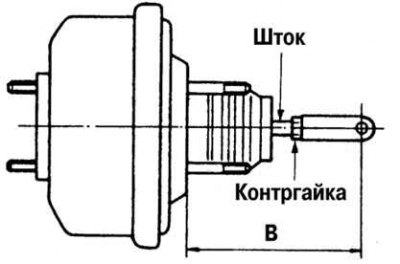
Fig. 6.31. Adjusting the length of the push rod

Fig. 6.31. Adjusting the length of the push rod


Loosen the lock nut and adjust the length of the push rod so that length "B" becomes equal to the specified value (Fig. 6.31).

Adjust until the gap between the protruding part of the stem and the screw is 0 mm - nominal length with a vacuum gauge reading of 66.7 kPa (-500 mm Hg.).
This article is available at: russian, bulgarian, belarusian, ukrainian, serbian, croatian, romanian, polish, slovak, hungarian
This text was checked by: Evdokia Filimonova
Share with friends on social networks:

Previous
Mazda3 BK » Brake system
Next

Removal and installation the brake booster
Checking the liquid level sensor
Removal and installation the master brake cylinder
Removal and installation the brake pedal
Checking the brake pedal
Disassembly and assembly of the master cylinder
Removal and installation the front brake disc
Checking the brake disc and brake components
Replacing the front brake pads
Removal and installation the rear disc brake mechanism
More articles on repairing other Mazda models
Checking the brake booster Mazda Familia 6 (1989-1994)
Brake booster Mazda Capella 3 (1982-1992, petrol)
Checking the vacuum hose check valve (brake booster) Mazda6 GG (2002-2008)
Checking the brake booster Mazda CX-5KE (2012-2017)
Checking the brake booster Mazda 121 (3) (1996-2003)
Link in different formats to this article
Comments and feedback from visitors
No comments yet


How much will 38 + 31 ?


Mazda3 BK (2003-2009) 
  • User manual
  • Vehicle description
  • Keys, locks and alarms
  • Controls and instruments
  • Air conditioning and heater
  • Seat adjustment
  • Security systems
  • Driving and operation
  • Faults en route
  • Maintenance
  • Power unit
  • Engine device (gasoline)
  • Engine repair (gasoline)
  • Diesel engine (Z6)
  • Lubrication system
  • Cooling system
  • Fuel system
  • Exhaust system
  • Engine electrical equipment
  • Engine management system
  • Transmission
  • Clutch
  • Mechanical gearbox
  • Automatic gearbox
  • Drive mechanism
  • Chassis
  • Suspension and wheels
  • Steering
  • Brake system
  • Body
  • Body elements
  • Doors and windows
  • Air conditioning and heater
  • Electrical equipment
  • Equipment and devices
  • Power devices
  • Lighting system
  • Windshield wipers and washers
  • Equipment checks
MazBook.ru © 2018–2026 · Mobile version · Articles and news · Sitemap: EN BG BY UA RS HR RO PL SK HU · Feedback · Site search · Add to bookmarks Familia 5 (BF) · Familia 6 (BG) · Capella 3 (GC) · Capella 3 and 4 (GC) · Capella 4 (GD) · Capella 5 (GE) · Capella 6 (GF) · Mazda3 BK · Mazda6 GG · CX-5KE · Mazda 121 (3) · Mazda BT-50 (1) ·
By continuing to use the site, you agree to the use of cookies 🔐