MazBook.ru
English Русский
Български
Беларускі
Український
Српски
Hrvatski
Română
Polski
Slovenský
Magyar
• Bookmark • Sitemap • Contacts •   
Cars Opel Cars Ford Cars Volkswagen Cars Audi Cars Kia Cars Renault Cars Peugeot


Familia Capella Mazda3 Mazda6 CX-? Others Articles
CX-5KE (2012-2017)

Replacing the front crankshaft oil seal (Mazda CX-5KE)

  • Home
  • Mazda CX-?
  • CX 5 KE (2012-2017)
  • Power unit
  • Diesel engines 2.2 l
  • Replacing the front crankshaft oil seal
0
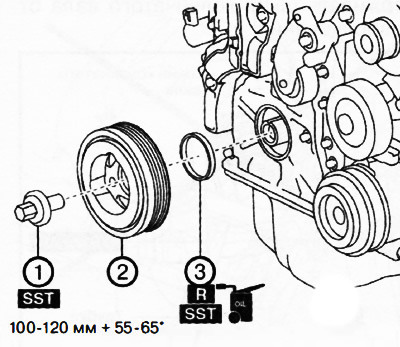
1. Crankshaft pulley bolt.

1. Crankshaft pulley bolt.
2. Crankshaft pulley.
3. Front crankshaft oil seal.


Note:

: replace the part with a new one after each removal.

: use a special tool or device.

: apply oil.


Warning: A hot engine can cause burns. Before starting work, turn off the engine and wait until it cools down.


1. Remove the front engine oil pan No.2.

2. Remove the mudguard.

3. Remove the accessory drive belt.

Note: To remove the crankshaft pulley bolt, you will need at least one more assistant.


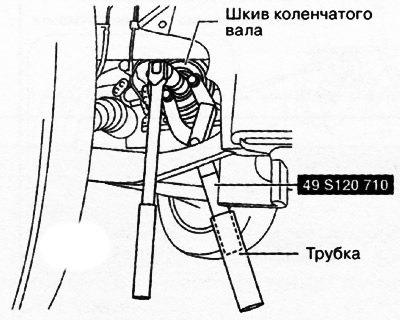
4. Using bolts (M12x1.75, strength class 8.8 or higher, 48-50 mm long - the length can be adjusted by adding washers), install a special tool on the crankshaft pulley. Tightening torque: 15 Nm.
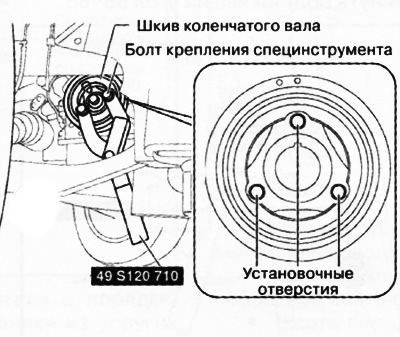
4. Using bolts (M12x1.75, strength class 8.8 or higher, 48-50 mm long - the length can be adjusted…


Attention.
  • To prevent damage to the crankshaft pulley and engine front cover, be sure to use the specified size bolts when installing the special tool on the crankshaft pulley and tighten them to the specified tightening torque.
  • After installing the special tool, make sure that the bolts do not touch the front engine cover.


Note: If bolts of 50 mm or more are used, additional washers must be added to adjust the working length of the bolt to 48-50 mm. Thus, to use the M12x1.75 bolts of 60 mm length, which are supplied with the special tool 49 S011 102A, a 10 mm thick washer must be added.
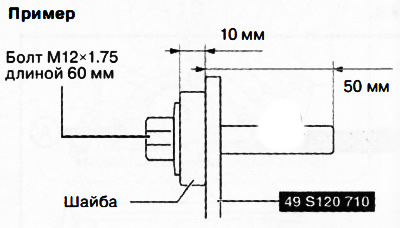

Note: If bolts of 50 mm or more are used, additional washers must be added to adjust the working…


5. One person needs to connect an extension tube of suitable length (100 mm or more) to a special tool and hold the crankshaft pulley from turning.
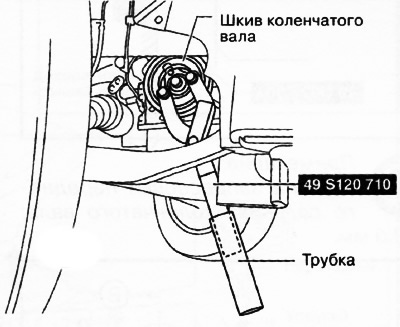


5. One person needs to connect an extension tube of suitable length (100 mm or more) to a special…


6. The second person must unscrew and remove the crankshaft pulley mounting bolt.
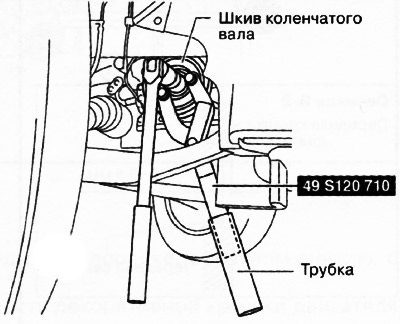
6. The second person must unscrew and remove the crankshaft pulley mounting bolt.


7. Remove the pulley from the crankshaft using a special tool.

8. Cut off the edges of the seal using a regular knife.

9. Remove the oil seal using a flat-head screwdriver wrapped in a clean cloth to avoid damaging the crankshaft surface.
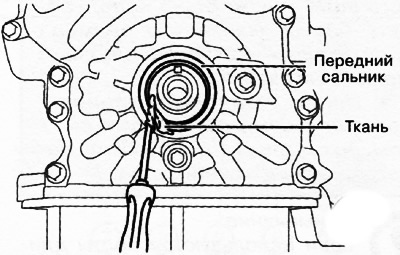
9. Remove the oil seal using a flat-head screwdriver wrapped in a clean cloth to avoid damaging the…


10. Apply clean engine oil to the inside surfaces of the new front crankshaft oil seal.


11. Manually insert the front crankshaft oil seal into the engine front cover.

12. Press the seal evenly using a suitable mandrel and hammer.
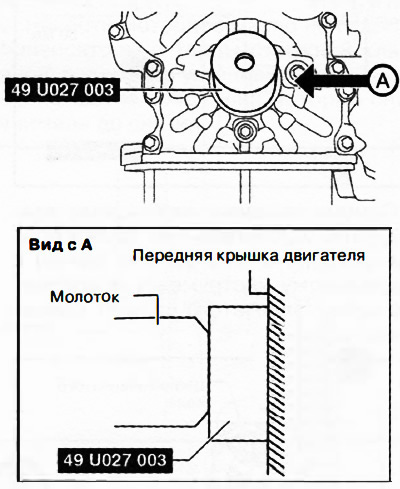
12. Press the seal evenly using a suitable mandrel and hammer.


Note: Front crankshaft oil seal pressing depth: 0-0.5 mm.
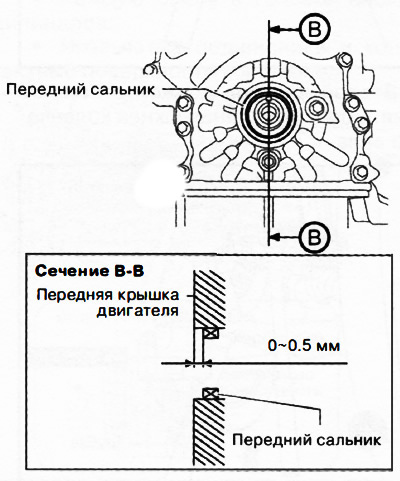

Note: Front crankshaft oil seal pressing depth: 0-0.5 mm.


13. Install the pulley with a special tool on the crankshaft.

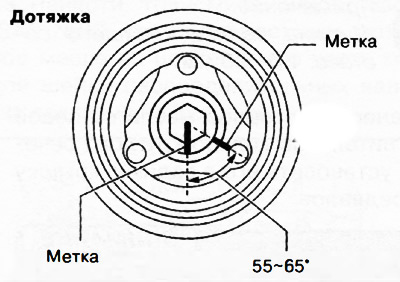
Note: Tightening the crankshaft pulley bolt must be done in two stages. For the second stage of tightening, (tightening to a certain angle) assistant needed.


14. Connect an extension tube of suitable length (100 mm or more) to a special tool and hold the crankshaft pulley from turning.
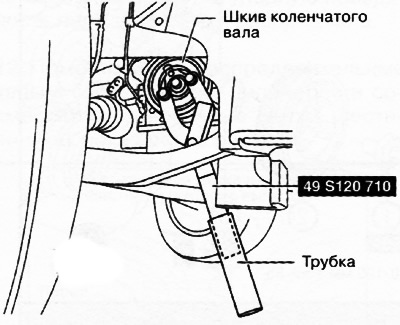
14. Connect an extension tube of suitable length (100 mm or more) to a special tool and hold the…


15. Tighten the crankshaft pulley bolt to a torque of 100-120 Nm.
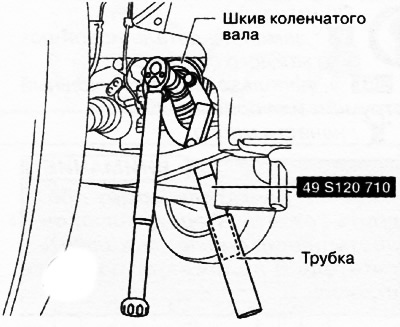


15. Tighten the crankshaft pulley bolt to a torque of 100-120 Nm.


16. Use a marker to mark the bolt and crankshaft pulley as shown in the figure to tighten the bolt to the required angle.
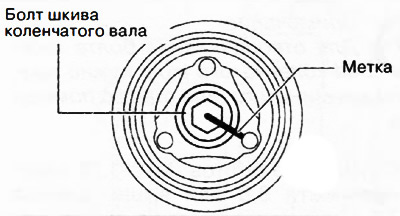
16. Use a marker to mark the bolt and crankshaft pulley as shown in the figure to tighten the bolt…


17. While one person holds the special tool to prevent the crankshaft from turning, the other should tighten the pulley bolt to an angle of 55-65°.
17. While one person holds the special tool to prevent the crankshaft from turning, the other…

18. Remove the special tool from the crankshaft pulley.

19. Further installation is carried out in the reverse order of removal.
This article is available at: russian, bulgarian, belarusian, ukrainian, serbian, croatian, romanian, polish, slovak, hungarian
This text was checked by: Evgeny Mereshnikov
Share with friends on social networks:

Previous
CX-5KE » Diesel engines 2.2 l
Next

Cylinder head
Installation of valve timing components
Removal the valve train components
Checking hydraulic compensators
Possible malfunctions of hydraulic clearance compensators
Replacing the rear crankshaft oil seal
Removal and installation the decorative engine cover
Engine assembly device
Removal the engine assembly
Installing the engine assembly
More articles on repairing other Mazda models
Replacing the front brake pads Mazda Familia 5 (1985-1989)
Replacing the front camshaft oil seal Mazda Capella 3 and 4 (1982-1992)
Replacing the front crankshaft oil seal Mazda3 BK (2003-2009)
Installing the front crankshaft oil seal Mazda6 GG (2002-2008)
Front Crankshaft Oil Seal — Removal and Installation Mazda BT-50 (1) (2006-2011)
Link in different formats to this article
Comments and feedback from visitors
No comments yet


How much will 27 + 21 ?


CX-5KE (2012-2017) 
  • General information
  • Introduction to the guide
  • User manual
  • Maintenance
  • Power unit
  • Petrol engines 2.0 l
  • Petrol engines 2.5 l
  • Diesel engines 2.2 l
  • Cooling system
  • Lubrication system
  • Supply system
  • Control system
  • Intake and exhaust system
  • Engine electrical equipment
  • Transmission
  • Clutch
  • Mechanical gearbox
  • Automatic gearbox
  • Transfer case
  • Drive shafts and cardan
  • Chassis
  • Wheels and tires
  • Front suspension
  • Rear suspension
  • Brake system
  • Steering
  • Body
  • Exterior (external elements)
  • Interior (internal elements)
  • Security systems
  • Heating and air conditioning
  • Electrical equipment
  • Equipment and devices
  • Electrical circuits
MazBook.ru © 2018–2026 · Mobile version · Articles and news · Sitemap: EN BG BY UA RS HR RO PL SK HU · Feedback · Site search · Add to bookmarks Familia 5 (BF) · Familia 6 (BG) · Capella 3 (GC) · Capella 3 and 4 (GC) · Capella 4 (GD) · Capella 5 (GE) · Capella 6 (GF) · Mazda3 BK · Mazda6 GG · CX-5KE · Mazda 121 (3) · Mazda BT-50 (1) ·
By continuing to use the site, you agree to the use of cookies 🔐