
MazBook.ru
English Русский
Български
Беларускі
Український
Српски
Hrvatski
Română
Polski
Slovenský
Magyar
• Bookmark • Sitemap • Contacts •   
Cars Opel Cars Ford Cars Volkswagen Cars Audi Cars Kia Cars Renault Cars Peugeot


Familia Capella Mazda3 Mazda6 CX-? Others Articles
CX-5KE (2012-2017)

Valve body seal (Mazda CX-5KE)

  • Home
  • Mazda CX-?
  • CX 5 KE (2012-2017)
  • Transmission
  • Automatic gearbox
  • Valve body seal
0

Replacing the valve body seal


1. Disconnect the negative battery terminal.

2. Remove the engine air filter.

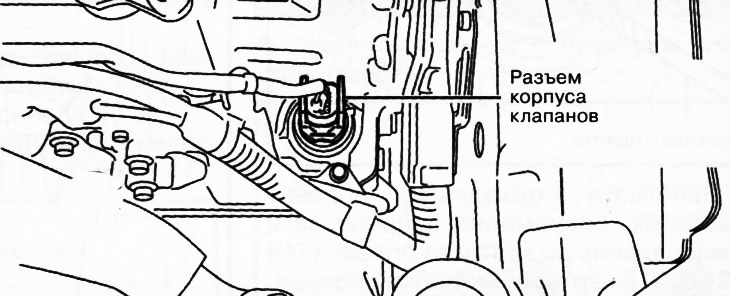
3. Disconnect the valve body connector.
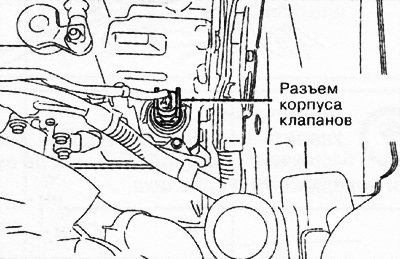
3. Disconnect the valve body connector.


Attention.
  • Be careful not to touch the connector terminals with your hands, as this may damage the terminals.
  • Water or foreign objects entering the connector may cause poor connection and corrosion. When disconnecting the connector, be careful not to allow water or foreign objects to enter.


4. Remove the hose clamp.
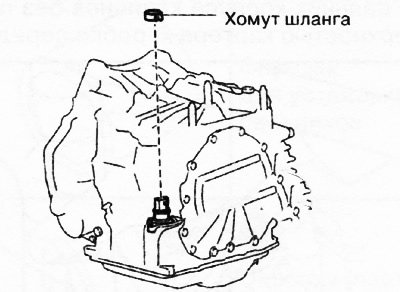
4. Remove the hose clamp.


5. Cut off the seal with a knife as shown in the figure.
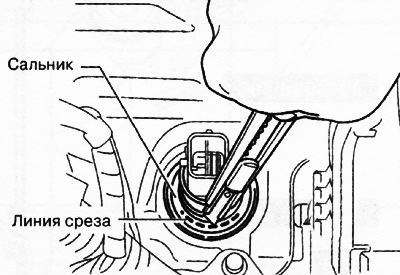
5. Cut off the seal with a knife as shown in the figure.


Attention.
  • Be careful not to damage the gearbox housing and the valve body connector.
  • To prevent foreign materials from getting inside the gearbox, thoroughly clean the seal installation area and cut off the seal without leaving any fragments.


6. Using a flat-head screwdriver wrapped in electrical tape, remove the oil seal from the gearbox housing.
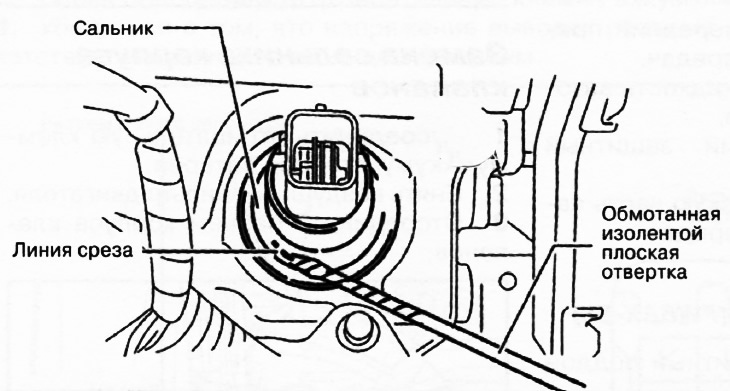


6. Using a flat-head screwdriver wrapped in electrical tape, remove the oil seal from the gearbox…


Note: Remove the seal by tapping the tip of a tape-wrapped flat-head screwdriver along the inside circumference of surface A of the seal.
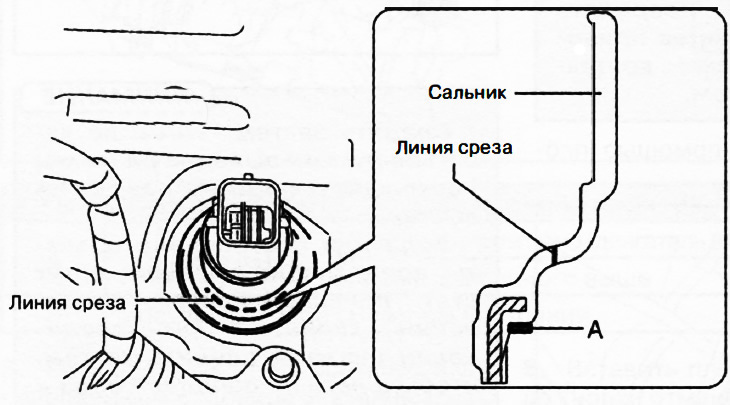

Note: Remove the seal by tapping the tip of a tape-wrapped flat-head screwdriver along the inside…


7. Tighten the valve body seal by hand.

8. Using a suitable drift and hammer, press the valve body seal flush with the gearbox housing surface without distortion.
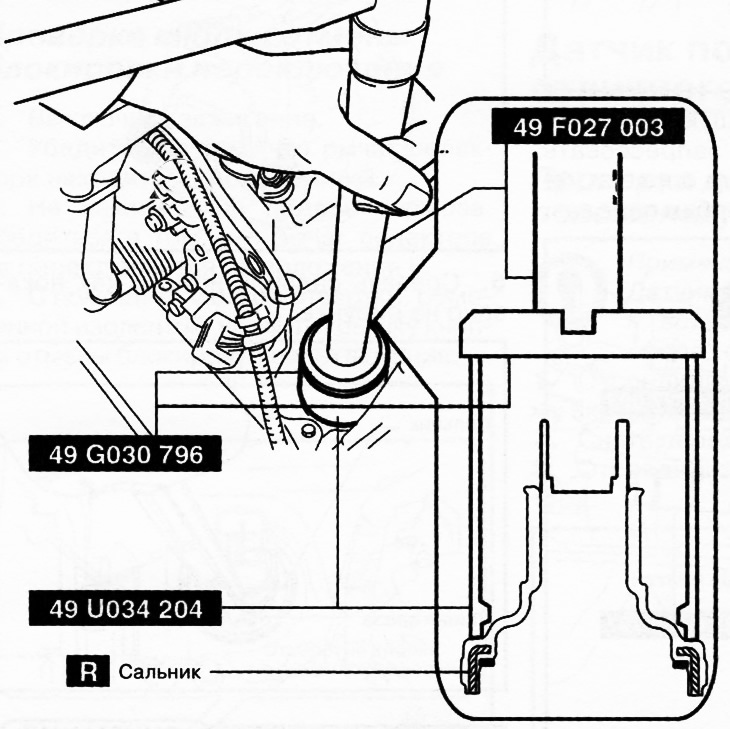
8. Using a suitable drift and hammer, press the valve body seal flush with the gearbox housing…


Note: replace the part with a new one after each removal.


Caution: When pressing in the valve body seal, be careful not to accidentally hit the valve body connector with a hammer. This could damage the connector, compromising its seal.


9. Install the new hose clamp in the position shown in the figure.
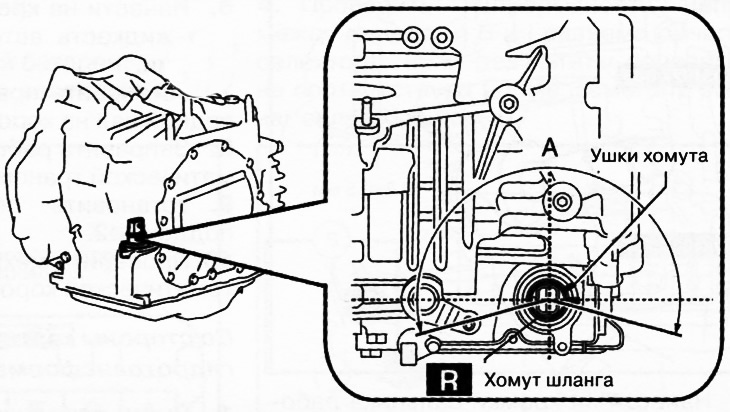
Range A: 210°.

Range A: 210°.


Note: replace the part with a new one after each removal.


Attention.
  • Reusing a hose clamp may cause automatic transmission fluid leaks, so only a new clamp should be used.
  • Set the hose clamp ears so that they are within the range A shown in the figure.
  • Install the hose clamp so that it does not catch on the top and bottom edges of the seal to ensure proper sealing.
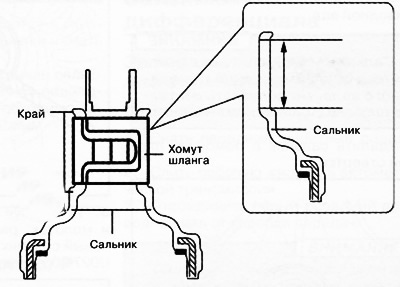

Install the hose clamp so that it does not catch on the top and bottom edges of the seal to ensure…


10. Connect the valve body connector.


10. Connect the valve body connector.


Attention.
  • Be careful not to touch the connector terminals with your hands, as this may damage the terminals.
  • Water or foreign objects entering the connector may cause poor connection and corrosion. When disconnecting the connector, be careful not to allow water or foreign objects to enter.
  • Insert the connector without distorting it so as not to damage its terminals.
  • Turn the connector lever until it clicks.


11. Install the engine air filter.

12. Connect the negative battery terminal.
This article is available at: russian, bulgarian, belarusian, ukrainian, serbian, croatian, romanian, polish, slovak, hungarian
This text was checked by: Evgeny Mereshnikov
Share with friends on social networks:

Previous
CX-5KE » Automatic gearbox
Next

Replacing differential seals
Position sensor other than P
Shift Lock Solenoid
Shift lock mechanism
Downshift switch
Special tools and accessories
More articles on repairing other Mazda models
Technical characteristics of the valve timing mechanism Mazda Familia 5 (1985-1989)
Checking and replacing the crankcase ventilation valve Mazda Capella 3 (1982-1992, petrol)
Valve, valve spring, valve stem seal, valve guide Mazda3 BK (2003-2009)
Valve, valve spring, valve stem seal, valve guide Mazda6 GG (2002-2008)
Checking and adjusting valve clearance Mazda 121 (3) (1996-2003)
Link in different formats to this article
Comments and feedback from visitors
No comments yet


How much will 18 + 24 ?


CX-5KE (2012-2017) 
  • General information
  • Introduction to the guide
  • User manual
  • Maintenance
  • Power unit
  • Petrol engines 2.0 l
  • Petrol engines 2.5 l
  • Diesel engines 2.2 l
  • Cooling system
  • Lubrication system
  • Supply system
  • Control system
  • Intake and exhaust system
  • Engine electrical equipment
  • Transmission
  • Clutch
  • Mechanical gearbox
  • Automatic gearbox
  • Transfer case
  • Drive shafts and cardan
  • Chassis
  • Wheels and tires
  • Front suspension
  • Rear suspension
  • Brake system
  • Steering
  • Body
  • Exterior (external elements)
  • Interior (internal elements)
  • Security systems
  • Heating and air conditioning
  • Electrical equipment
  • Equipment and devices
  • Electrical circuits
MazBook.ru © 2018–2026 · Mobile version · Articles and news · Sitemap: EN BG BY UA RS HR RO PL SK HU · Feedback · Site search · Add to bookmarks Familia 5 (BF) · Familia 6 (BG) · Capella 3 (GC) · Capella 3 and 4 (GC) · Capella 4 (GD) · Capella 5 (GE) · Capella 6 (GF) · Mazda3 BK · Mazda6 GG · CX-5KE · Mazda 121 (3) · Mazda BT-50 (1) ·
By continuing to use the site, you agree to the use of cookies 🔐