


Note: It is recommended to test the paint on some suitable metal, such as an old wing.
1. The painting area must be dry and dust-free. If possible, blow it with compressed air.
2. To collect dust, moisten the floor.
3. Wipe the repair area and the surrounding surface with silicone remover. Wiping the surface being cleaned will provide even better adhesion of the paint silicone-free polishing paste.
4. Before use, shake the aerosol can of paint vigorously for 2-3 minutes, otherwise paint will drip onto the metal.
5. When using Metallic varnish, spray a little paint onto the cardboard to remove any metal particles that may have settled in the tube.
[Information copied from the portal: www.MazBook.ru]
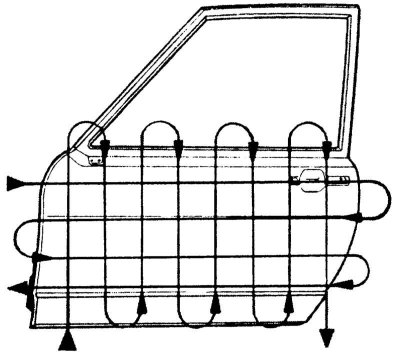
6. Large areas, both horizontal and vertical, are covered with a "cross procession": Painting begins outside the area being painted and the direction of the painting cone outside the surface is also changed.
7. Spray small surfaces in a spiral from the outside in to eliminate unnecessary large clouds of paint.
8. Move the aerosol can at a constant speed and at the same distance from the surface being painted. The correct distance is approximately 25 cm.
9. If it is necessary to ensure that the undamaged paint is covered as smoothly as possible: This is best achieved by painting in at least four passes. With each subsequent pass, extend the paint application by two to three centimetres.
Attention! If painting is done from a very close distance or the movement is too slow or has an inconsistent speed, so-called paint runs occur. This means that in some places the paint flows down because too much paint has accumulated there at one time. The same thing happens when the change in direction of movement is done over the surface being painted.
10. Repeat the painting process with approximately 5-minute breaks to evaporate the solvents until the paint layer is sufficient. Metallic varnish should be constantly shaken between painting passes to prevent metal particles from settling.
Attention! When painting with Metallic varnish it is very difficult to achieve a color match. Pigmentation (distribution of aluminum particles) it works better when spraying from a distance of 30 cm instead of 25 cm. There are techniques for leveling the colors: Slow hand movements and thus a thicker application of the varnish gives a darker tone, and with a quick application the varnish appears lighter.
11. When painting with Metallic varnish, the Metallic varnish primer layer is covered with clear varnish, only after that does Metallic varnish get its characteristic gloss. Painting is also done in a thin layer in three to four passes with pauses of several minutes. Before the first pass, the primer varnish should be weathered for at least thirty minutes. Clear varnish should cover the surface at least the width of a palm, for which the protective paper should be moved accordingly in advance.
12. Empty the aerosol can by turning it upside down and spraying until all the paint comes out.
13. Remove the protective paper immediately after painting. If you do not do this, paint that gets on the paper may penetrate the surface of the body.
14. Dry the painted surface. The drying process can be accelerated using a drying or strong photo lamp.
Warning! Do not use heaters with a fan, as this will cause dust particles to rise and settle on the fresh paint.
15. After the paint has dried, after at least 48 hours, carefully remove the paint coating from the border surfaces with a soft polishing agent. In this case, polish along the longitudinal dimension of the car.