
MazBook.ru
English Русский
Български
Беларускі
Український
Српски
Hrvatski
Română
Polski
Slovenský
Magyar
• Bookmark • Sitemap • Contacts •   
Cars Opel Cars Ford Cars Volkswagen Cars Audi Cars Kia Cars Renault Cars Peugeot


Familia Capella Mazda3 Mazda6 CX-? Others Articles
Familia 5 (1985-1989) Familia 6 (1989-1994)

Removal and installation the starter (Mazda Familia BG)

  • Home
  • Mazda Familia
  • Familia BG (1989-1994)
  • Electrical equipment
  • Power devices
  • Removal and installation the starter
0
Contents: Removal on a gasoline engine ⇓ Installation ⇓ Removal for diesel engine ⇓ Installation ⇓
A starter is required to start an internal combustion engine. The starter must accelerate the engine to 300 rpm. This only happens when the starter is working perfectly and the battery is sufficiently charged. The starter consists of drive housings, poles, and a collector. The pole and collector housings contain the anchor and collector, as well as the brush holder. The brush holder contains carbon brushes, which are a wearing part. If the carbon brushes are heavily worn, the starter cannot function properly.

The front housing of the drive contains a gear drive. When the starter is turned on, the traction relay located on the starter moves the gear to the toothed ring of the flywheel. When the gear reaches the stop, it is securely connected to the flywheel. Now the starter can accelerate the engine to the required number of revolutions. When the engine starts, the gear is accelerated by the engine and moves away from the flywheel.

Since a high current consumption is required to start the motor, the cable connections must be kept in perfect condition as part of maintenance. Corroded contacts must be cleaned and greased with protective pole grease.

Depending on the engine, MAZDA 323 is equipped with starters of different power: gasoline engines: 0.85/0.95 kW; diesel engines: 1.4/2.2 kW.

Attention! Depending on the type, the starter may be a returnable item, which means that the cost of the old starter is counted when buying a new one, the old starter must be returned when buying a new one.


Removal on a gasoline engine


1. Remove the battery, see Section Removal and installation the battery.

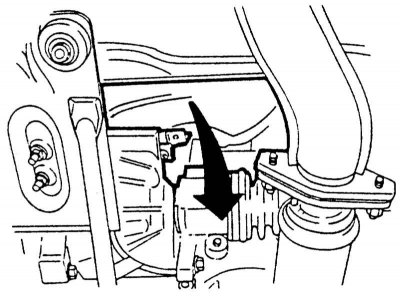
2. Raise the car.
2. Raise the car.


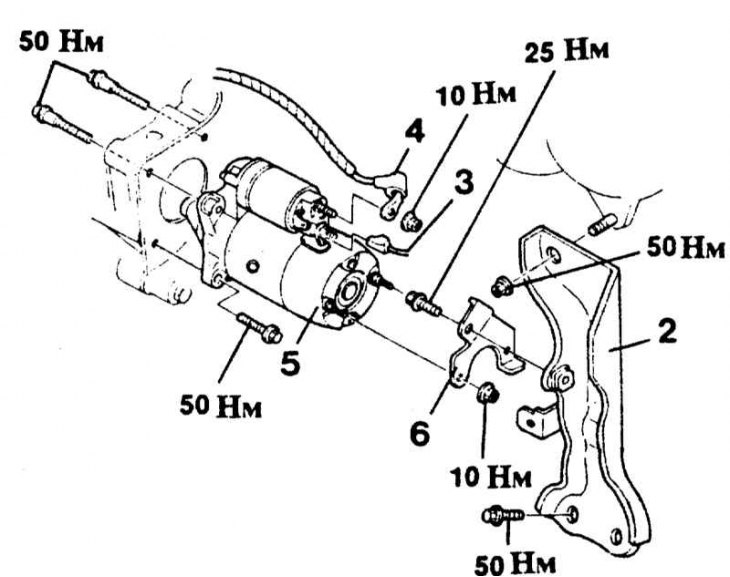
3. Unscrew the fastening "2" of the intake manifold.

4. Disconnect cable "3" terminal 3 (also designated as terminal 50).

5. Unscrew cable "4" of terminal B (also designated as terminal 30).

6. Unscrew the starter (3 bolts). 6 = starter mount.
6. Unscrew the starter (3 bolts). 6 = starter mount.


7. Remove the starter downwards.

Installation


1. Insert the starter from below, tighten the 3 bolts with force 50 Nm. Tightening torque for vehicles up to 9/89: 40 Nm.

2. Screw the wire to the 30 (V) terminal with force 10 Nm.

3. Connect the plug to terminal 50 (3), it should click into place.

4. Insert the intake pipe support and screw it on with force 50 Nm top and bottom. Tighten the mounting bolt on the starter mount with force 25 Nm.


5. Lower the vehicle, see Chapter Introduction.

6. Install the battery, see Section Removal and installation the battery.

7. If available, set the time on the clock and set the security code for the radio receiver.

Removal for diesel engine


1. Disconnect the ground cable from the battery.

Warning! This will erase the engine fault memory or the radio security code. Before disconnecting the battery, read the instructions in Section Removal and installation the battery.

Warning! This will erase the engine fault memory or the radio security code. Before disconnecting…


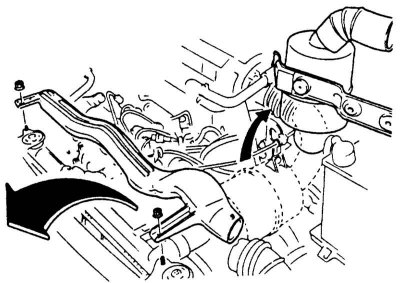
2. Unscrew the resonance channel, disconnect the air hose. Put both parts aside.
2. Unscrew the resonance channel, disconnect the air hose. Put both parts aside.


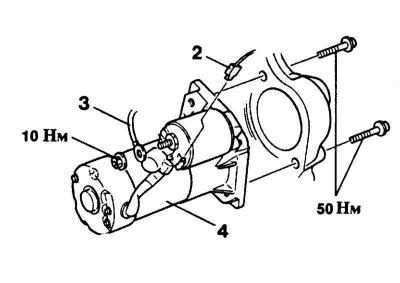
3. Disconnect cable "2" terminal 3 (also designated as terminal 50).

[The original article is available on: MAZBOOK.ru]

4. Unscrew cable "3" of terminal B (also designated as terminal 30).


5. Unscrew the starter "4" (2 bolts) and remove it upwards.

Installation


1. Insert the starter from above, tighten the 2 bolts with force 50 Nm.

2. Attach the wire to the 30 (V) terminal with force 10 Nm.

3. Connect the plug to terminal 50 (S), it should click into place.

4. Lower and screw on the resonant channel, put on the air hose.

5. Connect the ground cable to the battery.

6. If available, set the time on the clock and set the security code for the radio receiver.
This article is available at: russian, bulgarian, belarusian, ukrainian, serbian, croatian, romanian, polish, slovak, hungarian
This text was checked by: Evdokia Filimonova
Share with friends on social networks:

Previous
Familia 6 » Power devices
Next

Disassembling the generator / replacing carbon brushes
Generator components
Removal and installation the generator
Checking the generator voltage
Safety Precautions for Alternator
Checking/replacing the starter solenoid relay
More articles on repairing other Mazda models
Starter — testing on a car Mazda Capella 3 (1982-1992, petrol)
Starter — description Mazda3 BK (2003-2009)
Starter — General Information Mazda6 GG (2002-2008)
Removal and installation the starter Mazda CX-5KE (2012-2017)
General information about the starter Mazda 121 (3) (1996-2003)
Link in different formats to this article
Comments and feedback from visitors
No comments yet


How much will 39 + 43 ?


Familia 6 (1989-1994) 
  • General information
  • Introduction to guide
  • User manual
  • Maintenance
  • Power unit
  • Petrol engines
  • Diesel engines
  • Lubrication system
  • Cooling system
  • Ignition system
  • Supply system
  • Carburetor
  • Injection system
  • Exhaust system
  • Transmission
  • Clutch
  • Car gearbox
  • Chassis
  • Front suspension
  • Rear suspension
  • Steering
  • Brake system
  • Wheels and tires
  • Body
  • Body elements
  • Doors and windows
  • Body Care
  • Electrical equipment
  • Equipment and devices
  • Power devices
  • Heating system
  • Lighting and headlights
  • Windshield wipers and washers
  • Wiring diagrams (since 1987)
  • Wiring diagrams (since 1991)
Familia 5 (1985-1989) 
  • General information
  • Vehicle data
  • Model «E» engine
  • Engine repair
  • Cooling and lubrication system
  • Power and ignition system
  • Model «B» engine
  • Engine repair
  • Cooling and lubrication system
  • Ignition system
  • Power system (carburetor)
  • Power system (injector)
  • Transmission
  • Clutch
  • Mechanical gearbox
  • Automatic gearbox
  • Front wheel drive
  • Chassis
  • Steering
  • Front suspension
  • Rear suspension
  • Brake system
  • Electrical equipment
  • Equipment and devices
  • Electrical circuits
  • Wiring diagrams (station wagon)
MazBook.ru © 2018–2026 · Mobile version · Articles and news · Sitemap: EN BG BY UA RS HR RO PL SK HU · Feedback · Site search · Add to bookmarks Familia 5 (BF) · Familia 6 (BG) · Capella 3 (GC) · Capella 3 and 4 (GC) · Capella 4 (GD) · Capella 5 (GE) · Capella 6 (GF) · Mazda3 BK · Mazda6 GG · CX-5KE · Mazda 121 (3) · Mazda BT-50 (1) ·
By continuing to use the site, you agree to the use of cookies 🔐