
MazBook.ru
English Русский
Български
Беларускі
Український
Српски
Hrvatski
Română
Polski
Slovenský
Magyar
• Bookmark • Sitemap • Contacts •   
Cars Opel Cars Ford Cars Volkswagen Cars Audi Cars Kia Cars Renault Cars Peugeot


Familia Capella Mazda3 Mazda6 CX-? Others Articles
Familia 5 (1985-1989) Familia 6 (1989-1994)

Removal and installation of the exhaust system (Mazda Familia BG)

  • Home
  • Mazda Familia
  • Familia BG (1989-1994)
  • Power unit
  • Exhaust system
  • Removal and installation of the exhaust system
0
Contents: Removal ⇓ Installation ⇓

Cars produced before 9/89.
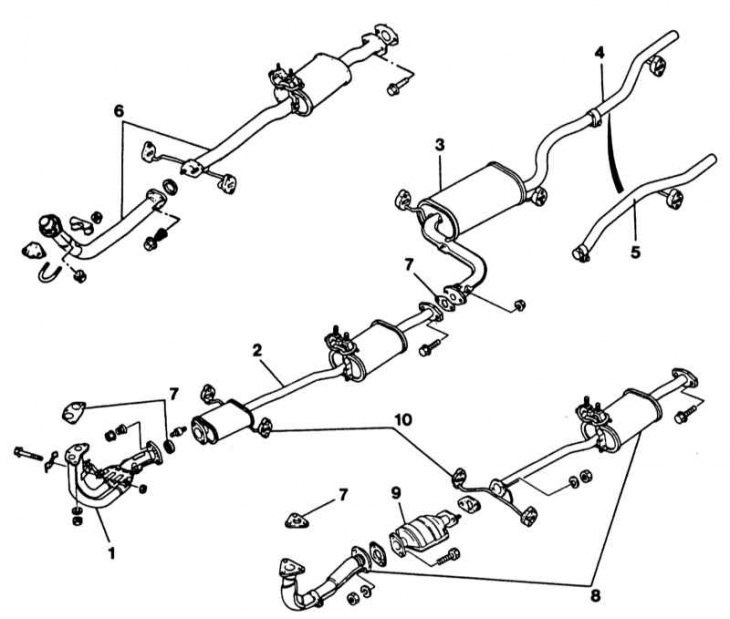


1 - exhaust pipe; 2 - front and middle mufflers; 3 - rear muffler; 4 - rear pipe of the «Sedan»…

1 - exhaust pipe; 2 - front and middle mufflers; 3 - rear muffler; 4 - rear pipe of the "Sedan" model; 5 - rear pipe of the "Compact" model; 6 - differences: diesel model; 7 - gasket (replace); 8 - differences: catalyst; 9 - catalyst; 10 - lubricate the rubber mount (high temperature grease)


Cars produced since 10/89. (variant with catalyst), front wheel drive
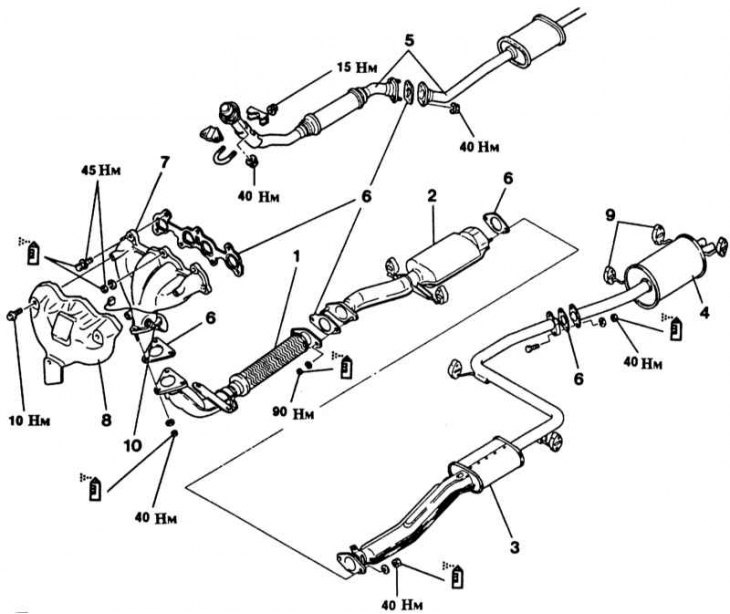


1 - exhaust pipe; 2 - catalyst; 3 - middle muffler; 4 - rear muffler; 5 - differences: diesel…

1 - exhaust pipe; 2 - catalyst; 3 - middle muffler; 4 - rear muffler; 5 - differences: diesel engine; 6 - gasket (replace); 7 - exhaust manifold; 8 - heat shield; 9 - rubber mount; 10 - lambda probe


lubricate (high temperature grease)

Attention! The removal of the system as a set will be described. However, each part of the exhaust system can be replaced separately. It is necessary to replace the rubber buffers and gaskets, as well as the mounting nuts.


Removal


1. Raise the car.

2. Cover all bolts and nuts of the exhaust system, as well as the connection points, with a rust-corrosive agent. Wait for some time until the agent takes effect.

3. Loosen the flange bolts on the rear muffler and move it back.

4. Disconnect the rear muffler from the rubber mount and remove.

5. Unscrew the middle exhaust pipe, detach the rubber support and remove.

Caution! Do not subject the catalytic converter to impacts when removing and installing, as this may damage it. Do not allow it to fall or strike it with a hammer.


6. Unscrew the exhaust pipe from the exhaust manifold.

Installation


Attention! To facilitate loosening of bolts and nuts of the exhaust system, it is recommended to coat them with high-temperature paste, for example Liqui Moly LM "508" ASC.


1. If used exhaust pipes are being installed, before connecting, it is necessary to clean the ends of the pipes from any remaining carbon deposits with sandpaper.

Attention! The exhaust system of models with a catalytic converter must be especially tight. Therefore, all seals must be replaced with new ones, otherwise there will be shortcomings in the dynamic characteristics.


2. Install the exhaust pipe onto the exhaust manifold and tighten evenly new nuts, without tightening them completely yet.

3. Unscrew the exhaust pipes and mufflers.

4. Before tightening the bolts, align the pipes and mufflers and attach them to the rubber mounts. Make sure there is sufficient distance to the bottom (minimum 25 mm).

5. Tighten the mounting flanges from front to back to the specified tightening torques.


Caution: Do not overtighten the bolts, otherwise the gaskets will be flattened, resulting in leaks.


6. Lower the vehicle.
This article is available at: russian, bulgarian, belarusian, ukrainian, serbian, croatian, romanian, polish, slovak, hungarian
This text was checked by: Evdokia Filimonova
Share with friends on social networks:

Previous
Familia 6 » Exhaust system
Next

Rules for operating vehicles with a catalytic converter
The principle of operation of a catalytic converter (catalyst)
Description of the exhaust system
Checking / removing and installing the lambda probe
More articles on repairing other Mazda models
General description of the fuel and exhaust system Mazda Capella 3 (1982-1992, petrol)
General information about the exhaust system Mazda3 BK (2003-2009)
Fuel and exhaust system components Mazda6 GG (2002-2008)
Checking the exhaust system Mazda CX-5KE (2012-2017)
Engine and exhaust system maintenance Mazda 121 (3) (1996-2003)
Link in different formats to this article
Comments and feedback from visitors
No comments yet


How much will 17 + 11 ?


Familia 6 (1989-1994) 
  • General information
  • Introduction to guide
  • User manual
  • Maintenance
  • Power unit
  • Petrol engines
  • Diesel engines
  • Lubrication system
  • Cooling system
  • Ignition system
  • Supply system
  • Carburetor
  • Injection system
  • Exhaust system
  • Transmission
  • Clutch
  • Car gearbox
  • Chassis
  • Front suspension
  • Rear suspension
  • Steering
  • Brake system
  • Wheels and tires
  • Body
  • Body elements
  • Doors and windows
  • Body Care
  • Electrical equipment
  • Equipment and devices
  • Power devices
  • Heating system
  • Lighting and headlights
  • Windshield wipers and washers
  • Wiring diagrams (since 1987)
  • Wiring diagrams (since 1991)
Familia 5 (1985-1989) 
  • General information
  • Vehicle data
  • Model «E» engine
  • Engine repair
  • Cooling and lubrication system
  • Power and ignition system
  • Model «B» engine
  • Engine repair
  • Cooling and lubrication system
  • Ignition system
  • Power system (carburetor)
  • Power system (injector)
  • Transmission
  • Clutch
  • Mechanical gearbox
  • Automatic gearbox
  • Front wheel drive
  • Chassis
  • Steering
  • Front suspension
  • Rear suspension
  • Brake system
  • Electrical equipment
  • Equipment and devices
  • Electrical circuits
  • Wiring diagrams (station wagon)
MazBook.ru © 2018–2026 · Mobile version · Articles and news · Sitemap: EN BG BY UA RS HR RO PL SK HU · Feedback · Site search · Add to bookmarks Familia 5 (BF) · Familia 6 (BG) · Capella 3 (GC) · Capella 3 and 4 (GC) · Capella 4 (GD) · Capella 5 (GE) · Capella 6 (GF) · Mazda3 BK · Mazda6 GG · CX-5KE · Mazda 121 (3) · Mazda BT-50 (1) ·
By continuing to use the site, you agree to the use of cookies 🔐