
MazBook.ru
English Русский
Български
Беларускі
Український
Српски
Hrvatski
Română
Polski
Slovenský
Magyar
• Bookmark • Sitemap • Contacts •   
Cars Opel Cars Ford Cars Volkswagen Cars Audi Cars Kia Cars Renault Cars Peugeot


Familia Capella Mazda3 Mazda6 CX-? Others Articles
CX-5KE (2012-2017)

Removal and installation fuel injectors (Mazda CX-5KE)

  • Home
  • Mazda CX-?
  • CX 5 KE (2012-2017)
  • Power unit
  • Supply system
  • Removal and installation fuel injectors
0
Contents: Removal fuel injectors ⇓ Installing fuel injectors ⇓
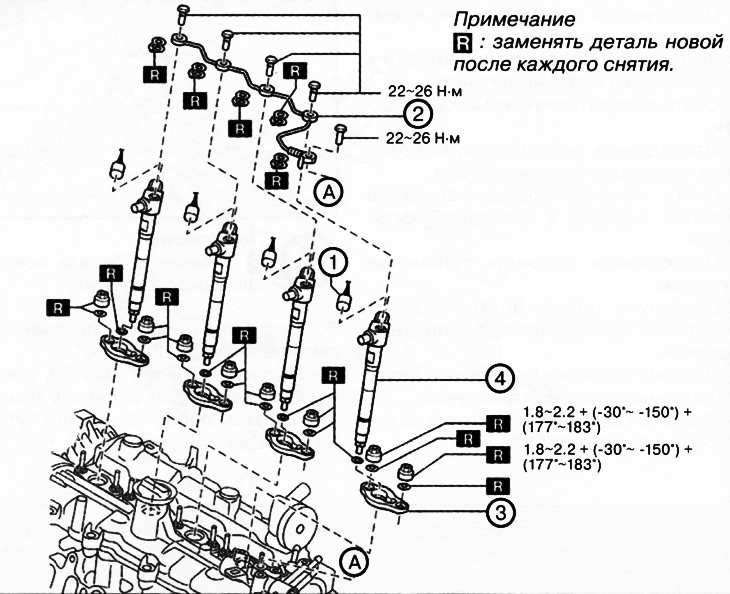
1. Fuel injector connectors.

1. Fuel injector connectors.
2. Return fuel line of fuel injectors.
3. Fuel injector brackets.
4. Fuel injectors.


Attention.
  • Leaks in fuel lines in a pressurized system are dangerous. Fuel can ignite and cause equipment damage, serious injury, or even death. Fuel can also come into contact with human skin and eyes. To prevent this, it is essential to perform a pressure relief procedure in the fuel system.
  • A person carrying a static charge can cause a fire or explosion, which could result in death or serious injury. Before working on the fuel system, you must discharge static electricity by touching the vehicle body.
  • If fuel gets on engine parts, it may cause damage to those components or cause a fire. Be sure to wipe up any spilled fuel with a clean rag.
  • Prevent foreign materials from entering the high-pressure fuel line. To do this, be sure to tighten the high-pressure fuel line connections to the specified tightening torque.


Note: If the fuel injector is replaced with a beam, the fuel injector initialization procedure must be performed using the M-MDS tool.


Removal fuel injectors


1. Disconnect the negative battery terminal.

2. Perform the procedure for preparing for servicing the power supply system.

3. Remove the decorative engine cover.

4. Disconnect the camshaft position sensor connector.

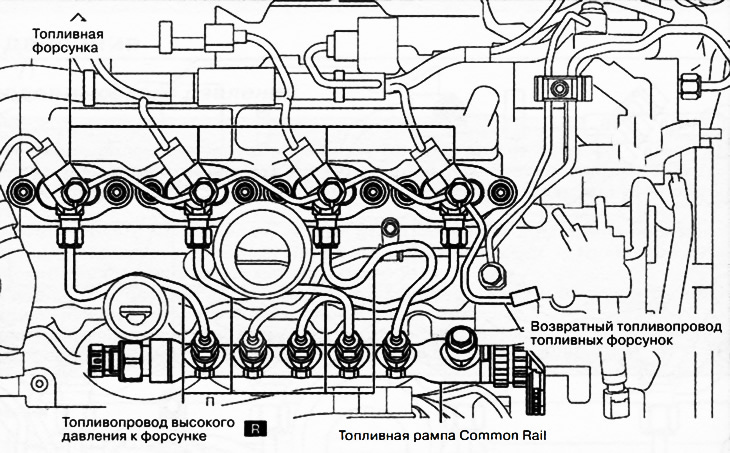
5. Remove the high pressure fuel lines leading to the fuel injectors.

6. Disconnect the fuel injector connectors.

7. Loosen the hollow bolts and remove the fuel injector return line.

8. Loosen the mounting nuts and remove the fuel injector brackets.

9. Remove the fuel injectors from the cylinder head.

Installing fuel injectors


1. Attach fuel injectors with brackets.
1. Attach fuel injectors with brackets.


2. Loosen the Common Rail fuel rail.

3. Install new high-pressure fuel lines going to the injectors.

Caution: Do not tighten the nut on the opposite side during steps 4 and 5.


4. Tighten the new nut (1) shown in the figure to a torque of 1.8-2.2 Nm.
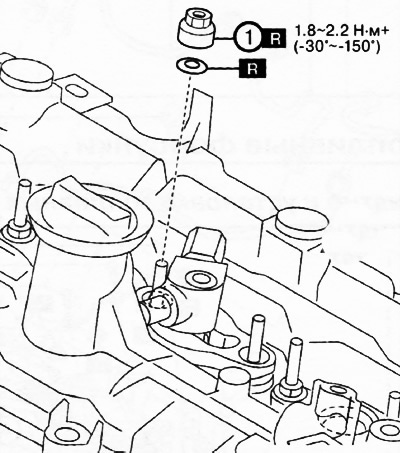
4. Tighten the new nut (1) shown in the figure to a torque of 1.8-2.2 Nm.


Note. : replace the part with a new one after each removal.


5. Loosen the nut (1) shown in the figure to an angle of -30°--150°.


6. Tighten the new nut (2), shown in the following figure, to a torque of 1.8-2.2 Nm, then tighten it another 177-183°.
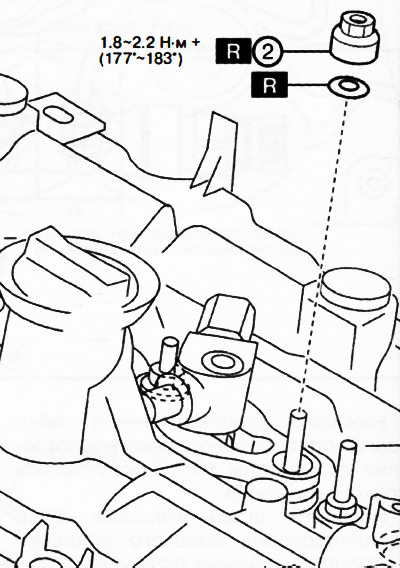
6. Tighten the new nut (2), shown in the following figure, to a torque of 1.8-2.2 Nm, then tighten…


Note: replace the part with a new one after each removal.


7. Tighten the high-pressure fuel lines of the fuel injectors on the Common Rail fuel rail side to a torque of 32-42 Nm.

8. Tighten the high-pressure fuel lines on the injector side to a torque of 32-42 Nm.

9. Tighten the Common Rail fuel rail to a torque of 20-26 Nm.

10. Tighten the fuel injector return line in the sequence shown in the figure to a torque of 22-26 Nm.
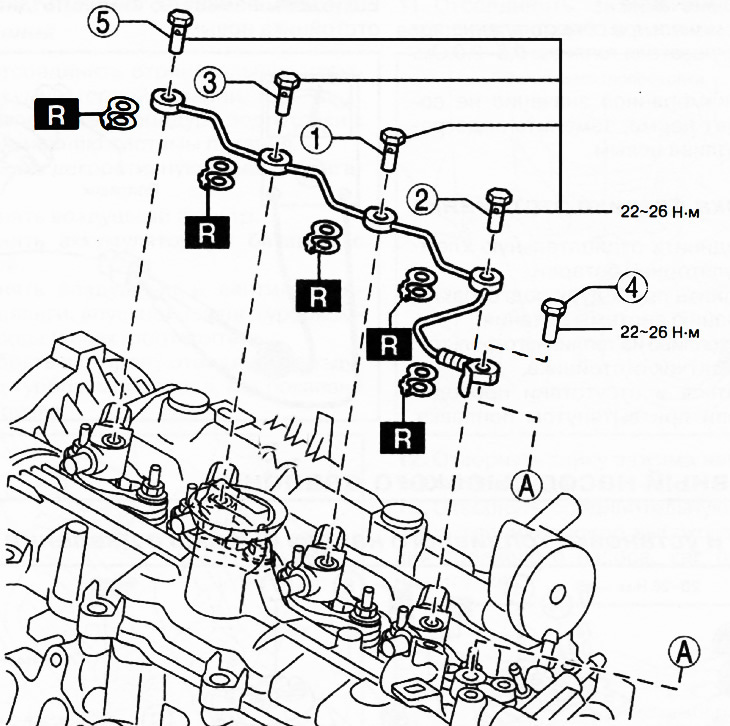
10. Tighten the fuel injector return line in the sequence shown in the figure to a torque of 22-26…


Note: : replace the part with a new one after each removal.


11. Perform the procedure for removing air from the fuel lines.

The original article is on [Mazbook]
This article is available at: russian, bulgarian, belarusian, ukrainian, serbian, croatian, romanian, polish, slovak, hungarian
This text was checked by: Evgeny Mereshnikov
Share with friends on social networks:

Previous
CX-5KE » Supply system
Next

Removal and installation of high pressure fuel lines
Checking fuel injectors of the high-pressure fuel pump
Removal and installation of fuel injectors of the high-pressure fuel…
Checking the high pressure fuel pump
High pressure fuel pump
Fuel filter
Checking fuel injectors
Removal and installation the high pressure fuel pump
Common Rail Fuel Rail
Removal and installation the lower housing
More articles on repairing other Mazda models
Fuel pump — removal and installation Mazda Familia 5 (1985-1989)
Fuel Injectors (EGI) — checking, removing and installing Mazda Capella 3 (1982-1992, petrol)
Recommended fuel Mazda3 BK (2003-2009)
Recommended fuel Mazda6 GG (2002-2008)
Checking fuel injectors Mazda 121 (3) (1996-2003)
Link in different formats to this article
Comments and feedback from visitors
No comments yet


How much will 17 + 17 ?


CX-5KE (2012-2017) 
  • General information
  • Introduction to the guide
  • User manual
  • Maintenance
  • Power unit
  • Petrol engines 2.0 l
  • Petrol engines 2.5 l
  • Diesel engines 2.2 l
  • Cooling system
  • Lubrication system
  • Supply system
  • Control system
  • Intake and exhaust system
  • Engine electrical equipment
  • Transmission
  • Clutch
  • Mechanical gearbox
  • Automatic gearbox
  • Transfer case
  • Drive shafts and cardan
  • Chassis
  • Wheels and tires
  • Front suspension
  • Rear suspension
  • Brake system
  • Steering
  • Body
  • Exterior (external elements)
  • Interior (internal elements)
  • Security systems
  • Heating and air conditioning
  • Electrical equipment
  • Equipment and devices
  • Electrical circuits
MazBook.ru © 2018–2026 · Mobile version · Articles and news · Sitemap: EN BG BY UA RS HR RO PL SK HU · Feedback · Site search · Add to bookmarks Familia 5 (BF) · Familia 6 (BG) · Capella 3 (GC) · Capella 3 and 4 (GC) · Capella 4 (GD) · Capella 5 (GE) · Capella 6 (GF) · Mazda3 BK · Mazda6 GG · CX-5KE · Mazda 121 (3) · Mazda BT-50 (1) ·
By continuing to use the site, you agree to the use of cookies 🔐