MazBook.ru
English Русский
Български
Беларускі
Український
Српски
Hrvatski
Română
Polski
Slovenský
Magyar
• Bookmark • Sitemap • Contacts •   
Cars Opel Cars Ford Cars Volkswagen Cars Audi Cars Kia Cars Renault Cars Peugeot


Familia Capella Mazda3 Mazda6 CX-? Others Articles
Capella 3 (1982-1992, petrol) Capella 3 and 4 (1982-1992) Capella 4 (1987-1992) Capella 5 (1991-1997) Capella 6 (1997-2005, petrol)

Fuel Injectors (EGI) — checking, removing and installing (Mazda Capella GC)

  • Home
  • Mazda Capella
  • Capella GC (1982-1992)
  • General information
  • Late models
  • Fuel Injectors (EGI) — checking, removing and installing
0
1. Start the engine and warm it up to normal temperature, then set it to normal idle mode.

2. To quickly check the serviceability of the injector, place the tip of a long screwdriver on the body of each injector in turn and listen to the clicking sound of the needle valve close to the screwdriver. A faulty injector will not click and will require further investigation.

3. With the engine idling, temporarily remove the wiring connector from each injector. The engine should reduce speed by 100-200 rpm for each injector.

4. Stop the engine and disconnect the electrical wiring from the injectors. Using an ohmmeter, check the resistance across the two terminals of each injector; it should be 12-16 ohms. If not, the injector is faulty.

5. To remove the injector, first disconnect the negative cable from the battery.

The text of the article is taken from the website: MazBook.ru

6. If the engine is hot, allow it to cool.

7. Disconnect the fuel supply hoses from the fuel filter and pressure regulator. Cover the hoses with a cloth before disconnecting to prevent fuel spillage.

8. Remove the wiring connectors from each injector if not already done.

9. Unscrew the pressure regulator from the end of the distributor pipe.

10. Unscrew and remove the distribution pipe from the injectors.

11. Remove the rubber O-rings located behind the sealing rings, injectors and insulators.

12. To test the injectors further, install them on the distribution pipe and connect them with a wire.
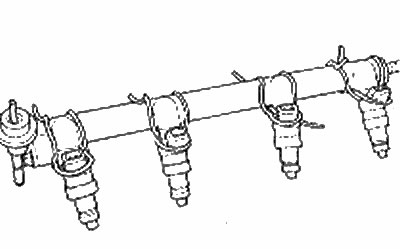
Injectors attached to the EGI distributor test tube

Injectors attached to the EGI distributor test tube


13. Temporarily connect the distributor hose between the fuel filter and the return pipe.

14. Connect the negative battery cable, then turn on the ignition.

15. Connect the fuel pump connector clamps (photo) with a long wire, and check that there is no fuel leakage from the ends of the injector. A small amount of fuel may leak after five minutes.
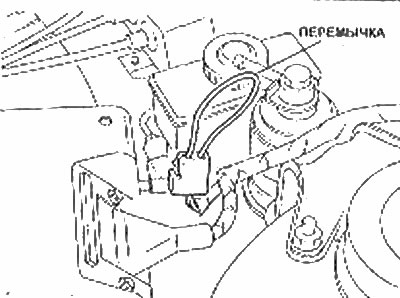
Fuel pump test connector with EGI jumper

Fuel pump test connector with EGI jumper
Checking the EGI fuel pump connector (soaked with an arrow)

Checking the EGI fuel pump connector (soaked with an arrow)

16. To continue testing, you will need a measuring glass vessel along with an electrical adapter and a 12-volt switching voltage.

17. Working on each injector in turn, install the plastic tube onto the end of the injector and place the free end in the measuring vessel.


18. Connect the fuel pump as described in Point 15 and turn on the ignition.

19. Apply power from a 12-volt battery to the injector for 15 seconds and check that the volume of fuel supplied is within 44-61 cm³.

20. Remove the testing equipment and install the injectors in reverse order, but replace the rubber O-rings. Lower them into the fuel only until they are positioned on the injectors and the distribution pipe is installed.
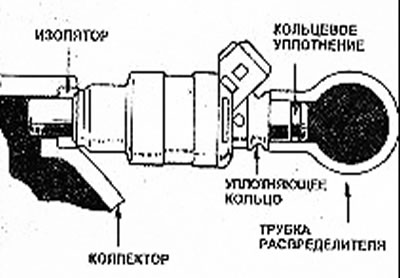
Sectional view of injector seals

Sectional view of injector seals
This article is available at: russian, bulgarian, belarusian, ukrainian, serbian, croatian, romanian, polish, slovak, hungarian
This text was checked by: Evdokia Filimonova
Share with friends on social networks:

Previous
Capella 3 » Late models
Next

Accelerator cable (EGI) — adjustment
Pneumatic valve (EG/) — check
Throttle Position Sensor (EGI) — checking and adjusting
Throttle body (EG/) — removal and installation
Throttle Body (EGI) — inspection
Fuel Pressure (EGI) — check
Fuel Pump (EGI) — checking, removing and installing
Open Circuit Relay (EGI) — test
EGI Control System — check
Water Temperature Sensor (EGI) — checking, removing, and installing
More articles on repairing other Mazda models
Checking/removing and installing the fuel shut-off valve Mazda Familia 6 (1989-1994)
Checking for fuel leaks after installing the pump unit (diesel) Mazda3 BK (2003-2009)
Checking for fuel leaks Mazda6 GG (2002-2008)
Checking fuel injectors of the high-pressure fuel pump Mazda CX-5KE (2012-2017)
Checking, removing and installing the fuel pump relay Mazda 121 (3) (1996-2003)
Link in different formats to this article
Comments and feedback from visitors
No comments yet


How much will 27 + 42 ?


Capella 6 (1997-2005, petrol) 
  • General information
  • Introduction to guide
  • User manual
  • Troubleshooting
  • Maintenance
  • Power unit
  • 4-cylinder engines
  • 6-cylinder engines
  • Engine overhaul
  • Cooling and ventilation
  • Power and exhaust systems
  • Engine electrics
  • Control system
  • Transmission
  • Mechanical gearbox
  • Automatic gearbox
  • Clutch and drive shafts
  • Chassis
  • Brake system
  • Car suspension
  • Steering
  • Body
  • Exterior (external elements)
  • Interior (internal elements)
  • Doors, windows and locks
  • Electrical equipment
  • Equipment and devices
  • Electrical circuits
Capella 5 (1991-1997) 
  • General information
  • User manual
  • Maintenance
  • Helpful hints
  • Power unit
  • Petrol engines 1.6 and 1.8
  • Petrol engines 2.0
  • 2.5 petrol engines
  • Overhaul engines 1.6 and 1.8
  • Overhaul engines 2.0 and 2.5
  • Diesel engine 2.0
  • Engine electrics
  • Cooling system
  • Air conditioner
  • Carburetor Nikki 30/34
  • Power system (1.6 and 1.8)
  • Power system (2.0 and 2.5)
  • Control system
  • Transmission
  • Mechanical gearbox
  • Automatic gearbox
  • Clutch and axles
  • Chassis
  • Brake system
  • Suspension and wheels
  • Steering
  • Body
  • Exterior (external elements)
  • Interior (internal elements)
  • Doors and windows
  • Electrical equipment
  • Equipment and devices
  • Electrical circuits
Capella 4 (1987-1992) 
  • General information
  • Introduction to manual
  • Vehicle specifications
  • Power unit
  • Engine repair
  • Lubrication system
  • Cooling system
  • Fuel system (carburetor)
  • Fuel injection (FE)
  • Fuel injection (DOHC)
  • Fuel system (diesel)
  • Ignition system
  • Transmission
  • Clutch
  • Gearbox
  • Drive shafts
  • Chassis
  • Front suspension
  • Rear suspension
  • Steering system
  • Brake system
  • Electrical equipment
  • Equipment and devices
  • Electrical circuits
Capella 3 and 4 (1982-1992) 
  • General information
  • User manual
  • Maintenance
  • Power unit
  • Gasoline engine
  • Engine overhaul (gasoline)
  • Diesel engine
  • Cooling and heating
  • Supply system
  • Ignition system
  • Emission reduction
  • Transmission
  • Clutch
  • Mechanical gearbox
  • Automatic gearbox
  • Drive shafts
  • Chassis
  • Brake system
  • Suspension and wheels
  • Steering
  • Body
  • Exterior (external elements)
  • Interior (internal elements)
  • Electrical equipment
  • Equipment and devices
  • Power devices
  • Electrical circuits
Capella 3 (1982-1992, petrol) 
  • General information
  • User manual
  • Maintenance
  • Troubleshooting
  • Late models
  • Power unit
  • Engine in car
  • Engine overhaul
  • Cooling and heating system
  • Fuel and exhaust system
  • Engine electrical system
  • Emission control system
  • Transmission
  • Mechanical gearbox
  • Automatic gearbox
  • Clutch and drive shafts
  • Chassis
  • Brake system
  • Suspension and wheels
  • Steering
  • Body
  • Exterior (external elements)
  • Interior (internal elements)
  • Electrical equipment
  • Equipment and devices
  • Lighting and lamps
  • Electrical circuits
MazBook.ru © 2018–2026 · Mobile version · Articles and news · Sitemap: EN BG BY UA RS HR RO PL SK HU · Feedback · Site search · Add to bookmarks Familia 5 (BF) · Familia 6 (BG) · Capella 3 (GC) · Capella 3 and 4 (GC) · Capella 4 (GD) · Capella 5 (GE) · Capella 6 (GF) · Mazda3 BK · Mazda6 GG · CX-5KE · Mazda 121 (3) · Mazda BT-50 (1) ·
By continuing to use the site, you agree to the use of cookies 🔐