
Removal and installation of the fuel filter
Attention.
- Leaks in the fuel lines of a pressurized system are dangerous. Fuel can ignite and cause equipment damage, serious injury or even death. In addition, fuel can get on the skin and in the eyes of a person. To prevent this, it is imperative to perform a pressure relief procedure in the power system.
- A person carrying static electricity can cause a fire or explosion that could result in death or serious injury. Before working on the fuel system, you must remove the static charge from yourself by touching the car body.
- If fuel comes into contact with engine parts, it may cause these components to malfunction or cause a fire. Be sure to clean up any spilled fuel with a clean rag.
- If the fuel does not pass through the fuel filter, this may cause a malfunction of the power system. In this regard, care must be taken that the fuel hoses are not installed incorrectly. Be sure to follow the procedures after servicing the power system (see relevant section above) before installing fuel lines.
1. Disconnect the negative battery terminal.
2. Complete the power system maintenance preparation procedure.
3. Remove the decorative engine cover.
4. Remove the battery.
5. Remove the components in the sequence shown in the figure.
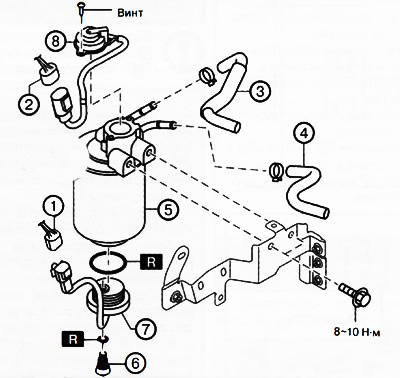
1. Sump sensor connector.
2. Fuel heating connector (versions with fuel heating).
3. Main fuel hose #1.
4. Main fuel hose #2.
5. Fuel filter.
6. Drain plug.
7. Sump sensor.
8. Fuel heating (versions with fuel heating).
6. Installation is made in an order, the return to removal.
7. Perform the bleed procedure for the fuel lines.
Checking the fuel filter
Attention.
- Leaks in the fuel lines of a pressurized system are dangerous. Fuel can ignite and cause equipment damage, serious injury or even death. In addition, fuel can get on the skin and in the eyes of a person. To prevent this, it is imperative to perform a pressure relief procedure in the power system.
- A person carrying static electricity can cause a fire or explosion that could result in death or serious injury. Before working on the fuel system, you must remove the static charge from yourself by touching the car body.
Visually inspect the fuel filter for cracks, damage or rust. Cracks or damage can cause fuel leaks. If any defects are found, replace the fuel filter with a new one.
Draining water from the fuel filter
1. Remove the fuel filter.
2. Loosen the drain plug at the bottom of the fuel filter.
3. Drain the water.
4. After draining the water from the filter, tighten the drain plug securely by hand.
Checking fuel heating
1. Disconnect the negative battery terminal.
2. Complete the power system maintenance preparation procedure.
3. Remove the heating element from the fuel filter.
4. Connect the vacuum pump to the fuel heater.
5. Having created a vacuum of 26.7-40.0 kPa in the fuel heater, measure the resistance between terminal B and the heater housing.
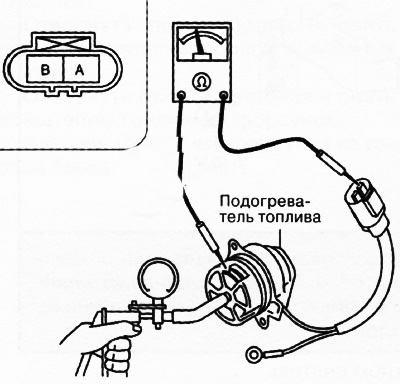
Note. Nominal resistance of the fuel heater: 0.5-2.0 Ohm.
6. If the measured value is not correct, replace the fuel heater with a new one.
Settler sensor test
1. Disconnect the negative battery terminal.
2. Complete the power system maintenance preparation procedure.
3. Drain the fuel from the fuel filter.
4. Remove the sump sensor.
5. Make sure that there is no continuity in the circuit when the float is pulled out.
If the circuit is open, replace the sump sensor with a new one.
