
MazBook.ru
English Русский
Български
Беларускі
Український
Српски
Hrvatski
Română
Polski
Slovenský
Magyar
• Bookmark • Sitemap • Contacts •   
Cars Opel Cars Ford Cars Volkswagen Cars Audi Cars Kia Cars Renault Cars Peugeot


Familia Capella Mazda3 Mazda6 CX-? Others Articles
CX-5KE (2012-2017)

Removal and installation rear drive shafts (Mazda CX-5KE)

  • Home
  • Mazda CX-?
  • CX 5 KE (2012-2017)
  • Transmission
  • Drive shafts and cardan
  • Removal and installation rear drive shafts
0
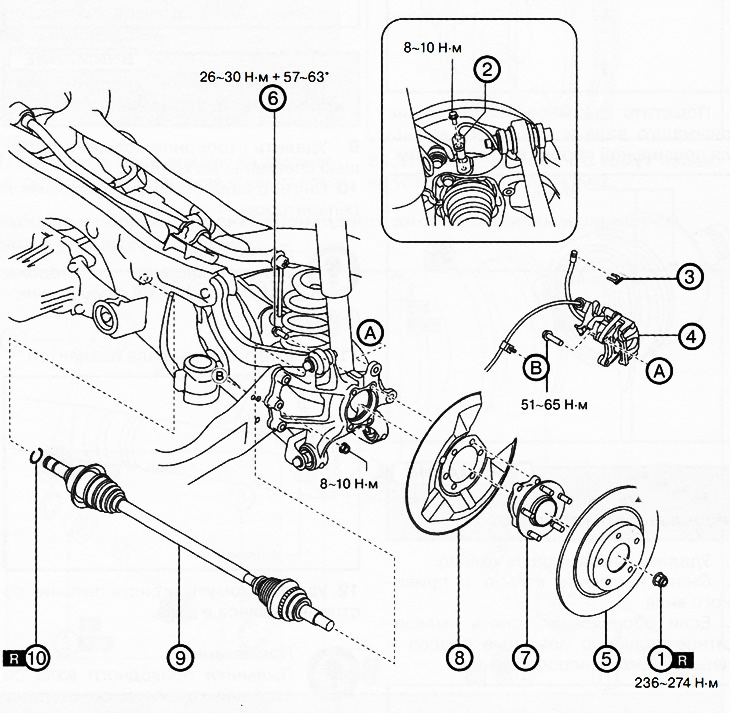
1. Drive shaft lock nut.

1. Drive shaft lock nut.
2. ABS wheel sensor.
3. Brake hose clamp.
4. Brake caliper assembly.
5. Brake disc.
6. Wheel hub mounting bolt.
7. Wheel hub.
8. Dust cover.
9. Rear drive shaft.
10. Retainer.


Note: replace the part with a new one after each removal.


Caution: Performing the following procedure without first removing the front ABS wheel sensor may cause an accidental open circuit in the wiring harness. Disconnect the front ABS wheel sensor wiring harness before performing the following procedures (from the drive shaft side) and secure the wiring in a suitable location where it will not be accidentally touched when servicing the vehicle.


[The original text can be found on Mazbook]

1. Drain the oil from the rear final drive into a suitable container.


2. Loosen the rear drive shaft lock nut.

3. Remove the rear ABS wheel sensor.

4. Remove the brake hose clamp.

5. Remove the brake caliper assembly (see chapter "Brake system") and put it aside, hanging it on the body with wire.

6. Remove the brake disc (see chapter "Brake system").

Note: Before removing the wheel hub, make alignment marks on the wheel hub and stub axle so that all parts can be reinstalled in their original positions later.


7. Loosen the bolts securing the wheel hub to the journal and remove the wheel hub with the dust cover.

Attention.
  • Be careful not to damage the rear final drive oil seal.
  • Be careful not to damage the drive shaft boots and the ABS sensor pulse disc.


8. Pull the drive shaft towards the wheel to remove it from the rear final drive.

9. Remove the retaining ring from the end of the drive shaft.

10. Installation is carried out in the reverse order of removal, taking into account the following:

Installing the drive shaft lock


Install the new retaining ring into the groove on the end of the drive shaft with the connector facing up.
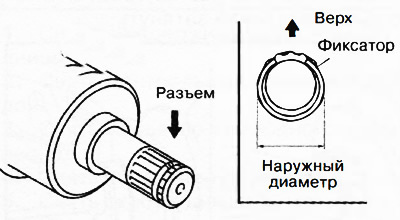
Install the new retaining ring into the groove on the end of the drive shaft with the connector…


After installation, measure the outer diameter of the retainer. If the measured value exceeds 25.2 mm, repeat the installation using a new retainer ring.


Tightening the drive shaft lock nut


After tightening the lock nut to a torque of 390 Nm, unscrew it by 180 degrees, then tighten it again to a torque of 236-274 Nm.

11. After installation, add the required amount of oil to the rear final drive.

12. Check and, if necessary, adjust the rear wheel alignment angles.
This article is available at: russian, bulgarian, belarusian, ukrainian, serbian, croatian, romanian, polish, slovak, hungarian
This text was checked by: Evgeny Mereshnikov
Share with friends on social networks:

Previous
CX-5KE » Drive shafts and cardan
Next

Checking the rear drive shafts
Disassembly and assembly of the front drive shaft with constant…
Disassembly and assembly of the front drive shaft with a tripod joint
Removal and installation the front drive shaft
Checking the front drive shaft
Disassembly and assembly of the rear drive shaft
Removal and installation the propeller shaft
Checking the cardan shaft
Rear final drive oil
Rear main gear oil seals
More articles on repairing other Mazda models
Removal the front wheel drive shafts Mazda Familia 5 (1985-1989)
Troubleshooting drive shafts Mazda Capella 3 (1982-1992, petrol)
Technical characteristics of drive shafts Mazda3 BK (2003-2009)
Folding the rear seat on all-wheel drive station wagons Mazda6 GG (2002-2008)
Checking the rubber boots of the drive shafts Mazda 121 (3) (1996-2003)
Link in different formats to this article
Comments and feedback from visitors
No comments yet


How much will 38 + 24 ?


CX-5KE (2012-2017) 
  • General information
  • Introduction to the guide
  • User manual
  • Maintenance
  • Power unit
  • Petrol engines 2.0 l
  • Petrol engines 2.5 l
  • Diesel engines 2.2 l
  • Cooling system
  • Lubrication system
  • Supply system
  • Control system
  • Intake and exhaust system
  • Engine electrical equipment
  • Transmission
  • Clutch
  • Mechanical gearbox
  • Automatic gearbox
  • Transfer case
  • Drive shafts and cardan
  • Chassis
  • Wheels and tires
  • Front suspension
  • Rear suspension
  • Brake system
  • Steering
  • Body
  • Exterior (external elements)
  • Interior (internal elements)
  • Security systems
  • Heating and air conditioning
  • Electrical equipment
  • Equipment and devices
  • Electrical circuits
MazBook.ru © 2018–2026 · Mobile version · Articles and news · Sitemap: EN BG BY UA RS HR RO PL SK HU · Feedback · Site search · Add to bookmarks Familia 5 (BF) · Familia 6 (BG) · Capella 3 (GC) · Capella 3 and 4 (GC) · Capella 4 (GD) · Capella 5 (GE) · Capella 6 (GF) · Mazda3 BK · Mazda6 GG · CX-5KE · Mazda 121 (3) · Mazda BT-50 (1) ·
By continuing to use the site, you agree to the use of cookies 🔐