


Contents: Removal for engines E1, E3, E5 ⇓ Removal for engines B3, B5, B6, BP ⇓ Removal for diesel engine ⇓
The water pump cannot be repaired. If it is faulty, the pump should be replaced. If the seal is faulty, the coolant will flow onto the cylinder block. The water pump is driven by a V-belt.
Removal for engines E1, E3, E5
1. Disconnect the ground cable from the battery.
Warning! This will erase the engine fault memory or the radio security code. Before disconnecting the battery, read the instructions in Section Removal and installation the battery.
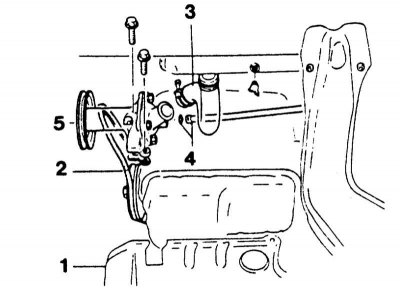
2. Remove the lower engine trim "1".
3. Drain and collect the coolant.
4. Loosen the water pump belt pulley mounting bolts.
Article is available on the website (mazbook.ru)
5. Remove V-belt "2", see Chapter Petrol engines, Chapter Removal and installation/tensioning the V-belt.
6. Unscrew the water pump belt pulley "5".
7. Disconnect the coolant hose "3", having first loosened the clamp.
8. Unscrew the water pump mounting bolts "5" and remove the water pump from the bypass system pipe "4".
Installation
1. Put it on the overflow pipe new gasket.
2. Insert the water pump so that the bypass pipe is completely seated in the pump. Tighten the mounting bolts with force 30 Nm.
3. Check that the water pump rotates freely and does not catch anywhere.
4. Put on the coolant hose and secure it with a clamp.
5. Install the belt pulley and tighten it by hand.
6. Install the V-belt, see Chapter Petrol engines, Chapter Removal and installation/tensioning the V-belt.
7. Tighten the belt pulley mounting bolts.
8. Fill with coolant.
9. Connect the ground cable to the battery.
10. If available, set the time on the clock and set the security code for the radio receiver.
11. After a test drive, check the cooling system for leaks.
Removal for engines B3, B5, B6, BP
1. Disconnect the ground cable from the battery.
Warning! This will erase the engine fault memory or the radio security code. Before disconnecting the battery, read the instructions in Section Removal and installation the battery.
2. Drain and collect the coolant.
3. Remove the belt cover and the timing belt itself, see Chapter Petrol engines, Chapter Removal and installation of the timing belt of engines B3, B5, B6 (SOHC), BP (SOHC).
4. BP Engine (DOHC): Remove the dipstick and unscrew the dipstick guide tube.
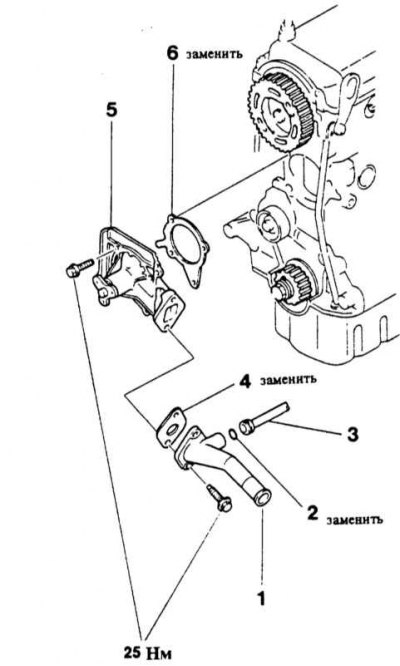
5. Unscrew the water nipple "1" and remove it from the bypass pipe "3".
6. BP Engine (DOHC): Unscrew the guide and tension rollers with the spring.
7. Unscrew the water pump mounting bolts "5" and remove the pump.
Installation
1. Clean the sealing surfaces on the cylinder block, water pump and water nipples first with a scraper, then wipe with a rag to remove any remaining sealant.
2. Carefully insert the new pump "5" with the new gasket "6". Tighten the bolts with force 25 Nm.
3. BP Engine (DOHC): Install the guide and tension rollers with the spring and tighten with force 45Nm.
4. Place a new gasket "4" on the bypass pipe "3".
5. Install the water pipe "1" with a new gasket "4" and tighten with force 25 Nm.
6. Install and tension the timing belt, see Chapter Petrol engines, Chapter Removal and installation of the timing belt of engines B3, B5, B6 (SOHC), BP (SOHC).
7. Fill with coolant.
8. Connect the ground cable to the battery.
9. If available, set the time on the clock and set the security code for the radio receiver.
10. Warm up the engine. Then place the car on a dry surface and check the cooling system for leaks.
Removal for diesel engine
1. Disconnect the ground cable from the battery.
Warning! This will erase the engine fault memory or the radio security code. Before disconnecting the battery, read the instructions in Section Removal and installation the battery.
2. Drain and collect the coolant.
3. Remove the belt cover and the timing belt itself, see Chapter Petrol engines, Chapter Removal and installation of the timing belt of engines B3, B5, B6 (SOHC), BP (SOHC).
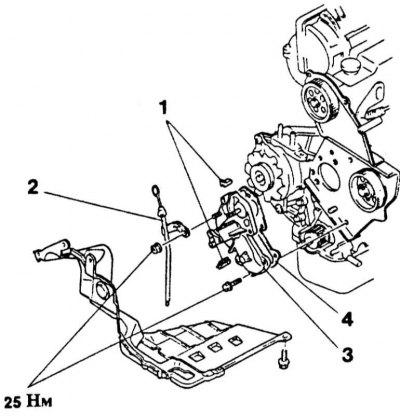
4. Remove the oil dipstick and unscrew the dipstick guide tube "2".
5. Unscrew the water pump mounting bolts "3" and remove the pump.
Installation
1. Clean the sealing surfaces on the cylinder block, water pump and water nipples first with a scraper, then wipe with a rag to remove any remaining sealant.
2. Carefully insert the new pump "3" with the new gasket "4". Tighten the bolts with force 25 Nm.
3. Screw the guide tube "2" of the oil dipstick with force 25 Nm and insert the dipstick.
4. Insert new gaskets "1".
5. Install and tension the timing belt, see Chapter Petrol engines, Chapter Removal and installation of the timing belt of engines B3, B5, B6 (SOHC), BP (SOHC).
6. Fill with coolant.
7. Connect the ground cable to the battery.
8. If available, set the time on the clock and set the security code for the radio receiver.
9. Warm up the engine. Then park the car in a dry place and check the cooling system for leaks.