
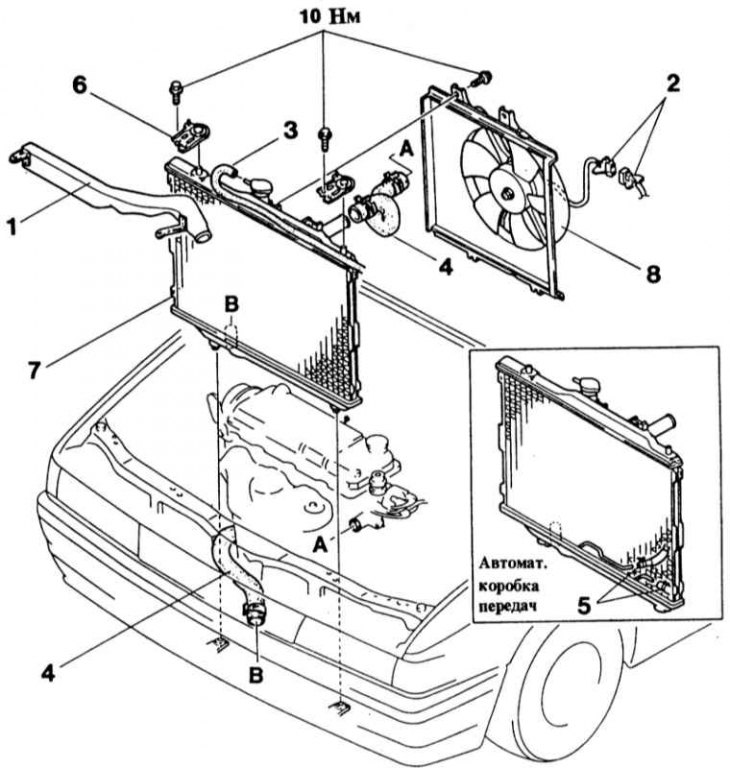
1 - resonance chamber; 2 - plug connection, fan; 3 - hose, expansion tank; 4 - coolant hoses; 5 - oil cooler connection. (Only vehicles with automatic transmission.); 6 - upper radiator holder; 7 - radiator; 8 - electric radiator fan
After a long period of use of the car, the thin channels in the radiator can become clogged due to coolant residue and lime deposits. This leads to a drop in cooling capacity, the engine overheats. In this case, only replacing the radiator will save.
Removing
1. Disconnect the ground cable from the battery.
Attention! This erases the data from the engine fault memory or the radio's security code. Before disconnecting the battery, read the instructions in Section Removing and installing the battery.
2. If present, unscrew the resonance chamber.
3. Drain the coolant.
4. Disconnect the upper and lower hoses on the radiator, after loosening and fully moving the clamps.
5. Disconnect the hose to the expansion tank from the radiator, after loosening the clamp.
6. Disconnect the radiator fan cable.
7. Diesel engine: Disconnect the coolant level sensor.
8. Vehicles with automatic transmission: Disconnect the pipes from the oil cooler by first loosening and fully moving the clamps. Plug the hoses with clean bolts.
9. Unscrew the bolts securing the upper radiator holder, tilt the radiator back and remove it together with the fan.
10. If there is not enough space, you can remove the radiator fan.
Attention! The radiator fins have very sharp edges, so it is recommended to wear gloves when removing them.
Attention! If the radiator is left removed for more than 48 hours, it must be flushed with clean water, dried with compressed air and the openings sealed. The radiator can also be stored filled with coolant by closing the holes. If this is not done, corrosion will form, which subsequently leads to leakage.
Installation
1. If required, move the fan to a new heatsink.
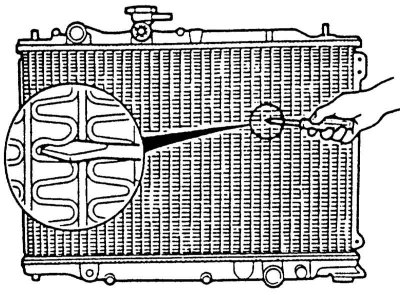
2. If an old radiator is installed, it should be checked beforehand. Check that there is no damage to the radiator mesh and waterproof casing.
3. If the radiator fins are bent, they must be carefully aligned with a screwdriver.
4. Check all coolant hoses for tears, cracks or other damage, replace if necessary. Check the condition of the rubber lugs on the radiator.
5. Insert the radiator from above so that the radiator fastening pins fit into the rubber caps on the bottom of the holder.
6. Tilt the radiator forward, install the upper bracket and tighten the mounting bolts with force 10 Nm.
7. Put on the upper and lower radiator hoses and secure them with clamps.
8. Put on the coolant hose to the expansion tank and secure it with a clamp.
9. Connect the cables to the thermal switch and fan.
10. Diesel engine: Connect the cable to the coolant level sensor.
11. Vehicles with automatic transmission: Remove the bolts from the hoses, put the hoses on the oil cooler and secure with clamps. Check fluid level in automatic transmission, see Chapter Maintenance.
12. Fill in coolant, see Section Current service.
13. Connect the mass cable to the battery.
14. If available, set the clock and set the radio security code.
15. Warm up the engine and check the tightness of the hose connections and the radiator.
16. Check coolant level, top up if necessary.