
MazBook.ru
English Русский
Български
Беларускі
Український
Српски
Hrvatski
Română
Polski
Slovenský
Magyar
• Bookmark • Sitemap • Contacts •   
Cars Opel Cars Ford Cars Volkswagen Cars Audi Cars Kia Cars Renault Cars Peugeot


Familia Capella Mazda3 Mazda6 CX-? Others Articles
Mazda 121 (3) (1996-2003) Mazda BT-50 (1) (2006-2011)

Removal and installation the radiator and fan (Mazda 121 (3))

  • Home
  • Mazda
  • 121 JASM (1996-2003)
  • Power unit
  • Cooling system
  • Removal and installation the radiator and fan
0
Contents: Removal ⇓ Removal only the radiator ⇓ Removal the fan separately ⇓ Installation ⇓
The fan can be removed without the radiator, especially since the preliminary work is almost identical. Instructions that only concern the removal of the fan are indicated separately.

Removal


Raise and support the vehicle. Unscrew the bolts and remove the lower radiator shroud.
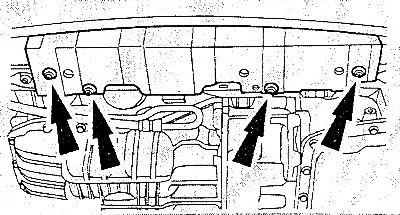
Removal only the radiator


Removal only the radiator


Drain the coolant from the radiator using the bolt at the bottom of the radiator.

Cars with air conditioning: unscrew the bolts securing the condenser to the radiator and hang the condenser on the body using wire.

Precautions: The refrigerant line in the air conditioning system must not be opened. If the refrigerant comes into contact with the skin, it may cause frostbite.
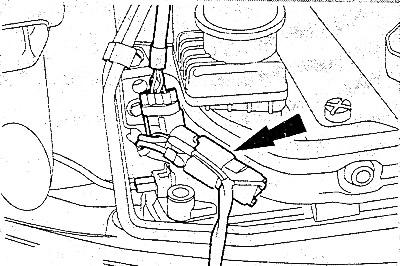

Remove the plug from the fan and pull the wire out of the guides. If there is one, remove the plug…


Remove the plug from the fan and pull the wire out of the guides. If there is one, remove the plug from the thermal switch on the lower left of the radiator. Disconnect the plug from the holder on the radiator (see picture).
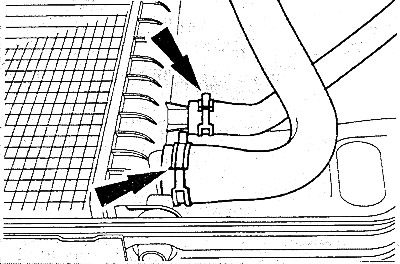


Remove the coolant hoses from the radiator at the top and bottom, after loosening the clamps.


Remove the coolant hoses from the radiator at the top and bottom, after loosening the clamps.

Original version of the article on the website: Mazbook.ru
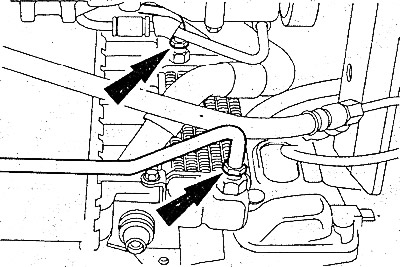
For automatic transmission models only: Unscrew the ATF cooler oil lines from the radiator and plug…


For automatic transmission models only: Unscrew the ATF cooler oil lines from the radiator and plug the open connections to prevent ATF loss.

Caution: When disconnecting the oil lines, fluid will leak out, so use a container to catch the drain. Clean the connections before loosening the nuts to prevent dirt from getting into the ATF.
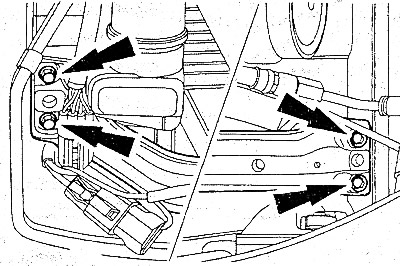

Support the radiator with a jack and a wooden block; unscrew the four radiator mounting bolts on…


Support the radiator with a jack and a wooden block; unscrew the four radiator mounting bolts on the right and left.
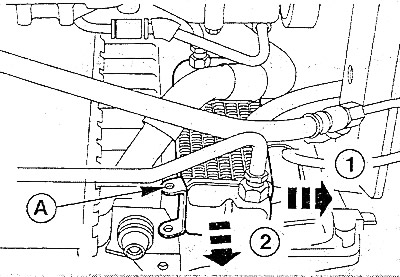


Automatic transmission models: When the fan needs to be removed separately, loosen the bolt at (A).…


Automatic transmission models: When the fan needs to be removed separately, loosen the bolt at (A). Pull the automatic transmission oil cooler to the side (1) and then downwards (2), making sure not to bend the pipes. Hang the oil cooler on the body using a wire.

Removal the fan separately


Pull the fan out of the car with the mount downwards. The mount is held at the top in the recesses by two rubber supports.
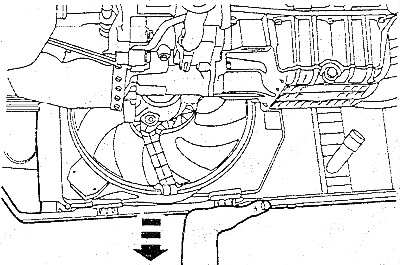
Pull the radiator together with the fan downwards out of the car.


Pull the radiator together with the fan downwards out of the car.

If necessary, unscrew the three bolts and remove the fan from the holder.

Installation


Install the fan on the holder and secure with bolts.

Check the rubber bushings on the radiator for damage and replace them if necessary.

Insert the radiator together with the fan from below so that the mounting protrusions enter the corresponding recesses at the top.
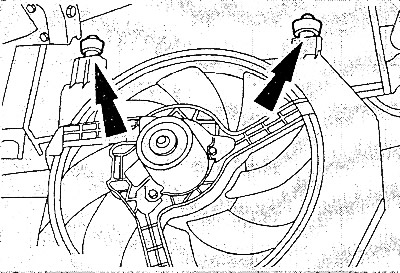


If the fan was removed separately, insert the fan with the holder, paying attention to the correct…


If the fan was removed separately, insert the fan with the holder, paying attention to the correct engagement of the upper protrusions in the recesses.

For models with air conditioning, install the condenser in front of the radiator and tighten the mounting bolts to 15 Nm.

Tighten the crossmember bolts (cross beam) at the bottom of the radiator with a torque of 25 Nm.

Note: Secure the ground wire on the left side with a bolt.


Install and bolt the cover under the radiator.

Lower the car.

Install the upper and lower radiator hoses and secure them with clamps.

Fill the system with coolant.

If equipped, install the oil cooler and connections for the automatic transmission. Finally, check the fluid level in the transmission.

Put the plug on the fan, insert the wire into the holder. Connect the thermal switch and secure the plug in the holder.

Connect the negative cable to the battery. Set the clock and enter the desired codes..

Start the engine and warm it up at idle speed until the fan turns on. Check the cooling system for leaks.

Check the coolant level again and top up if necessary.
This article is available at: russian, bulgarian, belarusian, ukrainian, serbian, croatian, romanian, polish, slovak, hungarian
This text was checked by: Evgeny Mereshnikov
Share with friends on social networks:

Previous
Mazda 121 (3) » Cooling system
Next

Checking the Thermostat
Removal and installation the thermostat
Checking the cooling system
Replacing the coolant
Coolant — Basic Information
Removal and installation the water pump (petrol 1.3 l)
Removal and installation the water pump (petrol 1.25/1.4 l)
Removal and installation the water pump (diesel)
Diagnostics of engine cooling system faults
More articles on repairing other Mazda models
Removal and installation the radiator Mazda Familia 6 (1989-1994)
Oil radiator — removal and installation Mazda Capella 3 (1982-1992, petrol)
Radiator of the cooling system — description Mazda3 BK (2003-2009)
Radiator — General Information Mazda6 GG (2002-2008)
Removal and installation the radiator Mazda CX-5KE (2012-2017)
Link in different formats to this article
Comments and feedback from visitors
No comments yet


How much will 14 + 33 ?


Mazda BT-50 (1) (2006-2011) 
  • General information
  • Introduction to guide
  • User manual
  • Maintenance
  • Power unit
  • Engine repair (diesel)
  • Cooling and lubrication system
  • Fuel injection system
  • Intake and exhaust system
  • Engine electrical equipment
  • Transmission
  • Clutch
  • Mechanical gearbox
  • All-wheel drive system
  • Transfer case and gearboxes
  • Chassis
  • Front suspension
  • Rear suspension
  • Steering
  • Brake system
  • Body
  • Exterior (external elements)
  • Interior (internal elements)
  • Heating and air conditioning
  • Security system SRS
  • Electrical equipment
  • Equipment and devices
  • Electrical circuits
Mazda 121 (3) (1996-2003) 
  • General information
  • User manual
  • Maintenance
  • Power unit
  • Petrol engine 1.3 l
  • Petrol engine 1.25/1.4 l
  • Diesel engine
  • Lubrication system
  • Cooling system
  • Ignition system
  • Supply system
  • Fuel injection (gasoline)
  • Fuel injection (diesel)
  • Exhaust system
  • Transmission
  • Clutch
  • Car gearbox
  • Chassis
  • Front suspension
  • Rear suspension
  • Steering
  • Brake system
  • Wheels and tires
  • Body
  • Exterior (external elements)
  • Interior (internal elements)
  • Doors, windows and locks
  • Heating system
  • Electrical equipment
  • Troubleshooting
  • Equipment and devices
  • Lighting system
  • Power devices
  • Electrical circuits
MazBook.ru © 2018–2026 · Mobile version · Articles and news · Sitemap: EN BG BY UA RS HR RO PL SK HU · Feedback · Site search · Add to bookmarks Familia 5 (BF) · Familia 6 (BG) · Capella 3 (GC) · Capella 3 and 4 (GC) · Capella 4 (GD) · Capella 5 (GE) · Capella 6 (GF) · Mazda3 BK · Mazda6 GG · CX-5KE · Mazda 121 (3) · Mazda BT-50 (1) ·
By continuing to use the site, you agree to the use of cookies 🔐