
MazBook.ru
English Русский
Български
Беларускі
Український
Српски
Hrvatski
Română
Polski
Slovenský
Magyar
• Bookmark • Sitemap • Contacts •   
Cars Opel Cars Ford Cars Volkswagen Cars Audi Cars Kia Cars Renault Cars Peugeot


Familia Capella Mazda3 Mazda6 CX-? Others Articles
Familia 5 (1985-1989) Familia 6 (1989-1994)

Removal and installation injectors (Mazda Familia BG)

  • Home
  • Mazda Familia
  • Familia BG (1989-1994)
  • Power unit
  • Diesel engines
  • Removal and installation injectors
0
Contents: Removal ⇓ Installation ⇓
Faulty injectors can cause severe engine detonation and damage to bearings. In this case, let the engine idle and loosen the union nuts of the injectors one by one. If the detonation disappears when one of the nuts is loosened, this indicates a faulty injector.
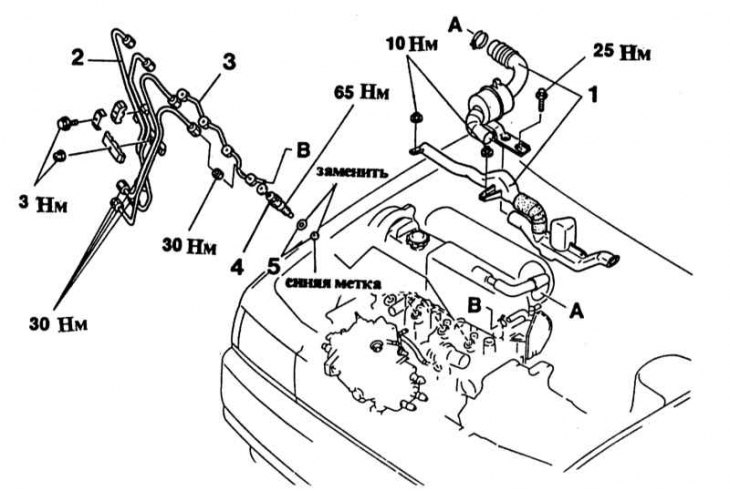
1 - intake noise muffler and resonance channel; 2 - injection pipelines; 3 - return fuel line; 4 -…

1 - intake noise muffler and resonance channel; 2 - injection pipelines; 3 - return fuel line; 4 - injectors; 5 - gaskets and washers


A faulty injector can also be identified by loosening the union nuts one by one while the engine is running at fast idle speed. If the speed remains the same after loosening one of the injectors, that injector is faulty. The injector can be checked with a pressure gauge. (This is done in a workshop.); required spray pressure: 110 Bar).

The first signs of injector failure:
  • Ignition failures
  • Detonation in one or more cylinders
  • The engine gets very hot
  • Engine power loss
  • Excessively strong black exhaust cloud
  • High fuel consumption

Removal


1. Disconnect the ground cable from the battery.

Warning! This will erase the engine fault memory or the radio security code. Before disconnecting the battery, read the instructions in Section Removal and installation the battery.


2. Unscrew the intake noise muffler and resonance channel.

3. Thoroughly clean the outside of the injection and return fuel lines with a cold cleaner.

4. Remove the injection pipes as a set; to do this, loosen the union nuts on the high-pressure fuel pump and injectors using a slotted open-end wrench.

Attention! Do not change the shape of the bend.


5. Remove the fuel hose from the return line and loosen the lock nut, remove the gaskets and return line.

6. Remove the injectors and arrange them in the order of installation.

Attention! No dirt should get into the combustion chambers through the nozzle holes.


7. In each hole there is also a gasket and a washer that must be replaced.

8. Check the injector needle for wear and damage, remove soot with a wooden spatula.

Attention! Never treat the nozzle or nozzle needle with wire, a file or sandpaper. Do not mix up individual elements of the nozzles.


Installation


Installation


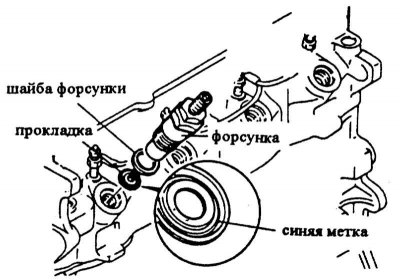
1. Install 4 new gaskets and washers.

Attention! Observe the installation position, the blue mark must face up.


2. Install the injectors and tighten them with force 65 Nm.

Attention! Overtightening the injector holders may result in deformation of the injectors, jamming of the injector needles or other damage.


3. Install the fuel return line with new gaskets and tighten the nuts with force 30 Nm.

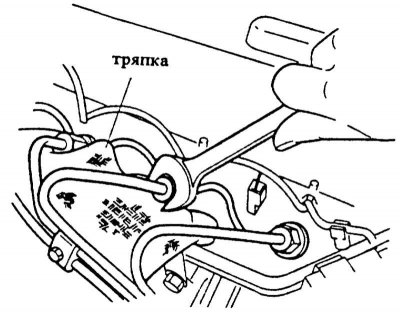
4. Install the injection pipes, tighten the union nuts with force 30 Nm.

5. On all injector holders, slightly loosen the union nuts of the injection pipes.

6. Turn the crankshaft with the starter until fuel comes out of the pipes. Tighten the pipes to the specified torque.

7. Install the intake noise muffler and resonance channel.
7. Install the intake noise muffler and resonance channel.


8. Connect the ground cable to the battery.

9. If available, set the time on the clock and set the security code for the radio receiver.
This article is available at: russian, bulgarian, belarusian, ukrainian, serbian, croatian, romanian, polish, slovak, hungarian
This text was checked by: Evdokia Filimonova
Share with friends on social networks:

Previous
Familia 6 » Diesel engines
Next

Checking / adjusting the idle speed
Adjusting the gas drive
Checking/replacing the fuel shut-off solenoid valve
Removal air from the fuel system
Checking the preheating system
Removal and installation a vacuum pump
More articles on repairing other Mazda models
Fuel Injectors (EGI) — checking, removing and installing Mazda Capella 3 (1982-1992, petrol)
Diagnostics and cleaning of fuel injectors Mazda CX-5KE (2012-2017)
Checking fuel injectors Mazda 121 (3) (1996-2003)
Link in different formats to this article
Comments and feedback from visitors
No comments yet


How much will 34 + 36 ?


Familia 6 (1989-1994) 
  • General information
  • Introduction to guide
  • User manual
  • Maintenance
  • Power unit
  • Petrol engines
  • Diesel engines
  • Lubrication system
  • Cooling system
  • Ignition system
  • Supply system
  • Carburetor
  • Injection system
  • Exhaust system
  • Transmission
  • Clutch
  • Car gearbox
  • Chassis
  • Front suspension
  • Rear suspension
  • Steering
  • Brake system
  • Wheels and tires
  • Body
  • Body elements
  • Doors and windows
  • Body Care
  • Electrical equipment
  • Equipment and devices
  • Power devices
  • Heating system
  • Lighting and headlights
  • Windshield wipers and washers
  • Wiring diagrams (since 1987)
  • Wiring diagrams (since 1991)
Familia 5 (1985-1989) 
  • General information
  • Vehicle data
  • Model «E» engine
  • Engine repair
  • Cooling and lubrication system
  • Power and ignition system
  • Model «B» engine
  • Engine repair
  • Cooling and lubrication system
  • Ignition system
  • Power system (carburetor)
  • Power system (injector)
  • Transmission
  • Clutch
  • Mechanical gearbox
  • Automatic gearbox
  • Front wheel drive
  • Chassis
  • Steering
  • Front suspension
  • Rear suspension
  • Brake system
  • Electrical equipment
  • Equipment and devices
  • Electrical circuits
  • Wiring diagrams (station wagon)
MazBook.ru © 2018–2026 · Mobile version · Articles and news · Sitemap: EN BG BY UA RS HR RO PL SK HU · Feedback · Site search · Add to bookmarks Familia 5 (BF) · Familia 6 (BG) · Capella 3 (GC) · Capella 3 and 4 (GC) · Capella 4 (GD) · Capella 5 (GE) · Capella 6 (GF) · Mazda3 BK · Mazda6 GG · CX-5KE · Mazda 121 (3) · Mazda BT-50 (1) ·
By continuing to use the site, you agree to the use of cookies 🔐