
MazBook.ru
English Русский
Български
Беларускі
Український
Српски
Hrvatski
Română
Polski
Slovenský
Magyar
• Bookmark • Sitemap • Contacts •   
Cars Opel Cars Ford Cars Volkswagen Cars Audi Cars Kia Cars Renault Cars Peugeot


Familia Capella Mazda3 Mazda6 CX-? Others Articles
Mazda 121 (3) (1996-2003) Mazda BT-50 (1) (2006-2011)

Removal and installation the radio (Mazda 121 (3))

  • Home
  • Mazda
  • 121 JASM (1996-2003)
  • Electrical equipment
  • Lighting system
  • Removal and installation the radio
0
Contents: Removal ⇓ Installation ⇓
The factory installed radio is equipped with a special mount that allows for quick removal and installation of the radio. In other cases, the radio is supplied with two removal brackets (A), which can also be purchased separately.
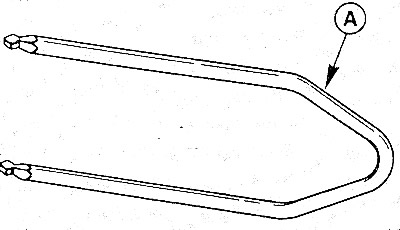
Removal


Removal


Turn off the ignition.

Disconnect the negative cable from the battery.

Note: This will erase the data in the memory units of the radio and the electronic engine control units. This prevents unauthorized switching on of the radio after the wires have been connected. The voltage supply is interrupted, for example, when the wires are disconnected from the battery, when the radio is removed, or when its fuse blows.


You must write down or remember the security codes before disconnecting the wires from the battery or before removing the radio. If the code is unknown, the radio can only be turned on again in a workshop.

The code number for a specific radio receiver is provided in the design for its operation. It should not be carried in the car.
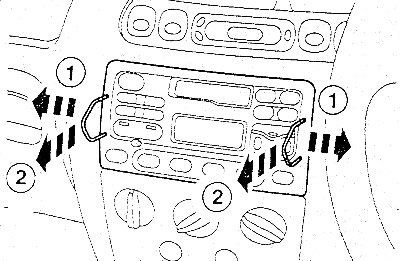
Insert the removal clips into the front of the receiver as shown in the figure.


Insert the removal clips into the front of the receiver as shown in the figure.


Press the release clips to the left and right of the radio (1) and simultaneously pull the radio together with the clips out of the front panel (2).
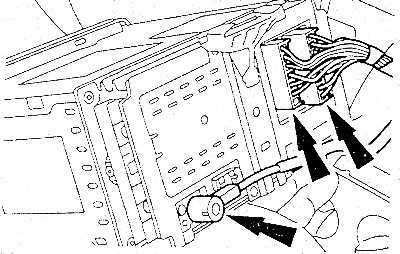
Disconnect the multi-pin plug and the antenna plug (arrow left).


Disconnect the multi-pin plug and the antenna plug (arrow left).

Caution: When doing this, pull on the plug, not on the wires.
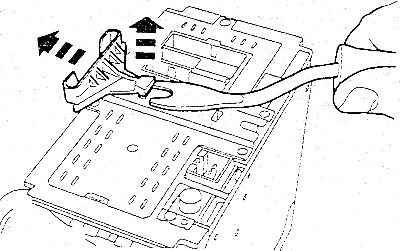

Pry the rear mount off the radio.


Pry the rear mount off the radio.

Installation
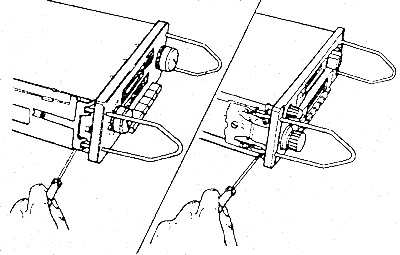


On the removed radio, remove the removal tool. To do this, press the side tabs on the radio inward.


On the removed radio, remove the removal tool. To do this, press the side tabs on the radio inward.


Place the rear mount onto the radio.

Place the plugs on the back of the radio.

Slide the radio into the front panel until it locks into place.

Connect the negative cable to the battery.

Turn on the radio and enter the security code.

Set the clock readings.
This article is available at: russian, bulgarian, belarusian, ukrainian, serbian, croatian, romanian, polish, slovak, hungarian
This text was checked by: Evgeny Mereshnikov
Share with friends on social networks:

Previous
Mazda 121 (3) » Lighting system
Next

Ford KA: Removing and installing the rear light
Ford KA: Headlight adjustment
Ford KA: Removing and installing headlights
Ford KA: Replacing Incandescent Bulbs
Removal and installation the rear light
More articles on repairing other Mazda models
Removal and installation the radio Mazda Familia 6 (1989-1994)
Radio (late models) — removal and installation Mazda Capella 3 (1982-1992, petrol)
Link in different formats to this article
Comments and feedback from visitors
No comments yet


How much will 34 + 45 ?


Mazda BT-50 (1) (2006-2011) 
  • General information
  • Introduction to guide
  • User manual
  • Maintenance
  • Power unit
  • Engine repair (diesel)
  • Cooling and lubrication system
  • Fuel injection system
  • Intake and exhaust system
  • Engine electrical equipment
  • Transmission
  • Clutch
  • Mechanical gearbox
  • All-wheel drive system
  • Transfer case and gearboxes
  • Chassis
  • Front suspension
  • Rear suspension
  • Steering
  • Brake system
  • Body
  • Exterior (external elements)
  • Interior (internal elements)
  • Heating and air conditioning
  • Security system SRS
  • Electrical equipment
  • Equipment and devices
  • Electrical circuits
Mazda 121 (3) (1996-2003) 
  • General information
  • User manual
  • Maintenance
  • Power unit
  • Petrol engine 1.3 l
  • Petrol engine 1.25/1.4 l
  • Diesel engine
  • Lubrication system
  • Cooling system
  • Ignition system
  • Supply system
  • Fuel injection (gasoline)
  • Fuel injection (diesel)
  • Exhaust system
  • Transmission
  • Clutch
  • Car gearbox
  • Chassis
  • Front suspension
  • Rear suspension
  • Steering
  • Brake system
  • Wheels and tires
  • Body
  • Exterior (external elements)
  • Interior (internal elements)
  • Doors, windows and locks
  • Heating system
  • Electrical equipment
  • Troubleshooting
  • Equipment and devices
  • Lighting system
  • Power devices
  • Electrical circuits
MazBook.ru © 2018–2026 · Mobile version · Articles and news · Sitemap: EN BG BY UA RS HR RO PL SK HU · Feedback · Site search · Add to bookmarks Familia 5 (BF) · Familia 6 (BG) · Capella 3 (GC) · Capella 3 and 4 (GC) · Capella 4 (GD) · Capella 5 (GE) · Capella 6 (GF) · Mazda3 BK · Mazda6 GG · CX-5KE · Mazda 121 (3) · Mazda BT-50 (1) ·
By continuing to use the site, you agree to the use of cookies 🔐