
MazBook.ru
English Русский
Български
Беларускі
Український
Српски
Hrvatski
Română
Polski
Slovenský
Magyar
• Bookmark • Sitemap • Contacts •   
Cars Opel Cars Ford Cars Volkswagen Cars Audi Cars Kia Cars Renault Cars Peugeot


Familia Capella Mazda3 Mazda6 CX-? Others Articles
Mazda 121 (3) (1996-2003) Mazda BT-50 (1) (2006-2011)

Rear window defroster (Mazda BT-50 (1))

  • Home
  • Mazda
  • BT-50 J97M (2006-2011)
  • Electrical equipment
  • Equipment and devices
  • Rear window defroster
0
Contents: Checking heater wires ⇓ Wire repair ⇓ Removal and installation the rear…⇓

Checking heater wires


1. Turn the ignition switch to the "ON" position.

2. Turn on the rear window defroster.

Caution: When measuring voltage, wrap the end of the voltmeter probe with aluminum foil and press the edge of the foil to the wire with your finger.
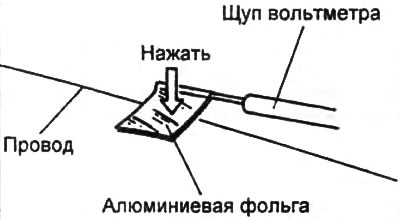

Caution: When measuring voltage, wrap the end of the voltmeter probe with aluminum foil and press…


3. Connect the positive lead of the voltmeter to side (1) of the wire and connect the negative lead to ground.
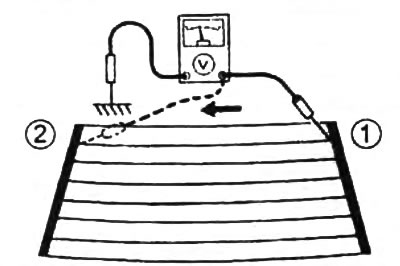
3. Connect the positive lead of the voltmeter to side (1) of the wire and connect the negative lead…


4. Gradually move the probe from side (1) to side (2). Check that the voltage gradually decreases from 12 V to 0 V.

If there is no voltage or the voltage changes quickly, the wire is damaged. Repair the wire.

Wire repair


1. Clean the ends of the wire at the break point with solvent and stick protective tape on both ends of the wire.
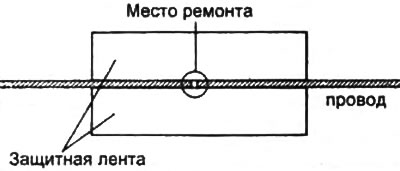


1. Clean the ends of the wire at the break point with solvent and stick protective tape on both…


2. Mix the repair compound thoroughly and apply a drop of the substance to the wire using a thin-ended brush.
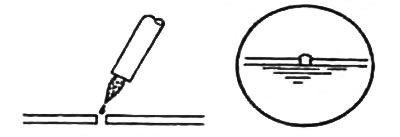
2. Mix the repair compound thoroughly and apply a drop of the substance to the wire using a…


Content based on information from (MazBook.ru)

Repair compound: DUPONT PASTE No.4817 or similar substance.

3. After a few minutes, remove the protective film and leave the composition to harden for 24 hours.

Removal and installation the rear window defroster switch


1. Disconnect the cable from the negative terminal of the battery.

2. Remove the center panel assembly.

3. Disconnect the connector from the rear window defroster switch.

4. Disconnect the connector from the hazard warning switch.

5. Turn down at the bottom.

6. Remove the rear window defroster switch.
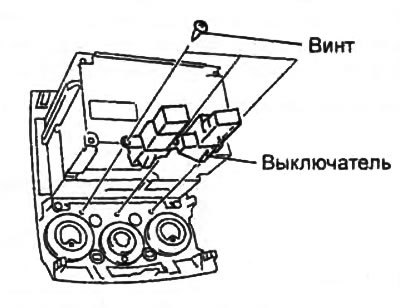
6. Remove the rear window defroster switch.


7. Install in the reverse order of removal.
This article is available at: russian, bulgarian, belarusian, ukrainian, serbian, croatian, romanian, polish, slovak, hungarian
This text was checked by: Vladimir Bazhenov
Share with friends on social networks:

Previous
Mazda BT-50 (1) » Equipment and devices
Next

External mirror adjustment system
Checking the window lifter motor
Removal and installation electric window lifters
Checking the window control switch
Removal and installation window lifter control switches
Central locking and anti-theft system
Central lock components — device
Location of audio system components
Audio system — disassembling and assembling the radio
Radio diagnostics
More articles on repairing other Mazda models
Checking the rear window defroster Mazda Familia 6 (1989-1994)
Scheme 8: Rear window defroster, cruise control and power sunroof… Mazda Capella 3 (1982-1992, petrol)
Rear window defroster Mazda3 BK (2003-2009)
Rear window defroster Mazda6 GG (2002-2008)
Rear window wiper and washer (some versions) Mazda CX-5KE (2012-2017)
Link in different formats to this article
Comments and feedback from visitors
No comments yet


How much will 33 + 10 ?


Mazda BT-50 (1) (2006-2011) 
  • General information
  • Introduction to guide
  • User manual
  • Maintenance
  • Power unit
  • Engine repair (diesel)
  • Cooling and lubrication system
  • Fuel injection system
  • Intake and exhaust system
  • Engine electrical equipment
  • Transmission
  • Clutch
  • Mechanical gearbox
  • All-wheel drive system
  • Transfer case and gearboxes
  • Chassis
  • Front suspension
  • Rear suspension
  • Steering
  • Brake system
  • Body
  • Exterior (external elements)
  • Interior (internal elements)
  • Heating and air conditioning
  • Security system SRS
  • Electrical equipment
  • Equipment and devices
  • Electrical circuits
Mazda 121 (3) (1996-2003) 
  • General information
  • User manual
  • Maintenance
  • Power unit
  • Petrol engine 1.3 l
  • Petrol engine 1.25/1.4 l
  • Diesel engine
  • Lubrication system
  • Cooling system
  • Ignition system
  • Supply system
  • Fuel injection (gasoline)
  • Fuel injection (diesel)
  • Exhaust system
  • Transmission
  • Clutch
  • Car gearbox
  • Chassis
  • Front suspension
  • Rear suspension
  • Steering
  • Brake system
  • Wheels and tires
  • Body
  • Exterior (external elements)
  • Interior (internal elements)
  • Doors, windows and locks
  • Heating system
  • Electrical equipment
  • Troubleshooting
  • Equipment and devices
  • Lighting system
  • Power devices
  • Electrical circuits
MazBook.ru © 2018–2026 · Mobile version · Articles and news · Sitemap: EN BG BY UA RS HR RO PL SK HU · Feedback · Site search · Add to bookmarks Familia 5 (BF) · Familia 6 (BG) · Capella 3 (GC) · Capella 3 and 4 (GC) · Capella 4 (GD) · Capella 5 (GE) · Capella 6 (GF) · Mazda3 BK · Mazda6 GG · CX-5KE · Mazda 121 (3) · Mazda BT-50 (1) ·
By continuing to use the site, you agree to the use of cookies 🔐