
MazBook.ru
English Русский
Български
Беларускі
Український
Српски
Hrvatski
Română
Polski
Slovenský
Magyar
• Bookmark • Sitemap • Contacts •   
Cars Opel Cars Ford Cars Volkswagen Cars Audi Cars Kia Cars Renault Cars Peugeot


Familia Capella Mazda3 Mazda6 CX-? Others Articles
Mazda 121 (3) (1996-2003) Mazda BT-50 (1) (2006-2011)

External mirror adjustment system (Mazda BT-50 (1))

  • Home
  • Mazda
  • BT-50 J97M (2006-2011)
  • Electrical equipment
  • Equipment and devices
  • External mirror adjustment system
0
Contents: Checking the electric drive of the…⇓ Removal and installation the switch…⇓ Checking the switch for adjusting…⇓
For the location of the exterior mirror components, see the illustration "Location of glass, power windows and rear view mirror components".

Checking the electric drive of the outside mirrors


1. Disconnect the connector from the outside mirror electric drive.

2. Apply battery voltage to the terminals of the electric drive.
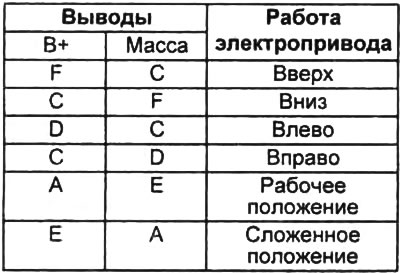
2. Apply battery voltage to the terminals of the electric drive.

"S+" - battery voltage.
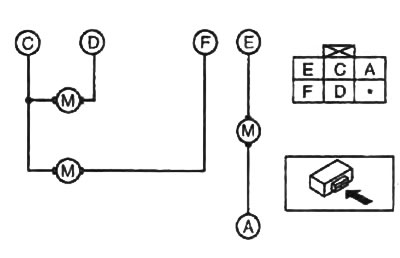
«S+» - battery voltage.


If the work does not match the description, replace the mirror.

[For details, see the website: MazBook]

Removal and installation the switch for adjusting the position of the outside mirrors


1. Disconnect the cable from the negative terminal of the battery.


2. Press the "C" latch with a flat-head screwdriver wrapped in electrical tape.
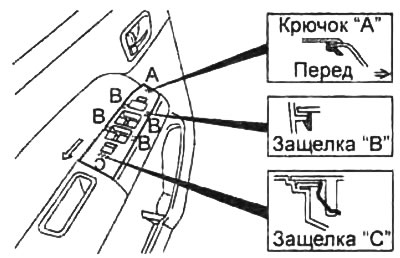
2. Press the «C» latch with a flat-head screwdriver wrapped in electrical tape.


3. Disconnect the latches "B", "C" and the hook "A" by sliding the cover in the direction indicated by the arrow.

4. Disconnect the connectors.

5. Loosen the screws and remove the outside mirror adjustment switch.
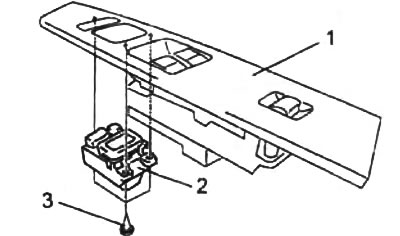
1 - overlay,

1 - overlay,
2 - switch for adjusting the position of the outside mirrors,
3 - screw.


6. Install in the reverse order of removal.

Checking the switch for adjusting the position of the outside mirrors


1. Remove the outside mirror adjustment switch.

2. Check the conductivity between the terminals of the outside mirror adjustment switch using an ohmmeter as shown in the figure "Checking the outside mirror adjustment switch".
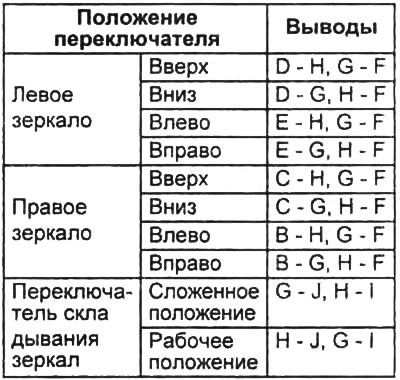


2. Check the conductivity between the terminals of the outside mirror adjustment switch using an…

If the conductivity is not as described, replace the mirror adjustment switch.
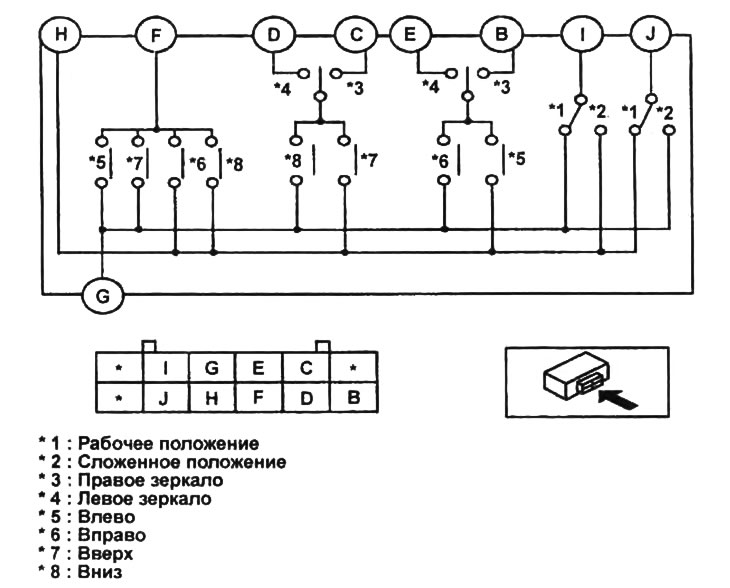
Checking the switch for adjusting the position of the outside mirrors.

Checking the switch for adjusting the position of the outside mirrors.
This article is available at: russian, bulgarian, belarusian, ukrainian, serbian, croatian, romanian, polish, slovak, hungarian
This text was checked by: Vladimir Bazhenov
Share with friends on social networks:

Previous
Mazda BT-50 (1) » Equipment and devices
Next

Checking the window lifter motor
Removal and installation electric window lifters
Checking the window control switch
Removal and installation window lifter control switches
Checking the main power window control switch
Rear window defroster
Central locking and anti-theft system
Central lock components — device
Location of audio system components
Audio system — disassembling and assembling the radio
More articles on repairing other Mazda models
Technical characteristics of the lubrication system Mazda Familia 5 (1985-1989)
Scheme 25: Automatic suspension adjustment system Mazda Capella 3 (1982-1992, petrol)
Interior rear view mirror Mazda3 BK (2003-2009)
Door lock control system Mazda6 GG (2002-2008)
Initialization of the automatic headlight adjustment system (vehicles… Mazda CX-5KE (2012-2017)
Link in different formats to this article
Comments and feedback from visitors
No comments yet


How much will 50 + 33 ?


Mazda BT-50 (1) (2006-2011) 
  • General information
  • Introduction to guide
  • User manual
  • Maintenance
  • Power unit
  • Engine repair (diesel)
  • Cooling and lubrication system
  • Fuel injection system
  • Intake and exhaust system
  • Engine electrical equipment
  • Transmission
  • Clutch
  • Mechanical gearbox
  • All-wheel drive system
  • Transfer case and gearboxes
  • Chassis
  • Front suspension
  • Rear suspension
  • Steering
  • Brake system
  • Body
  • Exterior (external elements)
  • Interior (internal elements)
  • Heating and air conditioning
  • Security system SRS
  • Electrical equipment
  • Equipment and devices
  • Electrical circuits
Mazda 121 (3) (1996-2003) 
  • General information
  • User manual
  • Maintenance
  • Power unit
  • Petrol engine 1.3 l
  • Petrol engine 1.25/1.4 l
  • Diesel engine
  • Lubrication system
  • Cooling system
  • Ignition system
  • Supply system
  • Fuel injection (gasoline)
  • Fuel injection (diesel)
  • Exhaust system
  • Transmission
  • Clutch
  • Car gearbox
  • Chassis
  • Front suspension
  • Rear suspension
  • Steering
  • Brake system
  • Wheels and tires
  • Body
  • Exterior (external elements)
  • Interior (internal elements)
  • Doors, windows and locks
  • Heating system
  • Electrical equipment
  • Troubleshooting
  • Equipment and devices
  • Lighting system
  • Power devices
  • Electrical circuits
MazBook.ru © 2018–2026 · Mobile version · Articles and news · Sitemap: EN BG BY UA RS HR RO PL SK HU · Feedback · Site search · Add to bookmarks Familia 5 (BF) · Familia 6 (BG) · Capella 3 (GC) · Capella 3 and 4 (GC) · Capella 4 (GD) · Capella 5 (GE) · Capella 6 (GF) · Mazda3 BK · Mazda6 GG · CX-5KE · Mazda 121 (3) · Mazda BT-50 (1) ·
By continuing to use the site, you agree to the use of cookies 🔐