
MazBook.ru
English Русский
Български
Беларускі
Український
Српски
Hrvatski
Română
Polski
Slovenský
Magyar
• Bookmark • Sitemap • Contacts •   
Cars Opel Cars Ford Cars Volkswagen Cars Audi Cars Kia Cars Renault Cars Peugeot


Familia Capella Mazda3 Mazda6 CX-? Others Articles
CX-5KE (2012-2017)

Removal and installation the intermediate shaft of the steering column (Mazda CX-5KE)

  • Home
  • Mazda CX-?
  • CX 5 KE (2012-2017)
  • Chassis
  • Steering
  • Removal and installation the intermediate shaft of the steering column
0
Contents: Removal ⇓ Installation ⇓ Checking the steering shaft ⇓
1. Hinge cover.

1. Hinge cover.
2. Intermediate shaft.


Note: replace the part with a new one after each removal.


Caution: Immediately after prolonged rotation of the steering gear, the temperature of the steering column (electric power steering drive) significantly increases, which can cause burns when touched. Before performing any maintenance, make sure that the steering column has cooled down.


Removal


1. Turn the steering wheel so that the connecting bolt is accessible for unscrewing.

Caution: Fix the steering wheel with tape or wire to prevent the steering shaft from turning after disconnecting. If the steering wheel is turned after the steering shaft is disconnected from the steering gear, the internal parts of the contact disk may be damaged.


2. Lock the adjustment lever.

3. Remove the hinge cover.

4. Place alignment marks across the gap between the steering column and the intermediate shaft fork as shown in the figure.
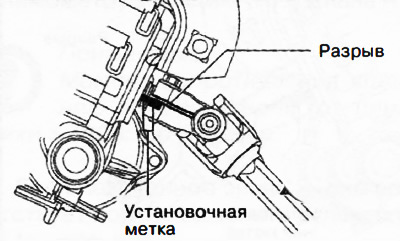
4. Place alignment marks across the gap between the steering column and the intermediate shaft fork…


5. Apply alignment marks to the steering gear shaft and intermediate shaft as shown in the figure.
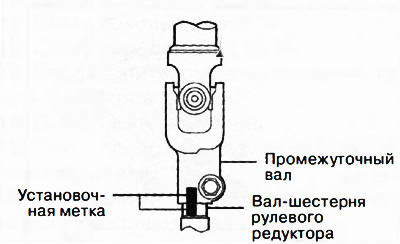
5. Apply alignment marks to the steering gear shaft and intermediate shaft as shown in the figure.


6. First loosen connecting bolt A, then connecting bolt B.
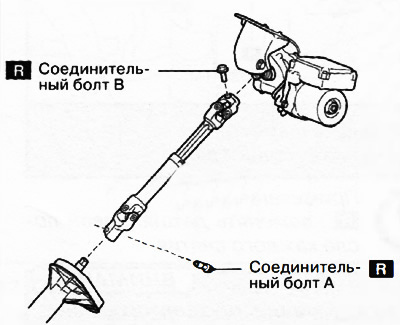
6. First loosen connecting bolt A, then connecting bolt B.


7. Remove the intermediate shaft.


Installation


1. Copy the timing marks from the old intermediate shaft to the new one.
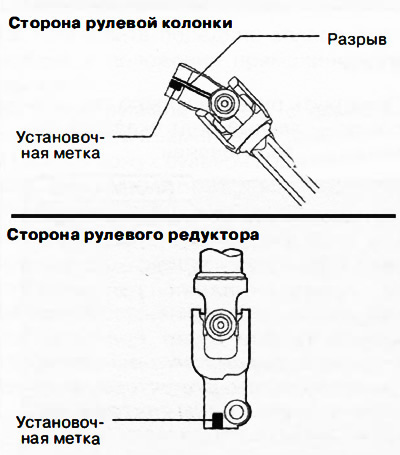
1. Copy the timing marks from the old intermediate shaft to the new one.


2. Align the alignment marks on the steering column and the steering gear shaft, applied before removing the intermediate shaft, and install the intermediate shaft.
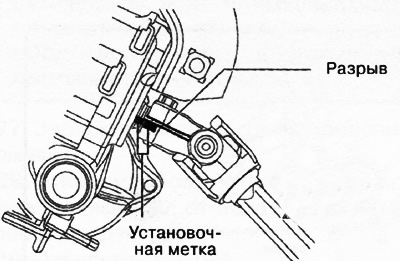
2. Align the alignment marks on the steering column and the steering gear shaft, applied before…

Note: Install connecting bolt B first, then connect connecting bolt A.
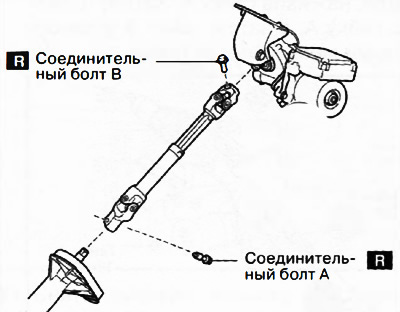


Note: Install connecting bolt B first, then connect connecting bolt A.


3. Make sure that the flange of the connecting bolt B is seated in a certain position (see picture).
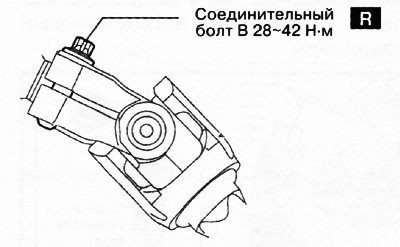
3. Make sure that the flange of the connecting bolt B is seated in a certain position (see picture).


Note: replace the part with a new one after each removal.


4. Make sure that the connecting bolt A is installed in the groove of the steering gear shaft.

For details, see the website [mazbook.ru]
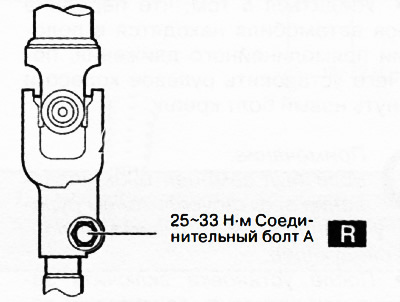
4. Make sure that the connecting bolt A is installed in the groove of the steering gear shaft.


Note: replace the part with a new one after each removal.


Checking the steering shaft


1. Check the steering column for excessive play and damage.

2. Check that the gaps between the steering column protrusions and the bracket shown in the figure are no more than 2.0 mm. If the gap between the protrusion and the bracket is more than 2.0 mm, replace the steering column assembly.
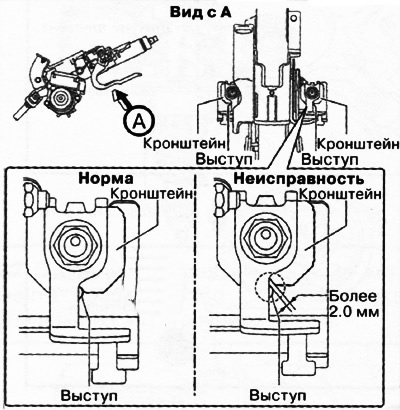
2. Check that the gaps between the steering column protrusions and the bracket shown in the figure…


Note: If the gap between the projection and the bracket is more than 2.0 mm, it indicates that the shock absorbing mechanism of the steering column has been activated. It is necessary to replace the steering column assembly with a new one.


3. Check the tilt/reach adjustment mechanism for the following:
  • The adjustment lever should move smoothly from the locked position to the unlocked position.
  • The steering shaft must be securely fixed when the adjusting lever is locked.

If there are any faults, replace the steering column with a new one.
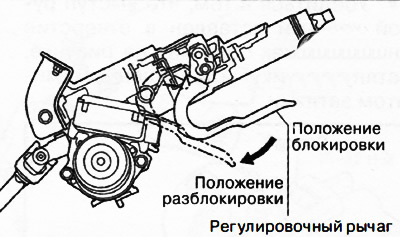
If there are any faults, replace the steering column with a new one.
This article is available at: russian, bulgarian, belarusian, ukrainian, serbian, croatian, romanian, polish, slovak, hungarian
This text was checked by: Evgeny Mereshnikov
Share with friends on social networks:

Previous
CX-5KE » Steering
Next

Installing the steering wheel and steering column
Removal the steering wheel and steering column
Checking the steering wheel and steering column
General steering procedures
Technical data
Replacing tie rod ends
Removal and installation the steering gear with rods
Disassembling the steering gear
Checking the steering gear components
Steering gear assembly
More articles on repairing other Mazda models
Steering column parts Mazda Familia 5 (1985-1989)
Height-adjustable steering column Mazda Capella 3 and 4 (1982-1992)
Central steering column switch for exterior lighting Mazda3 BK (2003-2009)
Central steering column switch for exterior lighting Mazda6 GG (2002-2008)
Removal and installation the steering column and steering wheel Mazda BT-50 (1) (2006-2011)
Link in different formats to this article
Comments and feedback from visitors
No comments yet


How much will 14 + 15 ?


CX-5KE (2012-2017) 
  • General information
  • Introduction to the guide
  • User manual
  • Maintenance
  • Power unit
  • Petrol engines 2.0 l
  • Petrol engines 2.5 l
  • Diesel engines 2.2 l
  • Cooling system
  • Lubrication system
  • Supply system
  • Control system
  • Intake and exhaust system
  • Engine electrical equipment
  • Transmission
  • Clutch
  • Mechanical gearbox
  • Automatic gearbox
  • Transfer case
  • Drive shafts and cardan
  • Chassis
  • Wheels and tires
  • Front suspension
  • Rear suspension
  • Brake system
  • Steering
  • Body
  • Exterior (external elements)
  • Interior (internal elements)
  • Security systems
  • Heating and air conditioning
  • Electrical equipment
  • Equipment and devices
  • Electrical circuits
MazBook.ru © 2018–2026 · Mobile version · Articles and news · Sitemap: EN BG BY UA RS HR RO PL SK HU · Feedback · Site search · Add to bookmarks Familia 5 (BF) · Familia 6 (BG) · Capella 3 (GC) · Capella 3 and 4 (GC) · Capella 4 (GD) · Capella 5 (GE) · Capella 6 (GF) · Mazda3 BK · Mazda6 GG · CX-5KE · Mazda 121 (3) · Mazda BT-50 (1) ·
By continuing to use the site, you agree to the use of cookies 🔐