
MazBook.ru
English Русский
Български
Беларускі
Український
Српски
Hrvatski
Română
Polski
Slovenský
Magyar
• Bookmark • Sitemap • Contacts •   
Cars Opel Cars Ford Cars Volkswagen Cars Audi Cars Kia Cars Renault Cars Peugeot


Familia Capella Mazda3 Mazda6 CX-? Others Articles
CX-5KE (2012-2017)

Precautions when handling gas discharge (xenon) lamps (Mazda CX-5KE)

  • Home
  • Mazda CX-?
  • CX 5 KE (2012-2017)
  • Electrical equipment
  • Equipment and devices
  • Precautions when handling gas discharge (xenon) lamps
0
Replacing gas discharge lamps with the negative terminal of the battery connected or in a workplace with high humidity may result in electric shock. Gas discharge lamps must be replaced under the following conditions:
  • Turn off the ignition and disconnect the negative battery terminal.
  • Perform maintenance of the gas discharge lamp in a dry place.
  • Dry your hands thoroughly before working.

Since the terminal of the gas discharge lamp is under voltage of about 25,000 V, touching it with your fingers or the tester probes may cause electric shock. When turning on the gas discharge lamp, do not touch its terminal with your fingers or the tester probes.
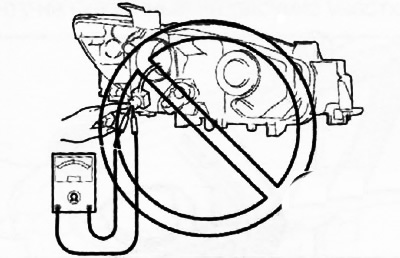
Since the terminal of the gas discharge lamp is under voltage of about 25,000 V, touching it with…


If the gas discharge lamp is turned on before the front combination lamp is fully assembled, it may cause electric shock. Before turning on the gas discharge lamp, the front combination lamp must be fully assembled and installed on the vehicle.

If you use a tester to check the operation of the gas discharge lamp control unit, you may get an electric shock. Do not disassemble the gas discharge lamp control unit.
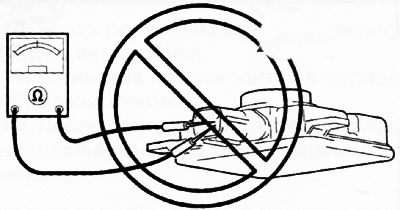
If you use a tester to check the operation of the gas discharge lamp control unit, you may get an…


A gas discharge lamp control unit damaged in an accident may supply high voltage to surrounding modules and cause electric shock. Therefore, even if the gas discharge headlamps show no external signs of damage after an accident and continue to function normally, a malfunction may occur later due to internal damage to the gas discharge lamp control unit. If the gas discharge lamp control unit is reused, perform the following checks to ensure that there are no malfunctions:
  • Check the gas discharge lamp several times to ensure it is switched on when cold (turn off the gas discharge lamp for about 10 minutes or more, and then turn it on again) and in a warm state (turn on the gas discharge lamp for about 15 minutes or longer, turn it off for about 1 minute, and then turn it on again), to make sure that the gas discharge lamp turns on normally.
  • Make sure that the gas discharge lamp shines evenly for about 5 minutes after switching on in a cold state. The light of the gas discharge lamp should not flicker or change brightness.
  • After connecting a known good lamp to the gas discharge lamp control unit, turn it on for about 30 minutes and make sure that the brightness of the right and left headlights of the car is the same.
This article is available at: russian, bulgarian, belarusian, ukrainian, serbian, croatian, romanian, polish, slovak, hungarian
This text was checked by: Evgeny Mereshnikov
Share with friends on social networks:

Previous
CX-5KE » Equipment and devices
Next

General precautions
Lighting equipment
Front combination headlamps
Front fog lights
Adjusting the front fog lights
Removal and installation the rear combination light from the car body
More articles on repairing other Mazda models
Fb. Circuit diagram for switching on the sound signal and brake light… Mazda Familia 5 (1985-1989)
Control and signal lamps Mazda Capella 3 (1982-1992, petrol)
Headlights with xenon lamps Mazda3 BK (2003-2009)
Headlights with xenon lamps Mazda6 GG (2002-2008)
Precautions when working with an electronic ignition system Mazda 121 (3) (1996-2003)
Link in different formats to this article
Comments and feedback from visitors
No comments yet


How much will 15 + 50 ?


CX-5KE (2012-2017) 
  • General information
  • Introduction to the guide
  • User manual
  • Maintenance
  • Power unit
  • Petrol engines 2.0 l
  • Petrol engines 2.5 l
  • Diesel engines 2.2 l
  • Cooling system
  • Lubrication system
  • Supply system
  • Control system
  • Intake and exhaust system
  • Engine electrical equipment
  • Transmission
  • Clutch
  • Mechanical gearbox
  • Automatic gearbox
  • Transfer case
  • Drive shafts and cardan
  • Chassis
  • Wheels and tires
  • Front suspension
  • Rear suspension
  • Brake system
  • Steering
  • Body
  • Exterior (external elements)
  • Interior (internal elements)
  • Security systems
  • Heating and air conditioning
  • Electrical equipment
  • Equipment and devices
  • Electrical circuits
MazBook.ru © 2018–2026 · Mobile version · Articles and news · Sitemap: EN BG BY UA RS HR RO PL SK HU · Feedback · Site search · Add to bookmarks Familia 5 (BF) · Familia 6 (BG) · Capella 3 (GC) · Capella 3 and 4 (GC) · Capella 4 (GD) · Capella 5 (GE) · Capella 6 (GF) · Mazda3 BK · Mazda6 GG · CX-5KE · Mazda 121 (3) · Mazda BT-50 (1) ·
By continuing to use the site, you agree to the use of cookies 🔐