
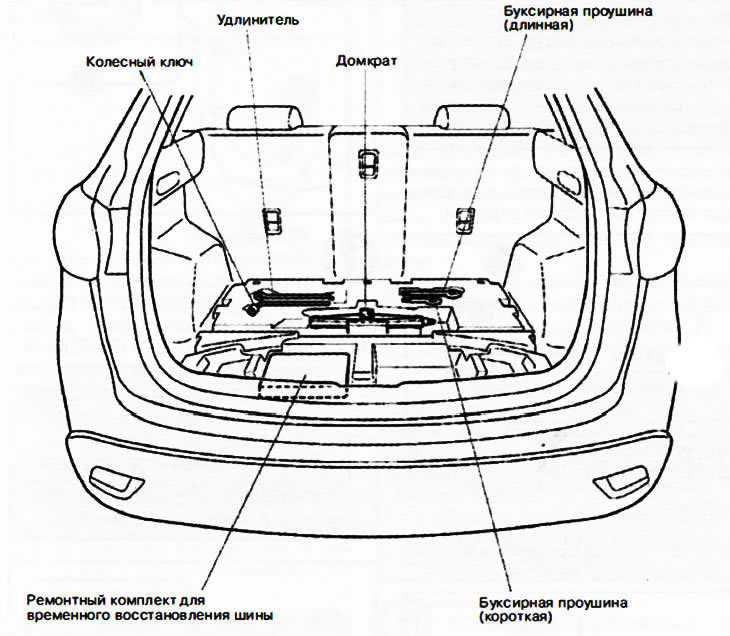
Note: Your vehicle is not equipped with a spare tire. In the event of minor damage to the tire, a repair kit should be used to temporarily restore the tire to serviceability. When using the repair kit, follow the instructions that come with the kit. If you use a repair kit to temporarily restore tire performance, have your Mazda dealer repair or replace the tire as soon as possible.
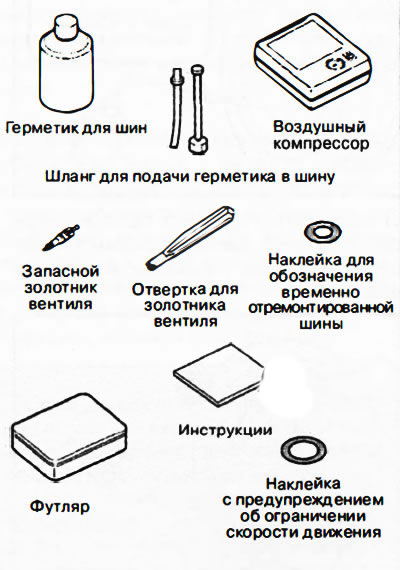
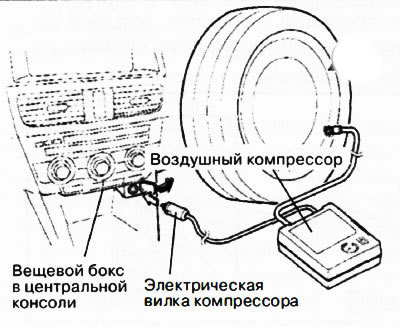
Tire Temporary Repair Kit
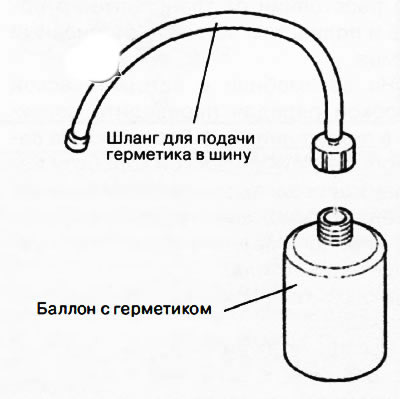
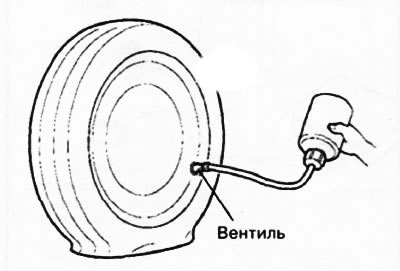
The Temporary Tire Retreading Kit includes the components shown in the illustration.
Attention.
- Do not let children touch the tire sealant bottle.
- Ingestion of sealant into the gastrointestinal tract is dangerous.
- If sealant is accidentally swallowed, drink plenty of water and seek immediate medical attention.
- Do not let children touch the tire sealant bottle.
- Contact with the sealant on the mucous membrane of the eyes or on the skin is dangerous. If the sealant gets into the eyes or on the skin of the body, immediately rinse the eyes or skin with plenty of water and immediately seek medical attention.
Note:
The sealant bottle cannot be reused. Purchase a new can of sealant from an Authorized Mazda Dealer.
The repair kit is not intended for use in the following cases. In such cases, you must contact the service station of an authorized Mazda dealer:
- Tire sealant expired (The expiration date is on the label on the sealant bottle).
- Tire puncture hole diameter exceeds 4mm. The point of damage is not on the tread, but in other parts of the tire.
- Prior to the stop, the vehicle was running on a completely flat or nearly flat tire.
- The tire has come off the wheel rim.
- Wheel rim damaged.
- The tire received two or more punctures.
Using a repair kit to temporarily retread damaged tires
1. Stop the vehicle on level ground, at a safe distance from traffic, and fully apply the parking brake.
2. On a car with an automatic transmission, move the selector to the position «R» («Parking»). On a manual transmission vehicle, move the gear lever to first gear or reverse gear. Then stop the engine.
3. Turn on the hazard warning lights.
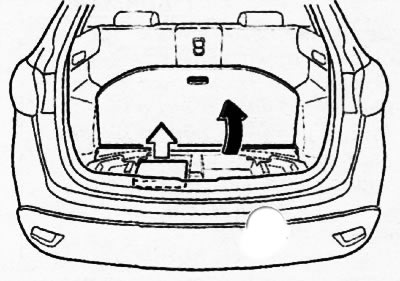
4. Get passengers out of the vehicle, unload the trunk and remove the tire repair kit.
5. Shake the can of tire sealant well several times.
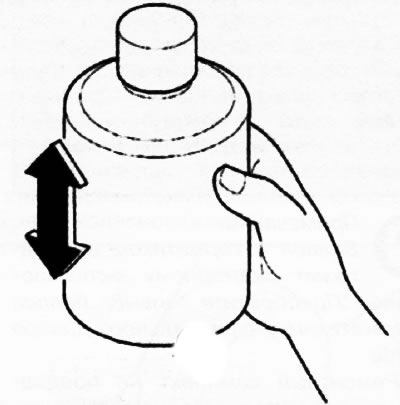
Attention. If you shake the bottle with the hose screwed on, the sealant may leak out through the hose. Sealant that gets on clothes or other things is almost impossible to remove. Shake the bottle several times before screwing on the hose.
Note: Tire sealant can be used at ambient temperatures down to -30°C. Already at temperatures below 0°C, the sealant hardens and its supply from the cylinder to the tire is difficult. Therefore, warm up the sealant bottle inside the car before injecting the sealant into the tire.
6. Remove the bottle cap. Screw the hose onto the neck of the cylinder without opening the inner cap of the cylinder. When screwing on the hose, the inner cover is destroyed at the same time.
7. Remove the valve cap from the damaged tire. Press the spool with the back of a spool screwdriver to completely bleed any remaining air from the tire.
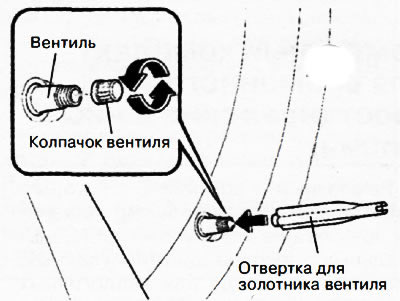
Attention. If excess air pressure remains in the tire, then when the spool is unscrewed, it may fly out of the valve. Therefore, unscrew the spool carefully.
8. Unscrew the spool using the screwdriver provided for this purpose, turning it counterclockwise.
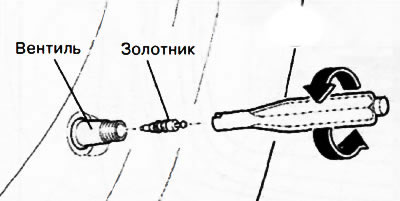
Note: Remove the spool to prevent contamination.
9. Remove the plug from the hose and insert the end of the hose into the valve hole.
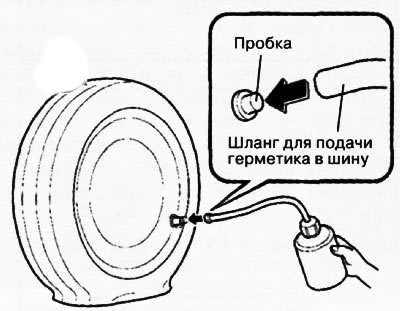
10. Lift and hold the can upside down. Squeeze the can with your hands and squeeze the sealant completely into the tire cavity.
Note: The sealant bottle is not reusable. Purchase a new can of sealant from an Authorized Mazda Dealer.
11. Remove the end of the hose from the valve. Screw the spool into the valve and tighten just enough to ensure a tight seal.
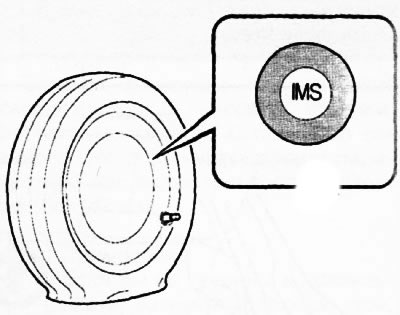
12. Affix a sticker to the outer sidewall of the tire indicating that the tire is temporarily retreaded with sealant.
Note: Do not discard empty used sealant bottle. Return the empty sealant bottle to your authorized Mazda dealer when you call for a tire replacement. An empty sealant bottle will be needed to collect and subsequently dispose of the sealant when it is removed from the tire cavity.
Attention. Observe the speed limit indicated on the sticker.
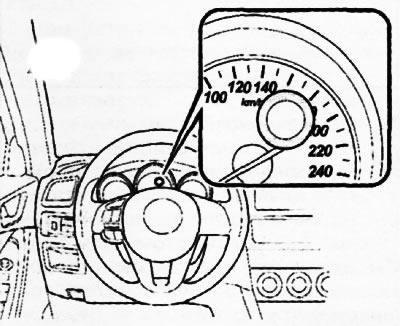
Attention.
- Do not affix a speed limit warning sticker to the instrument cluster: the sticker may obscure warning lights or control devices such as the speedometer from the driver.
- It is dangerous to attach a sticker to the steering wheel hub cover: the sticker may prevent the deployment of the front airbag and cause serious injury to the driver.
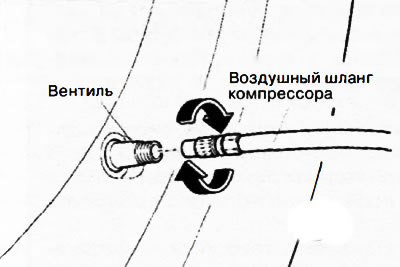
13. Screw the air compressor hose end onto the tire valve.
14. Connect the plug of the air compressor power cord to the auxiliary power socket. Then turn the ignition switch to position «ACC».
Attention.
- Before unplugging the compressor, check that the compressor is switched off.
- The compressor turns on and off with one button.
15. Press the switch button to turn on the compressor and inflate the tire exactly to the nominal pressure.
Attention.
- It is forbidden to inflate the tire with a compressor to a pressure higher than 3.1 kgf / cm2 (3 bar). It is dangerous to increase the pressure developed by the compressor to a value higher than 3.1 kgf / cm2 (3 bar). If the air pressure is increased to a higher value, you may be burned by the hot air escaping from the back of the compressor.
- If the tire inflation rate of the compressor has dropped or the temperature of the compressor housing has increased markedly, this indicates that the compressor is overheating. Stop the compressor immediately and let it cool down for at least 30 minutes.
Note:
- The tire pressure rating is shown on a label affixed to the body pillar in the driver's door opening.
- Do not run the air compressor continuously for more than 10 minutes. Longer operation may result in compressor failure.
- If the air pressure in the tire does not increase when the tire is inflated with the compressor, it may not be possible to repair the damaged tire. If the air pressure in the tire does not reach the nominal value after 10 minutes of compressor operation, then this is a sign of serious tire damage. In such a case, it is useless to try to restore the tire to working capacity with a repair kit - it will not help. Go to an Authorized Mazda Dealer or your nearest tire repair shop to have your tire replaced or repaired.
- If the air pressure in the tire is higher than normal, then unscrew the valve cap on the compressor and relieve the pressure.
16. After the tire is inflated to nominal pressure, turn off the air compressor and disconnect the compressor hose from the tire valve.
17. Screw the cap onto the tire valve.
18. Stow the tire repair kit in the luggage compartment and continue driving.
Attention.
- Drive carefully at a speed of no more than 80 km/h to the nearest tire repair shop or to the nearest service station of an authorized Mazda dealer.
- When the vehicle speed is above 80 km/h, the vehicle may vibrate.
Note:
- Vehicles equipped with a tire pressure monitoring system.
- If the pressure in the temporarily repaired tire is below the nominal value, the tire pressure drop indicator will turn on.
19. After driving for 10 minutes or after driving for 5 km, stop and check the tire pressure using the pressure gauge built into the air compressor. If the air pressure in the tire has fallen below the nominal value, re-inflate the tire to the required pressure (see operations starting from point 15).
Attention.
- If the tire pressure drops to 1.3 kgf/cm2 (1.3 bar) or lower, the damaged tire cannot be temporarily repaired with a repair kit. Park the vehicle on level ground in a safe place and contact technical assistance.
- If the tire pressure remains low after steps 14 to 20, park the vehicle on a level surface in a safe place and contact an Authorized Mazda Dealer for assistance.
Note: When checking the tire pressure with the compressor pressure gauge, be sure to turn off the compressor.
20. If the air pressure has not decreased, then the temporary tire repair is completed. Drive carefully to the nearest authorized Mazda dealer or tire repair shop for a tire change. After changing a tire, remove the speed limit sticker.
Attention.
- A tire that has been temporarily repaired with the sealing compound included in the repair kit must not be used on the vehicle again. A temporarily repaired tire must be replaced with a new one.
- A temporarily repaired tire may only continue to be used if the sealing compound is carefully removed from the tire and the condition of the tire is checked for significant damage. However, the tire valve must be replaced without fail.
Checking the tire temporary retread kit
Regularly check the condition of the repair kit:
- Check the expiration date of the sealant bottle.
- Check the air compressor for proper operation and operation.
Note: The sealant bottle has a limited shelf life. Check the expiration date on the label of the sealant bottle and if the expiration date has expired, replace the bottle with a new one. It is recommended to contact an authorized Mazda dealer service station and replace the old cylinder with a new one without waiting for the expiration date.