
Note:
The following signs may indicate damage to the wheel:
- increase in resistance to rotation of the steering wheel;
- increased vibration of the car;
- pulling the car to the side.
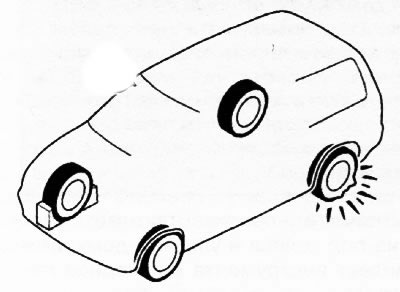
If the wheel is damaged, then to replace it, turn to the edge of the carriageway and, observing precautionary measures, slowly move to the nearest horizontal platform, which is at a sufficiently safe distance from the carriageway. It is dangerous to park your vehicle on a roadway or on the edge of a busy road.
Attention.
- Strictly follow all instructions for changing a wheel.
- Violation of the instructions for replacing a defective wheel is dangerous! The vehicle could fall off the jack and seriously injure bystanders. If the vehicle is jacked up, do not stand under the vehicle or place any part of your body under it. The same applies to passengers and other persons.
- It is forbidden to leave passengers in the passenger compartment if the car will be raised with a jack. Passengers can cause the vehicle to fall off the jack and cause serious injury to bystanders.
Note: Before using the jack, make sure its screw is well lubricated.
1. Stop the vehicle on level ground, at a safe distance from traffic, and fully apply the parking brake.
2. On a car with an automatic transmission, move the selector to the position «R» («Parking»). On a manual transmission vehicle, move the gear lever to first gear or reverse gear. Then stop the engine.
3. Turn on the hazard warning lights.
4. Check that none of the passengers are left in the car, make sure that all passengers are at a safe distance from the carriageway and the car.
5. Get out a jack, the tool and a spare wheel.
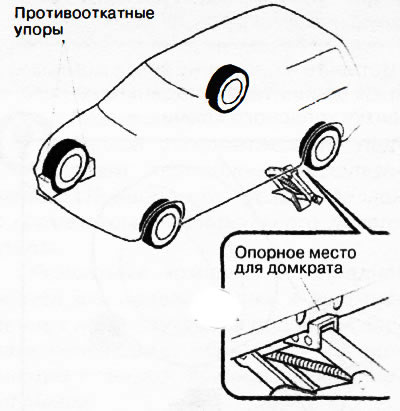
6. Place chocks under the wheel that is located diagonally from the damaged one. Wheel chocks should be installed in front and behind the wheel.
Note. Stones or blocks of wood of suitable size and shape can be used as wheel chocks if they can immobilize the vehicle.
Dismantling a defective wheel
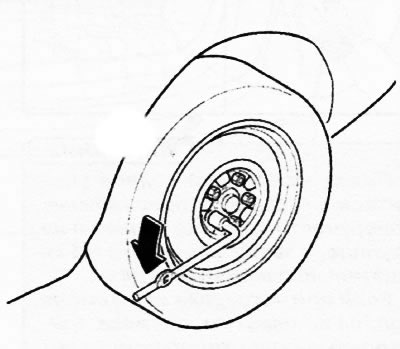
1. Vehicles with steel rims: If the wheel has a wheel cap, remove it using the flat end of the jack handle extension.
Note: Insert the pointed, flat end of the extension between the wheel rim and the edge of the trim cap and pry up on the cap to remove it.
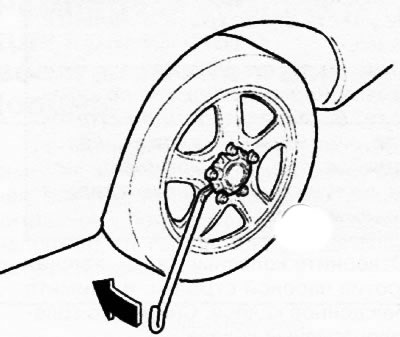
2. Loosen the wheel nuts one turn (counterclock-wise). Do not remove the nuts completely until the wheel is fully suspended.
3. Place the jack on a support surface.
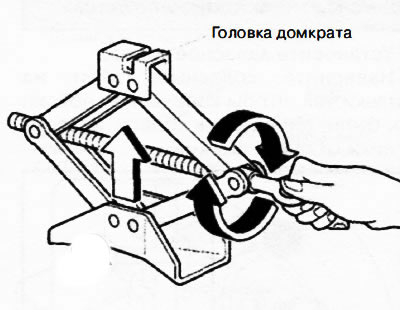
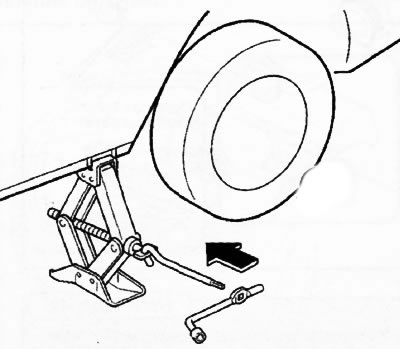
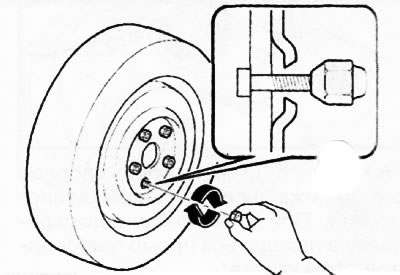
4. Turning the jack screw in the direction shown in the figure, raise the jack head to a height slightly less than the height of the vehicle body support points.
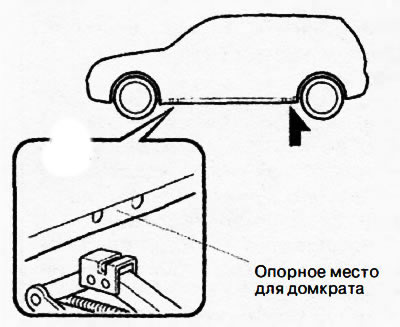
5. Place a jack under the support closest to the damaged wheel. In this case, the head of the jack must be directly under the supporting place of the body.
6. Slowly raise the head of the jack by turning the screw with your hands until the head rests against the supporting place of the body.
Attention.
- Install the jack only in the specially provided support places in front and behind on the body, shown in the figures. It is dangerous to lift the car if the jack is installed in other places not intended for lifting the car. The vehicle could fall off the jack and seriously injure or even kill a bystander. Only place the jack in the support points on the front and rear of the body that are specially designed for jacking up the vehicle (see pictures).
- It is forbidden to lift the car by resting the jack in places not intended for lifting the car, it is also forbidden to place any foreign objects under the jack itself or under its head.
- Lifting the car with the jack resting in places not intended for lifting the car, as well as placing any foreign objects under the jack itself or under its head is dangerous, as this may lead to deformation of the body, or the car may come off the jack, and people nearby may be seriously injured by a jack or a falling vehicle.
- Only use the jack supplied with your vehicle.
- It is dangerous to use a jack that is not designed for your Mazda vehicle. The vehicle could fall off the jack and seriously injure bystanders.
- Do not place any foreign objects under the jack.
- It is dangerous to lift the vehicle if the jack is supported by any supports. The jack may become unstable and nearby people may be seriously injured by the jack or a falling vehicle.
7. Insert the extension hook into the eye of the jack screw and put the wheel wrench handle on it.
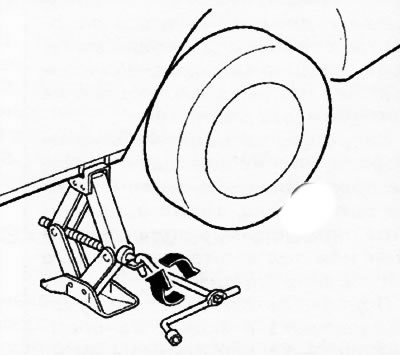
8. Turn the crank clockwise to raise the vehicle just enough to fit the spare wheel. Before loosening the wheel nuts, make sure that the vehicle is in a stable position and cannot fall off the jack or move unintentionally.
Attention.
- Do not raise the vehicle any further than required to change a wheel. Raising the vehicle more than is required to change a wheel is dangerous as the vehicle could become unbalanced and come off the jack.
- Do not start the engine or shake the vehicle while it is on the jack. Starting the engine or rocking the vehicle while it is on the jack is dangerous as the vehicle may fall off the jack and cause injury.
- It is forbidden to stay under the car raised on a jack. If the vehicle falls off the jack, the person under the vehicle could be seriously injured or killed.
9. Loosen the wheel nuts by turning them counterclockwise and remove the damaged wheel. Remove the decorative cap from the wheel.
Spare wheel installation
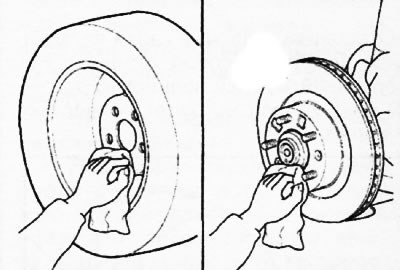
1. Clean the mating surfaces on the wheel rim and hub, as well as the wheel studs, from dirt with a rag.
Attention.
- Before installing the wheel, make sure that the mating surfaces on the wheel rim and on the hub, as well as the studs and nuts, are thoroughly cleaned of dirt.
- If, when installing or replacing a wheel, the mating surfaces of the wheel disc and hub, as well as the studs, are not cleaned of dirt, then this can lead to a dangerous accident during further operation of the vehicle. Loose wheel nuts can cause a wheel to come off the hub while the vehicle is moving, resulting in an accident.
2. Install the spare wheel.
3. Thread the wheel nuts onto the studs with the tapered collars of the nuts facing the wheel. Tighten the nuts by hand.
Attention. Do not apply oil or grease to the studs and wheel nuts. Do not tighten the wheel nuts to a torque greater than the rated torque. Applying oil or grease to studs or wheel nuts is hazardous. Loose wheel nuts can cause a wheel to come off the hub while the vehicle is moving, resulting in an accident. Also, wheel nuts and studs can be damaged by overtightening.
4. Turn the jack screw counterclockwise with the wheel wrench to lower the vehicle. Using a wheel wrench, tighten the nuts in a criss-cross pattern to 108-147 Nm.
Note: If you are unsure whether the wheel nuts are properly tightened, have the tire changer or authorized Mazda dealer check the wheel nut torque as soon as possible.
Attention.
- Always tighten wheel nuts to the correct torque.
- Incorrectly or loosely tightened wheel nuts can cause dangerous consequences. The wheel may wobble or come off the hub. This could result in loss of vehicle control and a serious accident.
- When installing the wheel, use the same nuts with which the wheel was secured. If necessary, replace the nuts with equivalent nuts with metric threads.
- Your vehicle uses metric wheel studs and nuts. Therefore, it is dangerous to fasten the wheels with nuts with a different type of thread. This will lead to unreliable wheel mounting and damage to the threads on the studs. As a result, the wheel may come off the hub, resulting in an accident.
5. Remove the wheel chocks from under the wheel and place the jack and tool kit in the stowed position.
6. Stow the damaged wheel in the luggage compartment.
7. Check tire pressure.
8. Repair the damaged wheel as soon as possible or replace the damaged tire with a new one.
Attention. It is forbidden to operate the car if at least one tire does not have the correct air pressure. Incorrect tire pressure poses a safety hazard. If the air pressure in the tires does not correspond to the nominal, this will adversely affect the vehicle's handling and may lead to an accident. When checking the air pressure in the tires, be sure to check the air pressure in the spare tire.
Note: To prevent the jack and tools from rattling when the vehicle is moving, secure them properly in the stowed position.