
MazBook.ru
English Русский
Български
Беларускі
Український
Српски
Hrvatski
Română
Polski
Slovenský
Magyar
• Bookmark • Sitemap • Contacts •   
Cars Opel Cars Ford Cars Volkswagen Cars Audi Cars Kia Cars Renault Cars Peugeot


Familia Capella Mazda3 Mazda6 CX-? Others Articles
Familia 5 (1985-1989) Familia 6 (1989-1994)

Checking and adjusting the ignition timing (Mazda Familia BG)

  • Home
  • Mazda Familia
  • Familia BG (1989-1994)
  • Power unit
  • Ignition system
  • Checking and adjusting the ignition timing
0
Usually, the ignition timing does not shift due to mechanical wear. However, for safety reasons, MAZDA requires regular checking of the ignition timing as part of maintenance. The ignition timing must also be adjusted if the distributor has been removed. A tachometer and stroboscope are required to check and adjust the ignition timing.

1. Warm up the engine to operating temperature and turn it off.

2. Connect the tachometer and stroboscope according to the manufacturer's instructions.
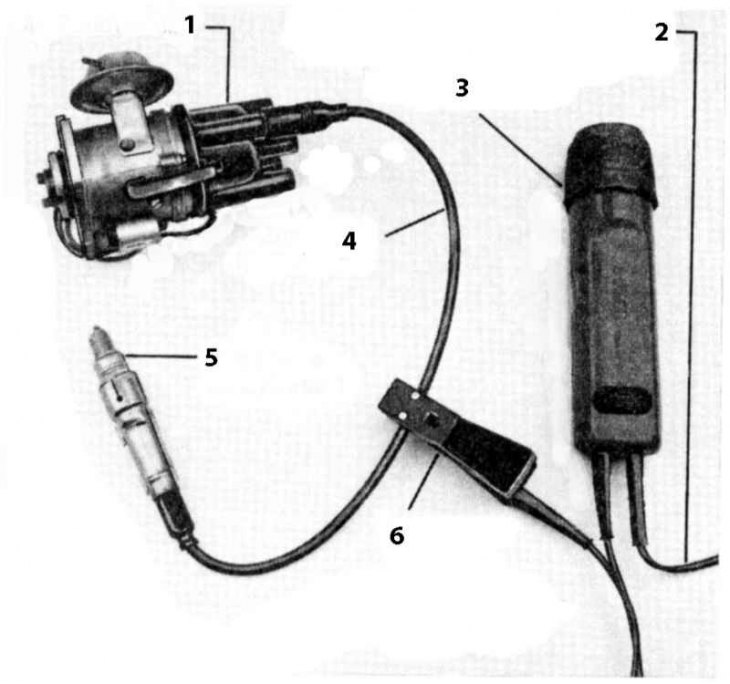
1 - ignition distributor; 2 - connection to the battery strobe; 3 - stroboscope; 4 - ignition cable…

1 - ignition distributor; 2 - connection to the battery strobe; 3 - stroboscope; 4 - ignition cable cylinder 1; 5 - spark plug cylinder 1; 6 - stroboscope capacitive terminal

1 - ignition distributor; 2 - connection to the battery strobe; 3 - stroboscope; 4 - ignition cable…


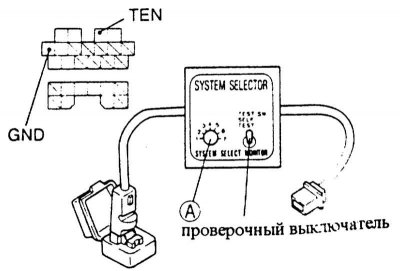
3. On some models, the MAZDA system switch must be connected to the diagnostic plug located on the left shock absorber casing (SST 49B0199A0). Set switch A to position 1, test switch to SELF TEST.


3. On some models, the MAZDA system switch must be connected to the diagnostic plug located on the…


4. If this device is not available, the GND and TEN contacts should be short-circuited with a piece of wire. Which models does this requirement apply to?.

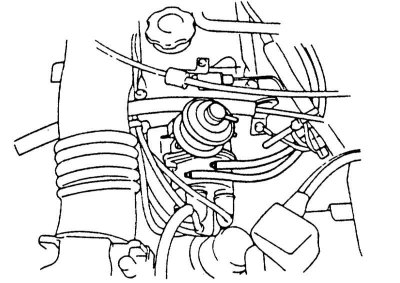
5. If equipped, disconnect the vacuum hose from the vacuum unit at the distributor and plug with a suitable clean bolt. On a dual vacuum unit, it may be necessary to disconnect only one of the two hoses.

6. Start the engine and let it idle. The required number of revolutions during the check.

7. Turn off all electricity consumers (radio, heated rear window, etc.) and air conditioning.
7. Turn off all electricity consumers (radio, heated rear window, etc.) and air conditioning.


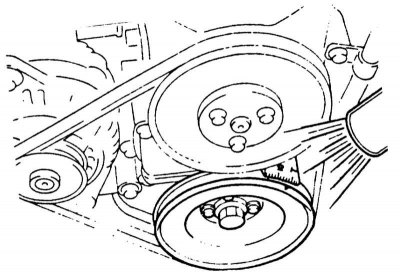
8. Use a stroboscope to illuminate the mark on the crankshaft belt pulley.

9. The ignition timing is adjusted correctly if the yellow mark on the belt pulley is stationary opposite the corresponding ignition timing value on the toothed belt cover. The ignition timing values are in the table.


9. The ignition timing is adjusted correctly if the yellow mark on the belt pulley is stationary…


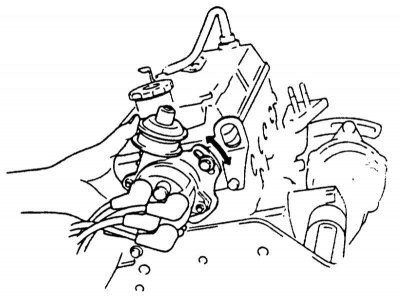
10. If the ignition timing is not as required, loosen the clamp bolt on the distributor and adjust the ignition timing by turning the distributor.

11. Tighten the clamp bolt on the distributor with force 25 Nm.

12. Remove the bolt from the vacuum hose and place the hose on the distributor vacuum device.

13. Disconnect the system switch or jumper from the diagnostic plug.

14. Turn off the test devices when the ignition is off.

15. In the workshop, you can also check the centrifugal and vacuum displacement of the distributor at different speeds. This is only required if the ignition system is faulty.

16. Check idle speed, adjust if necessary, see Chapter Power supply system, carburetor, fuel injection system.

Required values


EngineIgnition timingNumber of revolutions during adjustment
E1, E3, E54±1° before TDC850±50 rpm⁻¹
B3 carburetor2±1° before TDC850±50 rpm⁻¹
B3 injection0±1°3850±50 rpm⁻¹
B56 ±1° before TDC850±50 rpm⁻¹
B6 (SOHC) carburetor6±1° before TDC850±50 rpm⁻¹
B6 (SOHC) injection7±1° before TDC41025±25 rpm⁻¹
B6 (DOHC)12±1° before TDC900±50 rpm⁻¹
BP (SOHC)5±1° before TDC4— 2
BP (DOHC)10 ±1° before TDC4— 2


1 - Automatic transmission: idle speed + 100 rpm.
2 - Idle speed is adjusted automatically.
3 - Disconnect the hose from the lower vacuum device only.
4 - Connect the MAZDA system plug (SST 49B0199A0).
This article is available at: russian, bulgarian, belarusian, ukrainian, serbian, croatian, romanian, polish, slovak, hungarian
This text was checked by: Evdokia Filimonova
Share with friends on social networks:

Previous
Familia 6 » Ignition system
Next

Checking the ignition cable
Checking the ignition coil
Safety precautions when working with an electronic ignition system
Description of the ignition system
Removal and installation the ignition distributor
Spark plugs
Spark plugs for Mazda 323
More articles on repairing other Mazda models
Checking and adjusting the ignition timing Mazda Capella 3 (1982-1992, petrol)
Checking the ignition timing setting Mazda3 BK (2003-2009)
Checking the ignition timing setting Mazda6 GG (2002-2008)
Checking the ignition timing Mazda CX-5KE (2012-2017)
Checking and adjusting valve clearance Mazda 121 (3) (1996-2003)
Link in different formats to this article
Comments and feedback from visitors
No comments yet


How much will 36 + 31 ?


Familia 6 (1989-1994) 
  • General information
  • Introduction to guide
  • User manual
  • Maintenance
  • Power unit
  • Petrol engines
  • Diesel engines
  • Lubrication system
  • Cooling system
  • Ignition system
  • Supply system
  • Carburetor
  • Injection system
  • Exhaust system
  • Transmission
  • Clutch
  • Car gearbox
  • Chassis
  • Front suspension
  • Rear suspension
  • Steering
  • Brake system
  • Wheels and tires
  • Body
  • Body elements
  • Doors and windows
  • Body Care
  • Electrical equipment
  • Equipment and devices
  • Power devices
  • Heating system
  • Lighting and headlights
  • Windshield wipers and washers
  • Wiring diagrams (since 1987)
  • Wiring diagrams (since 1991)
Familia 5 (1985-1989) 
  • General information
  • Vehicle data
  • Model «E» engine
  • Engine repair
  • Cooling and lubrication system
  • Power and ignition system
  • Model «B» engine
  • Engine repair
  • Cooling and lubrication system
  • Ignition system
  • Power system (carburetor)
  • Power system (injector)
  • Transmission
  • Clutch
  • Mechanical gearbox
  • Automatic gearbox
  • Front wheel drive
  • Chassis
  • Steering
  • Front suspension
  • Rear suspension
  • Brake system
  • Electrical equipment
  • Equipment and devices
  • Electrical circuits
  • Wiring diagrams (station wagon)
MazBook.ru © 2018–2026 · Mobile version · Articles and news · Sitemap: EN BG BY UA RS HR RO PL SK HU · Feedback · Site search · Add to bookmarks Familia 5 (BF) · Familia 6 (BG) · Capella 3 (GC) · Capella 3 and 4 (GC) · Capella 4 (GD) · Capella 5 (GE) · Capella 6 (GF) · Mazda3 BK · Mazda6 GG · CX-5KE · Mazda 121 (3) · Mazda BT-50 (1) ·
By continuing to use the site, you agree to the use of cookies 🔐