


General information
1. The heater and air conditioner operate only when the ignition is on. The heater operation is directly related to the engine coolant temperature, so operate the heater when the engine is sufficiently warm. The amount of air passing through the heater/air conditioner can be adjusted by changing the fan speed.
2. On cars with air conditioning, after the cooling starts, the air coming out of the deflectors may look like fog for the first few minutes. This happens due to the sudden cooling of humid air and is not a sign of a malfunction.
3. Too much cooling is harmful to health. The air temperature in the cabin should be only 5 - 6°C lower than the outside air temperature.
4. When using the air conditioner, make sure that the outside air intake opening in front of the windshield is not blocked (for example, leaves).
5. The air conditioner should be turned on for at least 5 minutes every month, even in cold weather. This is necessary to lubricate the internal parts of the compressor and keep the air conditioner in working order.
6. When the air conditioner is turned on, the engine idle speed increases. Be careful when starting the car.
7. The air conditioning system has a built-in cabin filter to clean the air from dust and dirt.
Note: The procedure for replacing the cabin filter is given in the chapter "Maintenance and general check and adjustment procedures".
Heater and air conditioner control
The operation of the heater and air conditioner is controlled from the control panel (see the figure "Heater and air conditioner control panel").
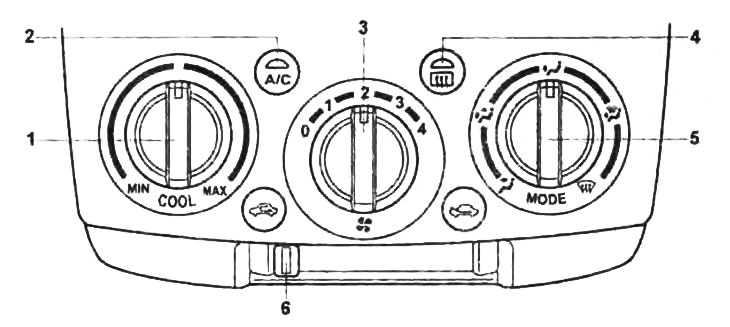
Heating and air conditioning control panel.
1 - temperature controller,
2 - air conditioner switch "A/C",
3 - heater fan speed switch,
4 - rear window heater switch,
5 - switch for changing the direction of air flows,
6 - air intake mode switch.
1. Turning on the heater and air conditioner. To turn on the heater, move the heater fan speed switch (3) from position "0" to any other.
To turn on the air conditioner, press the air conditioner switch "A/C" (2). The indicator on the switch will light when the switch (3) is moved from the "O" position to any other.
To turn off the heater/air conditioner, move the switch (3) to the "0" position or to turn off the air conditioner, press the "A/C" switch (2).
Note: The air conditioner does not operate when the outside temperature is 0°C or below.
2. The air flow direction change switch (5) is designed to change the air flow direction.
Move the switch to the required position.
 - In this position, the air flow is directed towards the head area.
 - In this position, the air flow is directed to the head and floor area simultaneously. In extreme positions of the temperature regulator, a warmer air flow is directed to the floor.
 - In this position, the main air flow is directed to the floor (a small flow of air is directed to the windshield and to the front door windows).
 - In this position, the main air flow is directed to the windshield and floor, with a small flow directed to the front door windows.
 - In this position, the air flow is directed to the windshield and front door windows (used in case of fogging of the windshield).
3. Air flow control. Control is performed by rotating the fan speed switch (3).
4. Changing the air intake mode. Switching the air intake adjustment (ventilation/recirculation) allows air to be drawn in either from outside the vehicle or from the passenger compartment. To change the air intake mode, move the switch (6) to the left, which will turn on the recirculation mode and the corresponding indicator on the air conditioner control panel will light up, or to the right, which will turn on the ventilation mode and the ventilation mode indicator on the air conditioner control panel will light up.
Use the air recirculation mode when the air outside is polluted, i.e. in tunnels and traffic jams, or if you want to quickly cool/heat the air inside the car.
Note: If the recirculation mode is used for a long period of time, the windows may fog up.
5. Change in air temperature.
The temperature regulator (1) is used to set the required air temperature in the vehicle interior.
6. Rear window heating.
If the rear window fogs up, press the switch (4) of the glass heater. The key in the ignition switch must be set to the "ON" position. When the heater is turned on, the indicator on the switch lights up.
The rear window heater is switched off by pressing the switch again.
Caution: When cleaning the rear window from the inside, be careful not to damage the heater wires.