


Contents: Removal ⇓ Installation ⇓
Removal
1. Mark the position of the wheel disc relative to the hub so that the balanced wheel can be installed in its original position.
2. Loosen the wheel nuts of the vehicle while it is parked on the ground.
3. Raise the front of the vehicle.
4. Remove the wheel.
Important! It is not allowed to swap the brake pads of the right and left wheels. Swapping them may result in uneven braking action. It is necessary to replace all the brake pads of one axle at the same time, even if only one pad has reached the wear limit. If the pads are to be installed again, they must be marked before removal.
5. Vehicles from 10/89, except station wagon models: Lightly tighten the 2 wheel nuts to lock the brake disc.
6. Pull the brake caliper outward with your hand and this will press the piston.
Cars up to 9/89 and "station wagon"
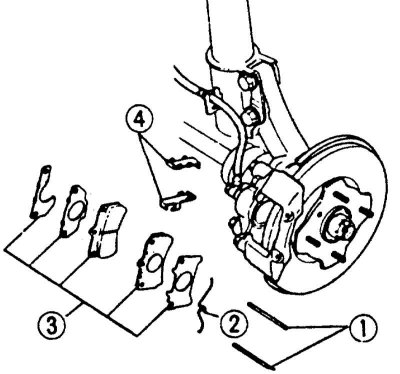
1. Remove individual elements in numerical order. First, knock out the fastening pins "1" with a hammer and punch. A nail can be used instead of a punch.
Cars from 10/89 issue, except for the "station wagon" model
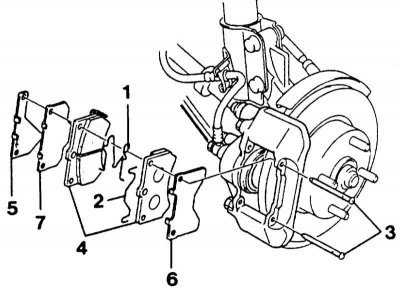
1. Remove individual elements in numerical order. First, remove the fastening springs "1" and "2" with a screwdriver, taking into account the installation position. Then knock out the fastening pins "3" with a hammer and punch or nail.
Caution! Replace loose mounting pins.
2. Remove the brake pads and intermediate pads (anti-squeak) plates using pliers, a screwdriver or an impact puller. If the pads are rusted, a special puller is required (for example, HAZET).
Installation
Caution! When the brake pads are removed, do not press the brake pedal, otherwise the piston will be pushed out of the housing.
1. Clean the guide surfaces and the pad seating areas in the housing shaft with a suitable soft metal brush or wipe with a cloth with alcohol. Do not use solvents containing mineral oils or tools with sharp edges.
The original article is on: MazBook
2. Before installing the pads, check the brake disc for grooves by feeling it with your fingers. Brake discs with grooves should be replaced.
3. Measure the thickness of the brake disc.
4. Check the dust cover and protective cuffs in the caliper for cracks. A damaged cap must be replaced, as penetrating dirt will quickly lead to a leak in the caliper. To do this, the brake caliper must be removed and disassembled (is done in the workshop).
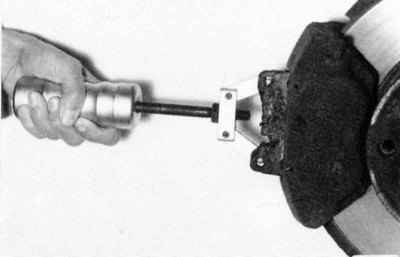
5. Press the brake piston with a special device. This can also be done with a strong wooden rod (with a hammer handle), while being especially careful that it does not become warped and that the piston surfaces and dust boot are not damaged.
Attention! When the piston is pushed in, the brake fluid is forced out of the brake cylinder into the expansion tank. Monitor the fluid level in the tank, and pump out some of the fluid with a suction device. To pump out the brake fluid, use a suction device or a plastic bottle that is intended only for brake fluid. Do not use drinking glass.
Warning! Brake fluid is poisonous and should never be sucked out by mouth through a hose. After replacing the pads, the "MAX" mark on the expansion tank should not be exceeded, as the fluid expands when heated. Leaking fluid flows down onto the brake cylinder, destroys the varnish and causes corrosion.
Attention! If the brake pads are heavily worn, check the ease of piston movement.
6. To do this, insert a wooden rod into the caliper and ask an assistant to slowly press the brake pedal. The brake piston should easily move out and back in. To check, the other caliper must be removed. Make sure that the piston does not move out completely. If the piston moves hard, repair the caliper (is done in the workshop). If the piston accidentally pops out, the brake system must be bled after installing the piston, see Section Bleeding the brake system.
7. The following step is optional: To prevent disc brakes from squeaking, coat the back and sides of the brake pad base with anti-squeak paste (for example Plastilube, Tunap VC 582/S, Chevron SR/2, Liqui Moly LM-36 or LM-508-ASC). In this case, apply lubricant only to the reverse side.
Caution! The paste must not under any circumstances come into contact with the brake pad or brake disc.
8. If necessary, wipe off the paste immediately and clean the area with alcohol.
9. Insert both brake pads with anti-squeal plates into the brake caliper.
10. Check the springs and pins of the brake shoe fastenings, replace them in case of severe corrosion and deformation. Insert individual elements in the reverse order, see illustration. Carefully hammer in the fastening pins until they stop.
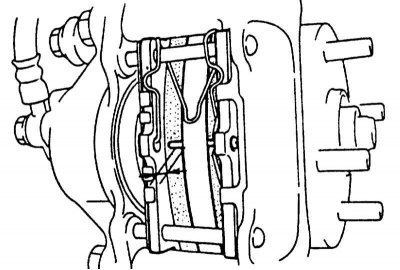
11. Support for models from 10/89 (except for the "station wagon"). Check the installation position of the mounting springs. The outer spring is located in the holes of the mounting pins.
12. If they were screwed on, unscrew the wheel nuts. Screw the wheel on, taking into account the mark on the hub. Lower the car and tighten the wheel nuts crosswise with force 100 Nm.
Caution: Press the brake pedal several times until you feel a noticeable resistance.
13. Check the brake fluid in the expansion tank and top up to the Max mark if necessary.
14. Carefully break in the new pads by reducing the vehicle speed from 80 to 40 km/h several times by lightly pressing the brake pedal. Take breaks in between to cool the brakes.
Attention! During the first 200 km, do not apply full braking.