
Removing
1. Mark the position of the rear wheel disc relative to the hub so that the balanced wheel can be returned to its original position.
2. Loosen the wheel nuts of the car on the ground.
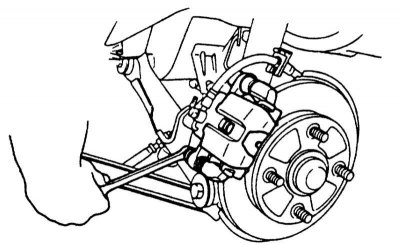
3. Remove the wheel.
Attention! Swapping the pads of the right and left wheels is unacceptable. Swapping can lead to uneven braking action. It is obligatory to replace all pads of one axle at the same time, even if only one pad has reached the wear limit. If the pads are to be installed again, they should be marked before being removed.
4. Vehicles since 10/89, except models "station wagon": Slightly screw on the 2 wheel nuts to lock the brake disc.
5. Release the handbrake.
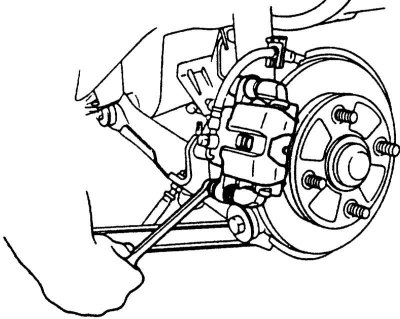
6. Cars up to 9/89, issue. and models "station wagon": Unscrew the lower guide pin of the caliper housing. On vehicles from 10/89: Unscrew the upper guide pin, additionally release the brake hose from the guide on the suspension strut.
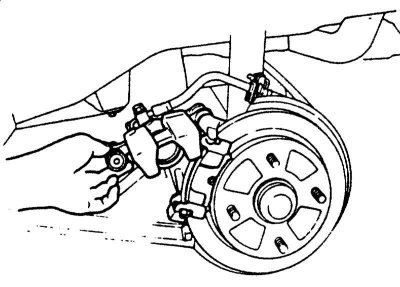
7. Tilt the piston housing up and hang it on a wire to the body so that the brake hose is not loaded.
Attention! Do not remove the brake hose, otherwise the system will need to be bled.
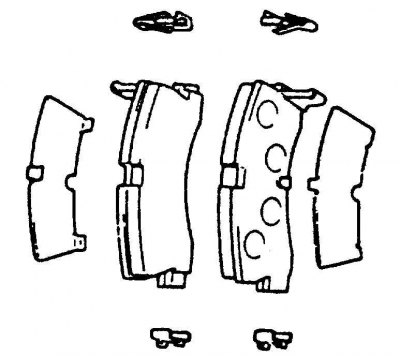
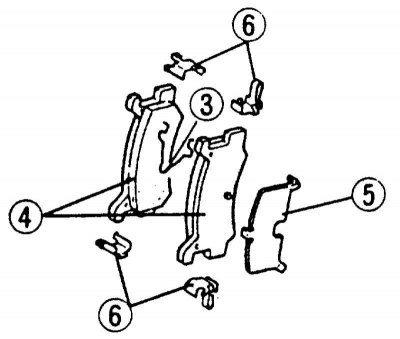
8. Cars up to 9/89, issue. and models "station wagon": remove the brake pads with 2 upper and lower springs and 2 anti-squeal plates.

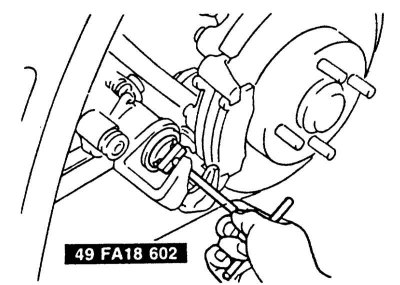
9. Vehicles since 10/89, except models "station wagon": Remove the spring -3- from the holes in the brake pads with a screwdriver. Then remove blocks -4- together with springs -6- and anti-squeak plate -5-.
Installation
Attention! When the brake pads are removed, do not press the brake pedal, otherwise the piston will be squeezed out of the housing. If the piston is accidentally pushed out, have it inserted by a MAZDA workshop.
1. Clean the guide surfaces and pad seatings in the housing shaft with a suitable soft metal brush or wipe with a rag and alcohol. Do not use solvents containing mineral oils or sharp-edged tools.
2. Before installing the pads, check the brake disc for grooves by feeling it with your fingers. Grooved brake discs must be replaced.
3. Measure the brake disc thickness.
4. Check the anther and protective cuffs in the caliper for cracks. A damaged cap must be replaced, as penetrating dirt will quickly lead to leaks in the caliper. To do this, the brake caliper must be removed and disassembled (performed in the workshop).
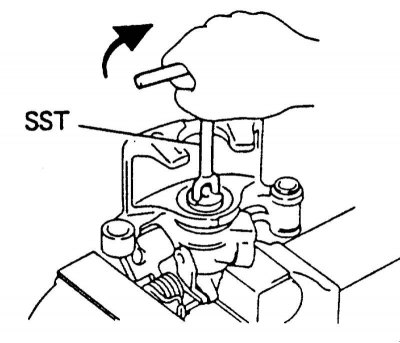
5. Slowly screw the piston to the right, clockwise, using a special tool, until it stops. Then turn the piston so that the grooves are straight.
Attention! The brake piston must be screwed in. If it is simply pushed in, the hand brake adjustment in the caliper will automatically be destroyed.
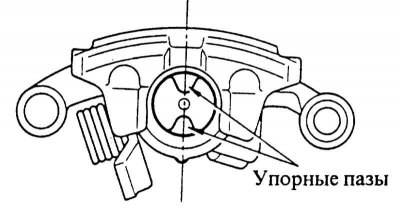
6. A special screw-in tool fits into the stop slots so that the piston can be turned. If there is no special device, you can make something similar on your own or contact the workshop.
Attention! When the piston is screwed in, the brake fluid is forced out of the brake cylinder into the expansion tank. Observe the level of liquid in the tank, it is possible to pump out part of the liquid by suction. To pump out the brake fluid, use a suction pump or a plastic bottle that is intended only for brake fluid. Do not use drinking utensils.
Attention! Brake fluid is poisonous and must never be sucked out by mouth through a hose. After replacing the pads, the mark must not be exceeded "MAX" on the expansion tank, as the liquid expands when heated. The escaping fluid flows down onto the brake cylinder, destroys the paintwork and causes corrosion.
7. The following step is optional: To prevent disc brake squealing, coat the back and sides of the brake shoe base with anti-squeak paste (e.g. Plastilube, Tunap VC 582/S, Chevron SRJ/2, Liqui Moly LM-36 or LM-508-ASC). In this case, apply lubricant only on the reverse side.
Attention! The paste must never get on the brake lining or on the brake disc.
8. If necessary, immediately wipe off the paste and clean the place with alcohol.
9. Install on the brake pads new springs, see illustrations in paragraph Removal.
10. Insert both brake pads with anti-squeal plates and tilt the piston housing down. In this case, the bulge on the inner brake shoe will enter the thrust groove of the piston. When folding down, make sure that the cuff is not damaged.
11. Vehicles since 10/89, except models "station wagon": Insert spring -3- into holes in brake shoes.
12. Screw the lower one, on cars from 10/89, issue. upper guide pin on the caliper holder with force 20 Nm. Attach the brake hose to the mount on the suspension strut.
13. If fitted, unscrew the wheel nuts. Screw the wheel, taking into account the mark on the hub. Lower the vehicle and tighten the nuts crosswise with force 100 Nm.
Attention! Depress the brake pedal several times until a noticeable resistance is felt. This sets the parking brake adjuster.
14. Check the brake fluid in the compensation tank, top up if necessary to the maximum mark.
15. Adjust the handbrake, see Section Handbrake adjustment.
16. Carefully run in new pads, to do this, reduce the vehicle speed several times from 80 to 40 km / h by slightly pressing the brake pedal. Take breaks in between to cool the brakes.
Attention! For the first 200 km, full braking should not be performed.