


Note: If only the brake disc is to be removed, do not unscrew the brake line from the caliper. In this case, hang the caliper on the body using a wire so that the hose is not stretched or twisted.
Removal
Caution: Release any pressure that may be present in the brake system by pressing the brake pedal at least 20 times.
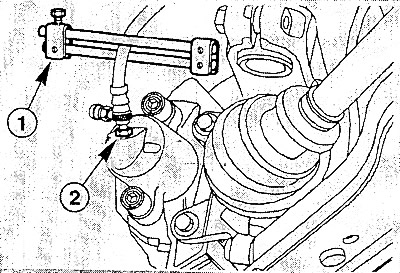
Mark the position of the front wheels relative to the hubs so that you can then reinstall the wheels in their original positions. Loosen the wheel nuts with the vehicle on the ground. Raise and support the vehicle from the front and remove the front wheels.
If necessary, disconnect the brake hose from the steering knuckle.
Clamp the brake hose using a suitable clamp.
If the brake caliper is to be completely removed: loosen the connecting bolt (2) of the brake hose on the caliper without unscrewing it.
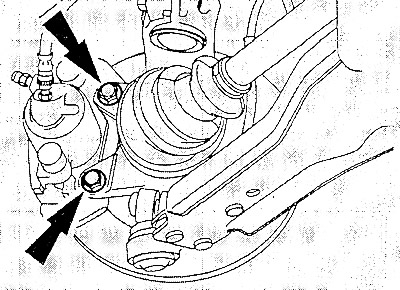
Unscrew the bolts securing the caliper with the bracket from the steering knuckle.
Remove the caliper from the brake disc.
If only the brake disc is being removed: hang the caliper on a wire hook on the body so that the brake hose is not twisted or stretched.
Caution: Do not unscrew the brake hose, as after installation you will have to remove air from the brake system.
If the caliper is removed completely: turn the caliper several times, unscrewing it from the brake hose. If necessary, hold the brake hose by the Allen key with an open-end wrench.
Precautions: When opening the brake circuit, some brake fluid will leak out. It should be collected in a container. You can also suck the brake fluid out of the reservoir.
Pull the mounting bracket off the threaded studs and remove the brake disc.
Caution: The brake disc must not be separated from the wheel hub by hammer blows. Instead, use a suitable rust dissolving compound to avoid damaging the brake disc. If removal is only possible by hammer blows, the brake discs and wheel bearings must be replaced for safety reasons. Wheel bearings must be replaced in a workshop, as a special press is usually required for this. Brake discs should also be replaced after using pullers.
Installation
To achieve uniform braking on both sides of the vehicle, both brake discs must be of the same thickness and wear pattern. Therefore, it is essential to replace both brake discs.
The workshop can check the discs for runout and uniform thickness. Technical data is given in the table.
Measure the thickness of the brake disc.
If present, remove rust from the brake disc flange and hub.
Clean new brake discs from protective varnish with solvent.
Install the brake disc and secure it with a bracket.
If it was unscrewed, screw the brake caliper onto the brake hose.
Install the brake caliper together with the pads. Do not twist or stretch the brake hose.
Secure the caliper together with its bracket with two bolts, tightening the bolts to a torque of 60 Nm.
If the brake hose has been removed, tighten the brake hose connection bolt on the caliper to 15 Nm, remove the clamp from the brake hose and bleed the brake system.
Install the front wheels in accordance with the marks made earlier, having previously lubricated the centering hole of the disk with consistent grease. Do not lubricate the threads of the wheel studs. Tighten the wheel nuts. Lower the car and tighten the wheel nuts crosswise to a torque of 90 Nm.
Caution: Press the brake pedal several times with the vehicle stationary until you feel strong resistance.
Conduct a security check.
Security check
Are the brake hoses tight?
Is the brake hose in the bracket?
Are the air bleed valves tightened?
Is there enough brake fluid?
Conduct a tightness check with the engine running. To do this, press the brake pedal with a force of 200-300 N (20-30 kg) for 10 seconds. The pedal should not fall through. Check the tightness of all connections.
The full text is on the website (MAZbook.ru)
Carefully break in the new brake discs by braking the car several times on a road with light traffic from 80 to 40 km/h, pressing the pedal lightly. Allow the brakes to cool between brakings.