


Contents: Removal ⇓ Installation ⇓
Removal
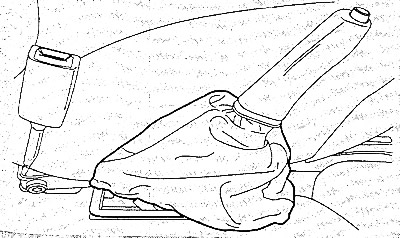
Unhook the parking brake lever boot and swing it upwards through the handle.
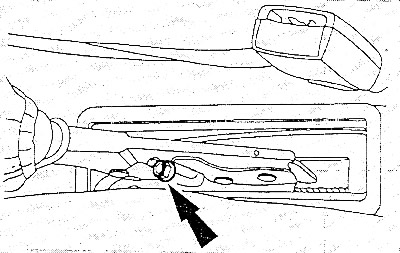
Loosen the parking brake cable adjusting nut.
Mark the position of the rear wheels on the hubs so that you can then install the wheels in their original positions. Loosen the wheel nuts with the car on the ground. Raise and support the car from behind and remove the rear wheels.
Ford Fiesta/Mazda 121
[The original text can be found on www.mazbook.ru]
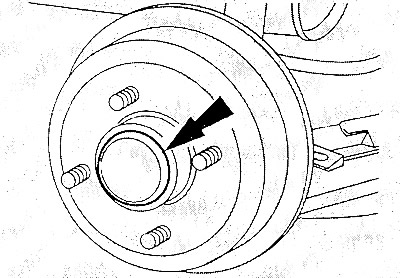
Press the hub cap, for which use
Caution: Be careful not to damage the cap. A bent or deformed cap can allow water to enter the wheel bearing, which will cause it to fail within a short time. Therefore, a damaged cap should always be replaced.
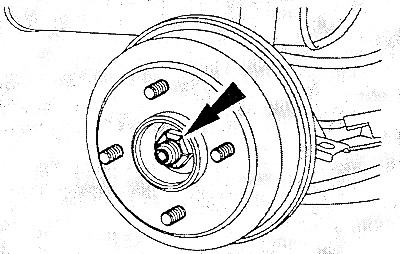
Precautions: The hub nut is very tight. Therefore, when loosening it, hold the wrench horizontally so that the car does not slide off the stands.
Unscrew the hub nut.
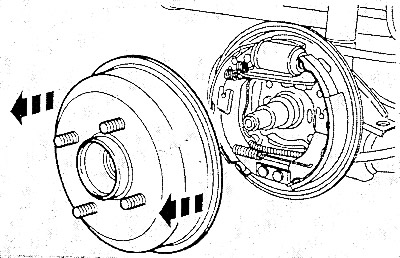
Remove the brake drum with the hub and wheel bearing.
Ford KA
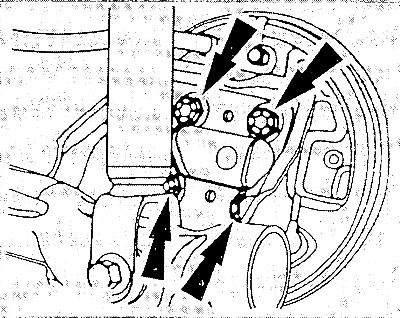
Remove the four bolts securing the rear hub/brake drum assembly from the axle flange on the rear suspension trailing arm.
Carefully pull the hub/drum assembly off the brake shoes.
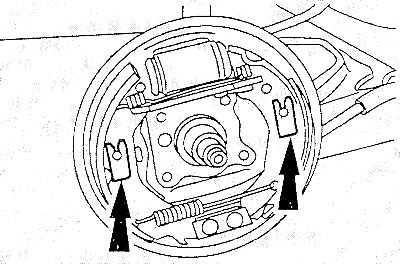
Press the two brake shoe mounting springs down with a screwdriver.
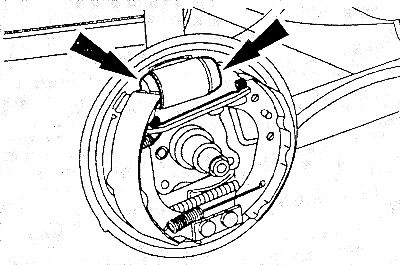
Press both brake shoes away from the wheel brake cylinder and remove them without damaging the dust caps.
Caution: When removing the pads from the brake wheel cylinder, be careful not to pull out the cylinder pistons. If necessary, place a rubber ring over the pistons to secure them.
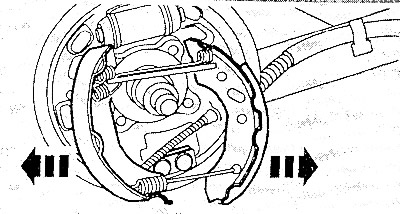
Remove the brake pads from the bottom of the supports.
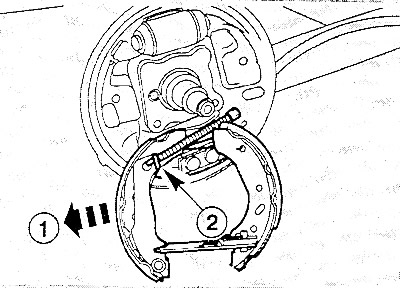
Fold the brake pads down.
Pull back the rear brake shoe (arrow 1).
Disconnect the parking brake cable (2) from the brake lever.
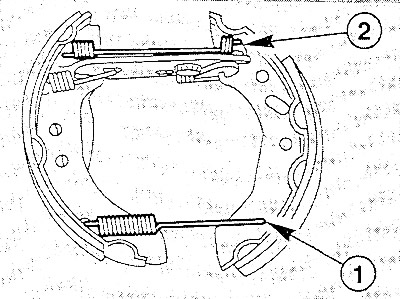
Caution: Before removing the return springs, it is recommended to mark the position of the return springs and the pressure rods to facilitate installation.
Unhook the upper (2) and lower (1) return springs with pliers.
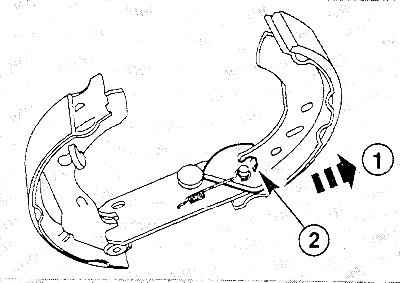
Remove the front brake shoe from the pressure rod (arrow 1). At the same time, turn the adjusting gear so that the brake shoe pawl is released.
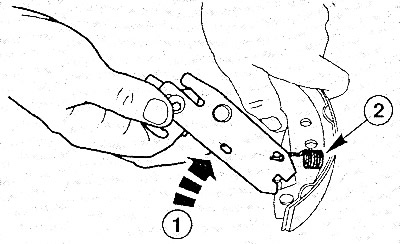
Disengage the pressure rod from the rear brake shoe by turning the rod 90° (arrow 1).
Unhook the pressure rod mounting spring.
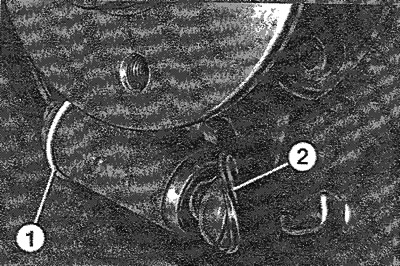
Check whether the wheel brake cylinder is damp on the outside. Pull back the dust cap (2) slightly and check whether there is moisture behind the dust cap.
Note: The pistons must not be removed.
Replace the wheel brake cylinder if necessary.
Installation
Always replace all four brake pads at the same time and install pads from the same manufacturer. Blow off the brake drum and brake mechanism mount with compressed air or clean with alcohol.
Warning: Do not inhale harmful dust. When the brake pads are removed, do not press the brake pedal, otherwise the pistons will jump out of the brake cylinders. If the brake cylinder is wet with brake fluid, it must be replaced.
Check the working surface of the brake drum for scratches with your finger. Replace damaged drums, both at the same time.
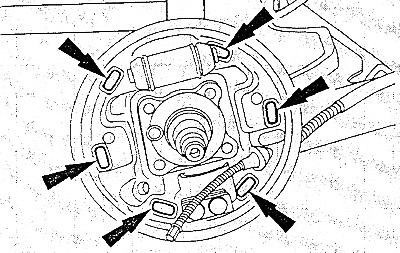
Clean the six contact surfaces between the pads and the brake plate and lubricate them with a thin layer of heat-resistant grease before installation. If necessary, pre-clean these areas with a soft metal brush.
Lubricate the adjusting lever, ratchet and intermediate lever of the parking brake at the mounting points with heat-resistant grease and attach the parts.
Assemble the brake shoes and pressure rod and attach the mounting springs. Make sure that the adjusting device is in the rearmost position. To do this, turn the adjusting gear so that the brake shoes are as close to each other as possible.
Attach the lower and upper return springs.
Attach the parking brake cable to the parking brake lever and the rear brake shoes.
Install the brake shoes in a circular upward motion onto the wheel brake cylinder.
Caution: Do not damage the dust caps.
Insert the pads into the support at the bottom.
Press the brake pads against the brake plate and, if necessary, secure them with a clamp.
Push the brake shoe mounting pins in from the rear and insert the clamp springs. Compress the springs and turn the pins 90°. At the same time, hold the mounting pin from the rear. Loosen the springs so that the mounting pin is locked.
If used, remove the spring.
If installed, remove the rubber ring from the wheel brake cylinder.
Install the brake drum.
Note: If the brake drum does not fit onto the brake shoes, adjust the automatic adjustment device again. To do this, press the ratchet lever with a screwdriver, if necessary, unhook the ratchet lever mounting spring and attach it after adjustment.
Ford Fiesta/Mazda 121
Screw on the new hub nut and tighten it slowly, turning the brake drum as you do so so it doesn't get caught.
Tighten the hub nut to 270 Nm.
Check the tightening torque. To do this, unscrew the hub nut by two turns and tighten it again with a torque of 270 Nm. At the same time, turn the hub.
Caution: Once tightened, the hub nut must not be loosened or it must be replaced.
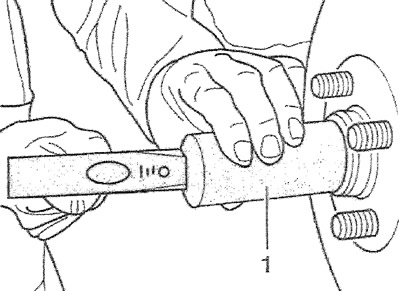
Carefully hammer the protective cap with a suitable pipe (1). The inner diameter of the pipe must rest against the edge of the cap. If the cap is even slightly deformed, it must be replaced.
Ford KA
Tighten the four rear hub/brake drum assembly mounting bolts to 70 Nm.
Install the rear wheels according to the marks made during removal, having first lightly lubricated the centering hole of the disk with consistent grease. Do not lubricate the threads of the wheel studs. Tighten the wheel nuts. Lower the car and tighten the wheel nuts crosswise to a torque of 90 Nm.
Press the brake pedal several times to center the brake pads.
Adjust the parking brake.
Place the boot on the parking brake lever and secure it.