


All engines
High oil consumption can be caused by worn oil seals. Oil seals on VZ, V5, V6 engines (SOHC), VR (SOHC) can be replaced without removing the cylinder head, in any case, a special tool MAZDA SST 49B0210A0 is required, as well as a nozzle for compressed air (HAZET 3428). On other engines, or if no special tool is available, the cylinder head must be removed.
Removing
B6 engines (DOHC), VR (DOHC) and diesel engine
1. Remove the camshaft and poppets, see Section Removal and installation of camshafts.
2. Remove the cylinder head, see Section Removal and installation of the cylinder head / replacement of the cylinder head gasket.
3. Remove valves, see Section Removal and installation of valves.
Engines B3, B5, B6 (SOHC), VR (SOHC)
1. Remove the rocker shaft, see Section Camshaft/timing drive.
2. Unscrew all spark plugs.
3. Set the piston of the corresponding cylinder to bottom dead center (NMT). To do this, first set the crankshaft to the position corresponding to the TDC of the piston of the 1st cylinder, see Section Removal and installation of a gear belt of VZ, V5, B6 engines (SOHC), VR (SOHC).
4. If the piston of the 1st cylinder is in the TDC position, the pistons of the 2nd and 3rd cylinders are at BDC. Mark the bottom pulley with chalk, then tighten the crankshaft 1/2 turn (180°), so that the chalk mark is at the top. Now the piston of the 1st cylinder is at BDC.
5. Screw the compressed air nozzle HAZET 3428 into the spark plug thread of the respective cylinder.
6. If there is no special tool, you should make a nozzle for compressed air from an old spark plug. To do this, saw off the earth electrode -1-. Break off the ceramic insulator -2- with a screwdriver and break off the middle electrode -3-. Knock out the remnants of the central electrode together with the element -4- and the connecting pin -5- with a suitable drift (approx. 3 mm). At the same time, clamp the candle in a vice or insert it into the socket head.
Attention! The thread of the spark plug must not be damaged to avoid subsequent damage to the threaded hole of the spark plug.
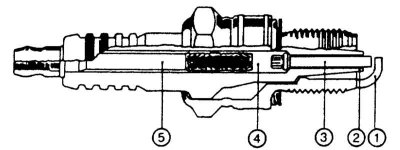
7. Screw the prepared spark plug into the appropriate cylinder and connect it with a hose to the compressed air compressor.
8. Maintain a constant pressure of 6 bar in the cylinder.
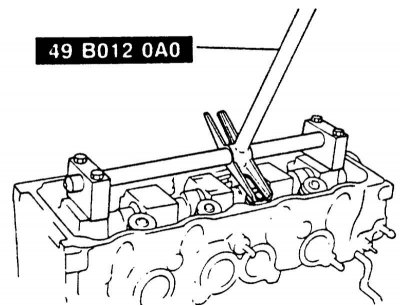
9. Screw the MAZDA 49B0120A0 tool to the support brackets 1 and 5 and compress the valve springs with the tool.
Attention! The piston must be at BDC.
10. Remove the valve cotters, loosen the valve springs.
Attention! Firmly seated crackers loosen with light blows of the hammer on the mount.
11. Remove cups and valve springs.
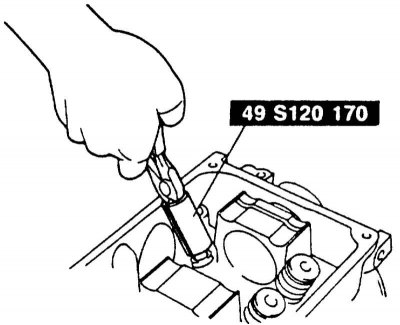
12. Remove the oil seals. For removal in workshops, a special tool is used (MAZDA SST49S120170, HAZET 791-5 or HAZET 791-2). The old oil seals sit very firmly. For removal, if possible, use an impact screwdriver.
Installation
1. Push the valve stem seal onto the valve guide by hand.
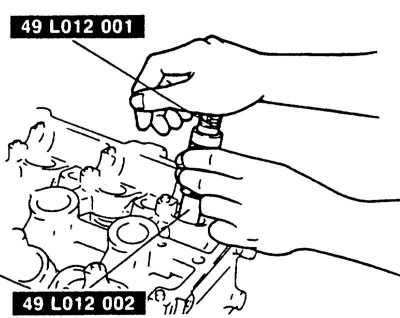
2. Using the special tool MAZDA SST49L012001 and SST49L012002, press in the oil seal by hand until the tool touches the cylinder head. If there is no special tool, you can use a suitable tube of the same diameter and non-sharp edges.
3. Insert and compress the spring cups and valve springs.
4. Insert the valve cotters, loosen the springs.
5. In the same way, replace all oil seals. Install poppets and camshaft, see Sections Camshaft/timing drive, Removal and installation of camshafts.
VZ, V5, V6 engines (SOHC), BP SOHC)
1. Install the rocker shaft, see Section Camshaft/timing drive.
2. Install all spark plugs.
VR engine (DOHC) and diesel engine
1. Install valves, see Section Removal and installation of valves.
2. Install the cylinder head, see Section Removal and installation of the cylinder head / replacement of the cylinder head gasket.
3. Install the camshaft and poppets, see Section Removal and installation of camshafts.