


Contents: Removal ⇓ Installation ⇓
Removal
1. Remove the spark plugs, see Chapter Maintenance.
2. Remove the cylinder head cover with gasket.
3. Set the crankshaft to the position corresponding to the TDC of the piston of the 1st cylinder, see Section Removal and installation the timing belt (DOHC).
Attention! The position of the crankshaft should not change any more after this.
4. Remove the timing belt, see Section Removal and installation of the timing belt of engines B3, B5, B6 (SOHC), BP (SOHC).
5. Remove the ignition distributor, see Chapter Ignition system, Chapter Removal and installation the ignition distributor.
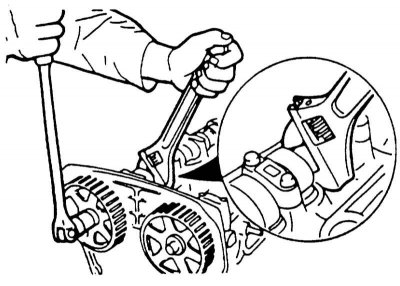
6. Hold the camshafts with a wrench and unscrew the gear mounting bolts. Remove the camshaft gears and, if necessary, knock them off with light blows of a rubber hammer.
Caution: Remove the gears carefully to avoid losing the guide pins.
7. Unscrew the sealing plate.
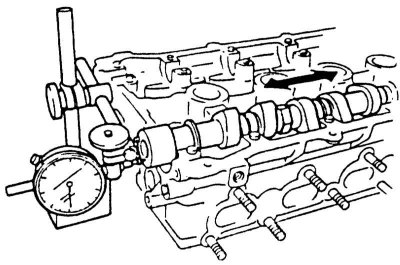
8. Check the axial clearance of the camshafts. Required value: 0.07 - 0.19 mm. Maximum permissible axial clearance: 0.20 mm. If this value is exceeded, the camshafts and possibly the cylinder head should be replaced.
9. Mark all bearing caps with chalk or felt-tip pen so that when installing them, they can be installed in the same places and in the same position.
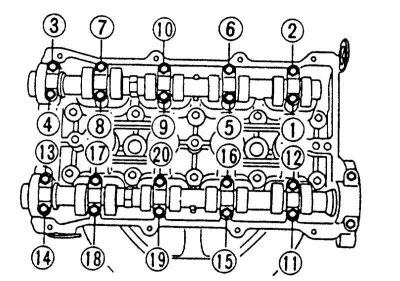
10. Loosen the bearing caps of the intake and exhaust camshafts evenly in several passes in the order shown and remove the caps.
11. Remove the camshafts with the old seals.
Installation
Caution! Since the axial clearance of the camshaft is extremely small, the camshaft must be held horizontally during installation. To ensure this, the following requirements must be met. If the camshaft is skewed during installation, the shaft itself or the cylinder head may be damaged.
1. Coat all camshaft bearing areas with a small amount of engine oil.
2. Insert the camshafts.
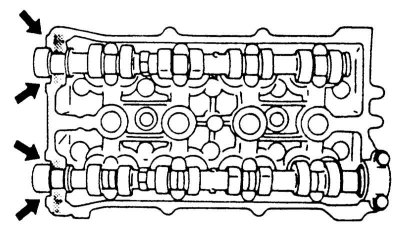
3. Apply a silicone-based sealant (e.g, DOW CORNING Q3-7057).
Attention! Sealant should not be applied to the bearing journals.
4. Install all bearing caps according to markings.
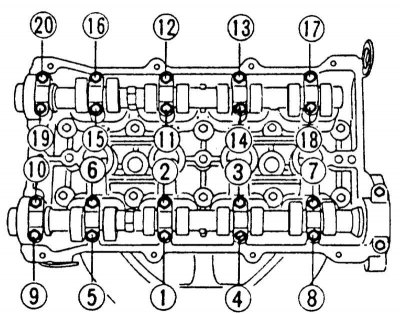
5. Tighten the bearing cap mounting bolts using a torque wrench in the sequence shown. Tighten the bolts in two passes.
- 1st pass: 10 Nm
- 2nd pass: 15 Nm
6. Lubricate the camshaft seals and their mounting location with a small amount of engine oil. Carefully hammer the seal with a pipe of the same diameter. Hammer the seals so that they are flush with the cylinder head.
Attention! Do not skew the seals during installation.
7. Install the sealing plate and tighten the mounting bolts with force 10 Nm.
8. Clean the camshaft gear from water and oil.
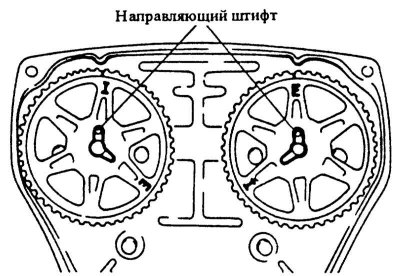
8. Turn the camshafts so that the guide pins are facing up.
9. Set the camshaft gears with the I marks facing upwards (inlet side), E (outlet side).
10. Tighten the camshaft mounting bolts with force 60 Nm. While doing this, hold the wheel with an adjustable wrench.
Caution! When tightening the camshaft, do not damage the cylinder head with the wrench.
11. Install and tension the timing belt, see Section Removal and installation of the timing belt of engines B3, B5, B6 (SOHC), BP (SOHC).
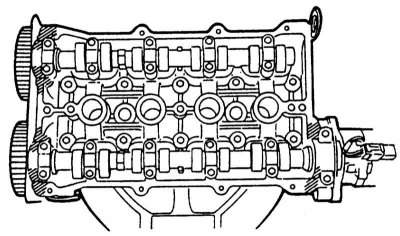
12. Apply a silicone-based sealant (e.g, DOW CORNING Q3-7057).
13. Install the cylinder head cover with gasket and tighten with force 10 Nm.
14. Install the ignition distributor, see Chapter Ignition system, Chapter Removal and installation the ignition distributor.