


Engines E1, E3, E5
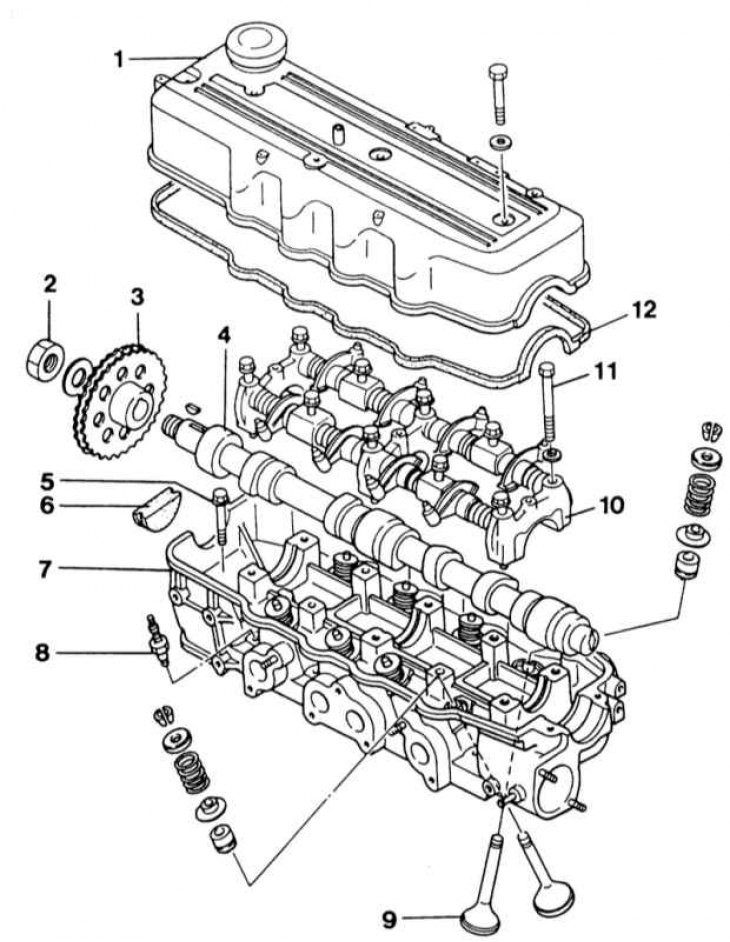
1 - cylinder head cover; 2 - camshaft gear mounting bolt; 3 - camshaft drive chain; 4 - camshaft; 5 - bolt; 6-segment seal; 7 - cylinder head; 8 - spark plug; 9 - valve; 10 - rocker shaft with rocker arms and camshaft bearing halves; 11 - cylinder head bolt; 12 - Cylinder head cover gasket
In principle, the cylinder head of the E engines has the same design as other petrol engines. The following text will only point out the differences.
Removal
1. Disconnect the ground cable from the battery.
Warning! This will erase the engine fault memory or the radio security code. Before disconnecting the battery, read the instructions in Section Removal and installation the battery.
2. Lock the crankshaft and unscrew the camshaft gear mounting bolt.
3. To lock the crankshaft, engage 5th or 4th gear and ask an assistant to press the brake pedal.
4. Unscrew the drive chain tensioner.
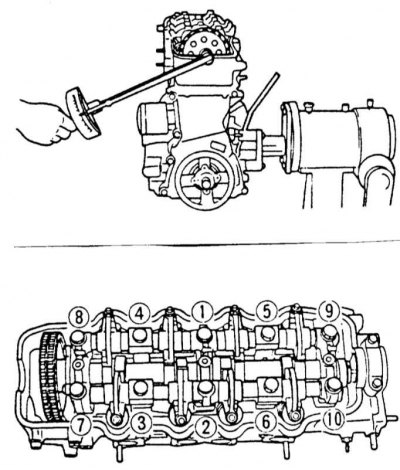
5. Loosen the cylinder head bolts in sequence 1 through 10 by 1/2 turn on the first pass, by one full turn on the second pass, and completely unscrew on the third pass.
Caution: Loosening the cylinder head bolts in the wrong order may result in deformation or cracks in the cylinder head.
6. Remove the rocker arm shafts with the camshaft bearing halves.
7. Tie the camshaft sprocket and drive chain with wire to fix the position of the sprocket and chain relative to each other.
8. Remove the camshaft sprocket and remove the camshaft.
9. Have an assistant keep the camshaft sprocket under tension at all times to prevent the drive chain from slipping off the crankshaft sprocket.
Caution! If the chain has slipped off the crankshaft sprocket, the timing mechanism must be adjusted again.
10. Check that all hoses and wires running from the cylinder head to the engine and body are disconnected.
11. Remove the cylinder head with the help of an assistant.
Caution! Do not place the cylinder head on the sealing surface after removal, otherwise the fully open valves may be damaged. Place the cylinder head on two wooden blocks.
Installation
1. Insert the camshaft.
2. Install the camshaft sprocket with the drive chain.
3. Install the rocker arm shafts with the camshaft bearing halves.
4. Tighten the 10 bolts by hand until they touch the cylinder head. Then tighten the bolts in three passes. In each pass, tighten the bolts in sequence, from 1 to 10.
- 1st pass: 50 Nm
- 2nd pass: 70 Nm
- 3rd pass: 90 Nm
Caution! The cylinder head bolts must be tightened very carefully. Before tightening, the accuracy of the torque wrench must be checked. In addition, the tightening sequence must be followed precisely.
5. Lock the crankshaft, install the camshaft gear mounting bolt and tighten it with force 75 Nm.
6. To lock the crankshaft, engage 4th or 5th gear and ask an assistant to press the brake pedal.
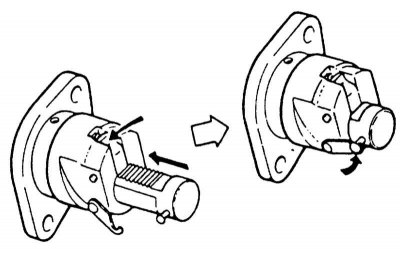
7. Press the stopper in the direction of the arrow and push the chain tensioner sleeve fully into the tensioner housing. Secure the sleeve with the bracket.
8. Install and screw on the chain tensioner with a new gasket.
9. After installing the tensioner, the bracket is loosened by rotating the crankshaft. The clutch shifts automatically and sets the chain play.
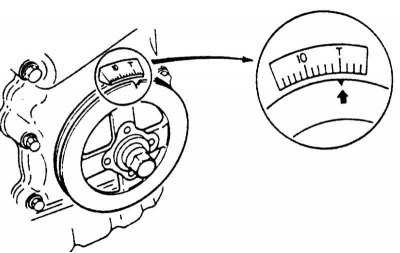
10. Check the drive chain adjustment. To do this, turn the crankshaft so that the mark on the belt pulley coincides with the "T" mark. At the same time, the rocker arms of the 1st cylinder should have a small play, and the rocker arms of the 4th cylinder should be in the valve overlap position, i.e. both valves should be pressed down by the rocker arms. If this is not the case, the drive chain must be adjusted again.
11. Install the cylinder head cover with a new cover gasket and segment seal. Screw the cover on with force 10 Nm.
12. Connect the battery ground cable.
13. If available, set the time on the clock and set the security code for the radio receiver.
14. Check the valve clearance, see Section Checking/adjusting valve clearance.
Adjusting the drive chain
1. Remove the cylinder head cover.
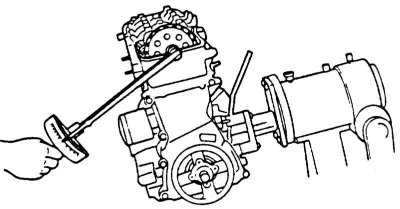
2. Block the crankshaft and unscrew the camshaft sprocket mounting bolt (the engine is shown in the removed position).
3. To lock the crankshaft, engage 5th or 4th gear and ask an assistant to press the brake pedal.
4. Remove the chain tensioner.
5. Remove the V-belt, see Section Removal and installation/tensioning the V-belt.
6. Raise the car.
7. Block the crankshaft and unscrew the crankshaft belt pulley mounting bolt.
8. Unscrew all oil pan bolts that are screwed into the drive chain cover.
9. Unscrew the chain cover.
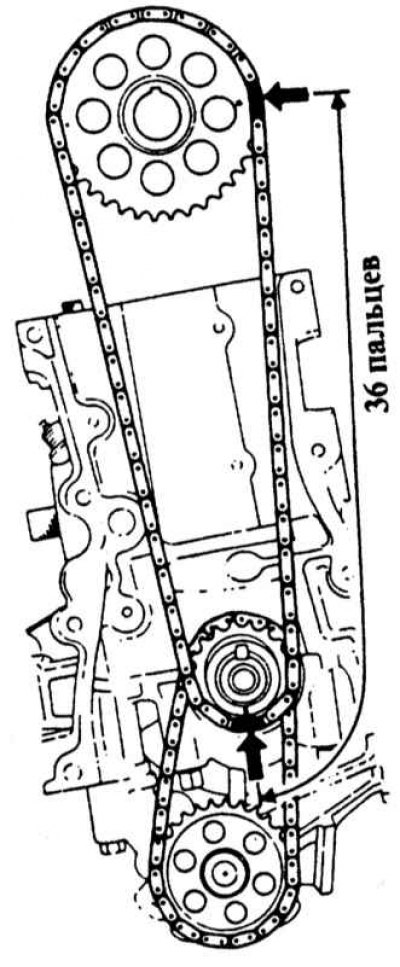
10. Turn the crankshaft so that the keyway is facing up. At the same time, the polished (shiny) links of the chain should match the marks on the sprockets of the camshaft and crankshaft. If the marks do not match, remove the sprocket from the camshaft and adjust the chain.
11. If the chain is adjusted correctly, install the camshaft sprocket, timing chain housing, cylinder head cover, crankshaft pulley and oil pan mounting bolts.
[The article is copied from the website: Mazbook.ru]