


Contents: Removal ⇓ Installation ⇓
Engines B6, BP (DOHC)
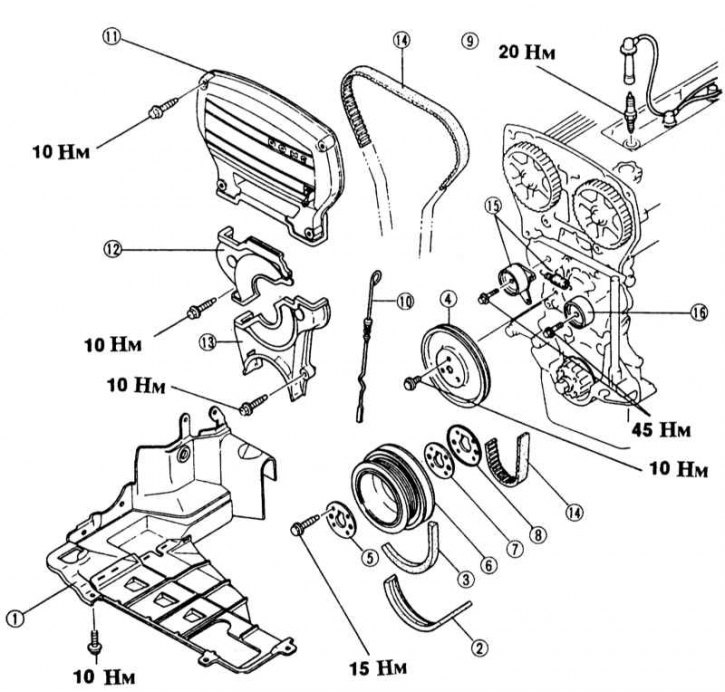
1 - lower engine shield; 2 - V-belt of the servo control pump and air conditioning compressor; 3 - generator V-belt; 4 - water pump belt pulley; 5 - washer; 6 - crankshaft belt pulley; 7 - outer guide disc of the toothed belt; 8 - inner guide disc of the toothed belt; 9 - spark plug; 10 - measuring rod; 11 - Upper timing belt casing; 12 - middle toothed belt cover; 13 - lower toothed belt casing; 14 - toothed belt; 15 - tension roller with spring; 16 - guide roller
Removal
1. Disconnect the ground cable from the battery.
Warning! This will erase the engine fault memory or the radio security code. Before disconnecting the battery, read the instructions in Section Removal and installation the battery.
2. Raise the vehicle and remove the right front wheel.
3. Remove the lower engine shield in the right wheel well.
4. If equipped, remove the V-belt of the servo pump and air conditioning compressor, see Section Removal and installation/tensioning the V-belt.
5. Loosen the water pump belt pulley mounting bolts.
6. Remove the alternator V-belt, see Section Removal and installation/tensioning the V-belt.
7. Loosen the water pump belt pulley mounting bolts and remove the pulley.
Up to 2/91 issue.
1. Block the crankshaft and unscrew the crankshaft belt pulley mounting bolts.
2. To lock the crankshaft, engage 5th gear and ask an assistant to press the brake pedal.
3. Remove the washer, crankshaft belt pulley, outer and inner toothed belt guide discs.
Since 3/91 issue.
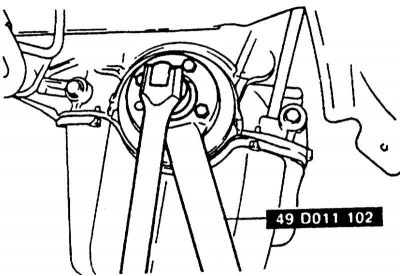
1. Unscrew the crankshaft belt pulley mounting bolts. Hold the belt pulley neck with a special tool MAZDA SST 49D011102.
2. Remove the oil dipstick.
3. Unscrew the upper, middle and lower timing belt covers.
4. Remove the spark plugs, see Chapter Maintenance.
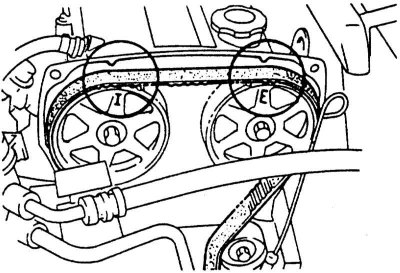
5. Set the piston of the 1st cylinder to the ignition position. To do this, turn the crankshaft so that the marks on the camshaft pulley match the marks on the timing gear cover.
6. To turn the crankshaft, engage 5th gear and move the car on a level surface. Another way to turn the crankshaft: Raise the front wheel, engage 5th gear and turn the wheel by hand.
Attention! After the piston of the 1st cylinder is in the ignition position, set the gearbox to neutral and check again whether the marks on the crankshaft belt pulley and the timing gear cover match. If the marks match, do not turn the crankshaft any further.
7. If the old timing belt is to be reinstalled, it should be marked. An arrow indicating the direction of rotation should be applied to the belt. The crankshaft rotates clockwise.
8. Loosen the tension roller bolt and press the tension roller in the direction of the arrow until the toothed belt is loosened. Tighten the tension roller bolt again.
Caution! When squeezing the roller, place a rag underneath to avoid damaging the toothed belt or tension roller.
9. Remove the toothed belt, after this do not change the position of the toothed wheels.
Installation
Caution! Do not bend or twist the toothed belt. Replace a dirty, damaged or worn toothed belt in any case. Check the evenness and ease of movement of the tension roller.
Caution! If the camshaft is turned with the timing belt removed, none of the pistons should be in the TDC position. Otherwise, serious damage to the pistons and valves may occur. If it is necessary to turn the crankshaft, all pistons should first be set to half height. To do this, draw a line with chalk on the top of the crankshaft gear (condition: the crankshaft is in the TDC position of the piston of the 1st cylinder), then turn the crankshaft wheel 1/2 turn to the left or right. The chalk mark is in a horizontal position.
1. Make sure that the camshaft is in the position corresponding to TDC of the 1st cylinder. In this case, the marks on the camshaft wheel and the marks on the timing gear drive cover must match.
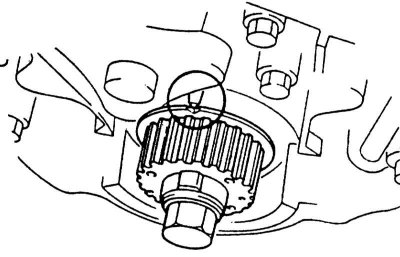
2. Check whether the marks on the camshaft gear and the cylinder block match.
3. Apply the toothed belt so that the branch between the exhaust camshaft wheel and the crankshaft wheel is taut. If you are installing an old belt, pay attention to the direction of its rotation.
Attention! When installing the timing belt, the position of the camshaft and crankshaft should not change. Otherwise, serious malfunctions may occur in the engine, or the engine will not develop its maximum power.
4. Make sure that the camshafts are in the position corresponding to TDC of the 1st cylinder. In this case, the marks on the camshaft gears should match the marks on the timing gear cover and the cylinder head.
5. The marks on the crankshaft gear and cylinder block must coincide at the same time. Then the engine is in the TDC position of the piston of the 1st cylinder.
6. Turn the crankshaft twice in the direction of rotation and check the alignment of the marks again; repeat the adjustment if necessary.
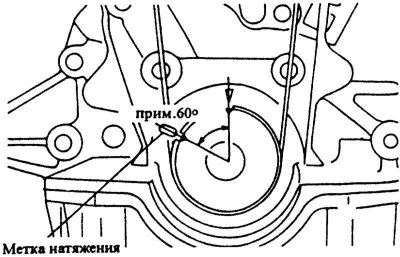
7. Turn the crankshaft in the direction of rotation to the tension mark, which is approximately 60 before the TDC mark.
Information copied from the portal: MAZBOOK.RU
8. Loosen the tension roller bolt so that the roller fits against the belt.
9. Tighten the tension roller mounting bolt with force 45 Nm.
10. Turn the crankshaft twice in the direction of rotation and check the adjustment again.
11. Check the tension of the toothed belt. The toothed belt in the section between the two camshaft pulleys should deflect by 9 - 11 mm when pressed with a force of 10 kg, which corresponds to pressing with the thumb. If the value does not meet the requirement, loosen the tension roller and tighten it again.
12. Screw the upper, middle and lower toothed belt covers with force 10 Nm.
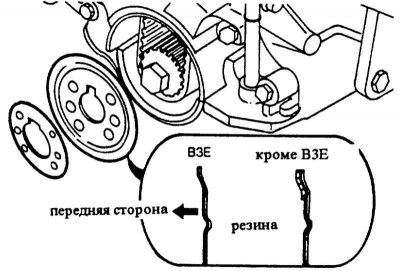
13. Install the outer and inner toothed belt guide discs according to the recesses on the crankshaft wheel. Take into account the installation position.
Up to 2/91 issue.
1. Install the crankshaft belt pulley and washer and tighten the mounting bolts with force 15 Nm.
Since 3/91 issue.
1. Install the crankshaft belt pulley mounting bolt. Hold the pulley neck with a special device
2. MAZDA SST 49D011102 and tighten the bolt with force 165 Nm.
3. Install the water pump belt pulley and tighten the mounting bolts with hand force.
4. Install the V-belt, see Section Removal and installation/tensioning the V-belt.
5. Tighten the water pump belt pulley with force 10 Nm.
6. Install the spark plugs and connect the tips, see Chapter Maintenance.
7. Screw the shield into the right wheel well.
8. Insert the oil dipstick.
9. Install the front wheel and lower the vehicle.
10. Connect the ground cable to the battery.
11. If available, set the time on the clock and set the security code for the radio receiver.
12. Check the ignition timing, adjust if necessary, see Chapter Ignition system, Chapter Checking/adjusting ignition timing.