MazBook.ru
English Русский
Български
Беларускі
Український
Српски
Hrvatski
Română
Polski
Slovenský
Magyar
• Bookmark • Sitemap • Contacts •   
Cars Opel Cars Ford Cars Volkswagen Cars Audi Cars Kia Cars Renault Cars Peugeot


Familia Capella Mazda3 Mazda6 CX-? Others Articles
Mazda 121 (3) (1996-2003) Mazda BT-50 (1) (2006-2011)

Removal and installation the door lock cylinder (Mazda 121 (3))

  • Home
  • Mazda
  • 121 JASM (1996-2003)
  • Body
  • Doors, windows and locks
  • Removal and installation the door lock cylinder
0
Contents: Removal ⇓ Installation ⇓

Removal


Disconnect the negative cable from the battery with the ignition off.

Note: This will erase the data from the electronic memory blocks. See the instructions in the chapter "Electrical equipment".


Remove the door trim. Pull back the protective film in the area of the door lock cylinder, fold it aside and secure with adhesive tape.

Unscrew the bolts and remove the rear glass guide. Disconnect the door handle connecting rod from the door lock.

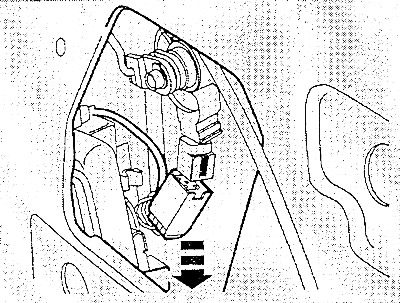
If present, disconnect the plug from the alarm system switch.


If present, disconnect the plug from the alarm system switch.

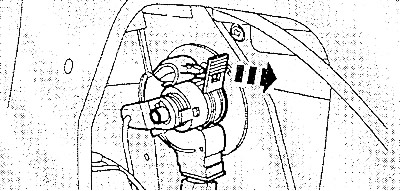
If there is one, remove the alarm system switch by unhooking it at the top.

If there is one, remove the alarm system switch by unhooking it at the top.

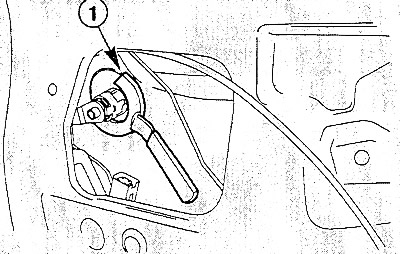
Turn the fastening ring so that the lock cylinder projections are free. In the workshop, a special…


Turn the fastening ring so that the lock cylinder projections are free. In the workshop, a special device (1) is used for this, but you can also use a small screwdriver.
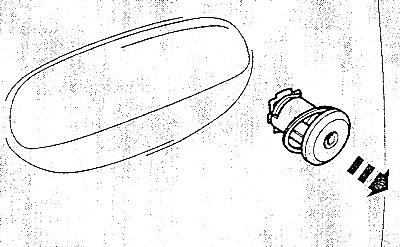


Remove the lock cylinder from the door.


Remove the lock cylinder from the door.

Installation


Check the lock cylinder seal for damage or cracks. Old seals must be replaced.

Insert the lock cylinder with seal into the door.

Install the washer and the mounting ring. Press the lock cylinder against the door and simultaneously turn the mounting ring to secure the lock cylinder.

If removed, insert the alarm system switch and put on the plug.

Attach the connecting rod to the door lock, having first pressed the tip of the plastic clamp slightly to the side.

Insert the glass guide and secure it with bolts.

Stick the protective film.

Note: The film must be glued evenly, tightly and without folds, otherwise it will be pulled inside the door. Seal small cracks with adhesive tape. In case of major damage, replace the entire film.


Install door trim.

Connect the negative cable to the battery.
This article is available at: russian, bulgarian, belarusian, ukrainian, serbian, croatian, romanian, polish, slovak, hungarian
This text was checked by: Evgeny Mereshnikov
Share with friends on social networks:

Previous
Mazda 121 (3) » Doors, windows and locks
Next

Removal and installation the outer door handle
Removal and installation the door lock rod
Removal and installation the door
Removal and installation the door lock
Ford Fiesta Courier Rear Doors
Removal and installation the rear door lock (Ford Fiesta Courier)
Removal and installation door trim
Removal and installation the inner door handle
More articles on repairing other Mazda models
Door lock / handle / cylinder Mazda Familia 6 (1989-1994)
Scheme 14. Clock, trunk light, ignition switch and door lock cylinder… Mazda Capella 3 and 4 (1982-1992)
Opening the trunk lid by pressing the lock cylinder Mazda3 BK (2003-2009)
Door lock control system Mazda6 GG (2002-2008)
Removal and installation the cylinder head Mazda CX-5KE (2012-2017)
Link in different formats to this article
Comments and feedback from visitors
No comments yet


How much will 46 + 45 ?


Mazda BT-50 (1) (2006-2011) 
  • General information
  • Introduction to guide
  • User manual
  • Maintenance
  • Power unit
  • Engine repair (diesel)
  • Cooling and lubrication system
  • Fuel injection system
  • Intake and exhaust system
  • Engine electrical equipment
  • Transmission
  • Clutch
  • Mechanical gearbox
  • All-wheel drive system
  • Transfer case and gearboxes
  • Chassis
  • Front suspension
  • Rear suspension
  • Steering
  • Brake system
  • Body
  • Exterior (external elements)
  • Interior (internal elements)
  • Heating and air conditioning
  • Security system SRS
  • Electrical equipment
  • Equipment and devices
  • Electrical circuits
Mazda 121 (3) (1996-2003) 
  • General information
  • User manual
  • Maintenance
  • Power unit
  • Petrol engine 1.3 l
  • Petrol engine 1.25/1.4 l
  • Diesel engine
  • Lubrication system
  • Cooling system
  • Ignition system
  • Supply system
  • Fuel injection (gasoline)
  • Fuel injection (diesel)
  • Exhaust system
  • Transmission
  • Clutch
  • Car gearbox
  • Chassis
  • Front suspension
  • Rear suspension
  • Steering
  • Brake system
  • Wheels and tires
  • Body
  • Exterior (external elements)
  • Interior (internal elements)
  • Doors, windows and locks
  • Heating system
  • Electrical equipment
  • Troubleshooting
  • Equipment and devices
  • Lighting system
  • Power devices
  • Electrical circuits
MazBook.ru © 2018–2026 · Mobile version · Articles and news · Sitemap: EN BG BY UA RS HR RO PL SK HU · Feedback · Site search · Add to bookmarks Familia 5 (BF) · Familia 6 (BG) · Capella 3 (GC) · Capella 3 and 4 (GC) · Capella 4 (GD) · Capella 5 (GE) · Capella 6 (GF) · Mazda3 BK · Mazda6 GG · CX-5KE · Mazda 121 (3) · Mazda BT-50 (1) ·
By continuing to use the site, you agree to the use of cookies 🔐