
MazBook.ru
English Русский
Български
Беларускі
Український
Српски
Hrvatski
Română
Polski
Slovenský
Magyar
• Bookmark • Sitemap • Contacts •   
Cars Opel Cars Ford Cars Volkswagen Cars Audi Cars Kia Cars Renault Cars Peugeot


Familia Capella Mazda3 Mazda6 CX-? Others Articles
Familia 5 (1985-1989) Familia 6 (1989-1994)

Removal and installation the shock absorber strut (Mazda Familia BG)

  • Home
  • Mazda Familia
  • Familia BG (1989-1994)
  • Chassis
  • Front suspension
  • Removal and installation the shock absorber strut
0
Contents: Removal ⇓ Installation ⇓

Removal


1. Loosen the wheel nuts with the vehicle parked on the ground.

2. Mark the position of the wheel disks in relation to the hub. Thanks to this, the balanced wheel can be installed in its original place.

3. Raise the front of the vehicle.

4. Remove the wheel.

5. Support the front suspension against the wishbone to prevent the drive shafts from sagging downwards after the shock absorber strut is removed. To do this, install a suitable support or hydraulic lift under the wishbone.
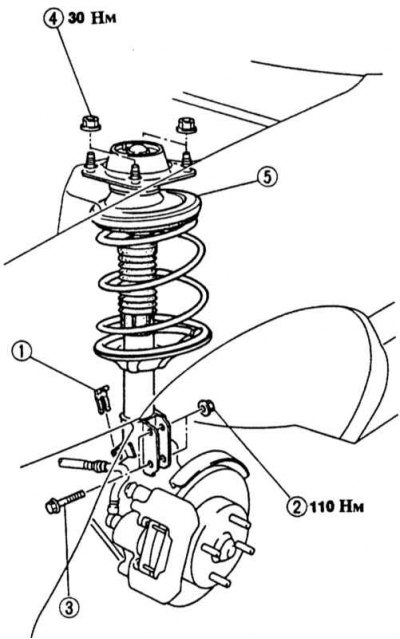
5. Support the front suspension against the wishbone to prevent the drive shafts from sagging…


6. Remove the mounting bracket "1" of the brake hose on the shock absorber strut.

7. Loosen 2 nuts "2", remove pin "3" and separate the shock absorber strut from the steering knuckle.

8. Unscrew the 4 upper fastening nuts "4" (up to 8/89 only 2 nuts) shock absorber strut and remove the shock absorber strut as a set. At the same time, make sure that the rubber cuff of the drive shaft is not damaged by the released strut. If necessary, wrap the cuff with a rag.

Caution! Do not loosen the middle nut of the shock absorber under any circumstances, as the spring is under compression.


Installation


Cars up to 9/89 issue and the "station wagon" model
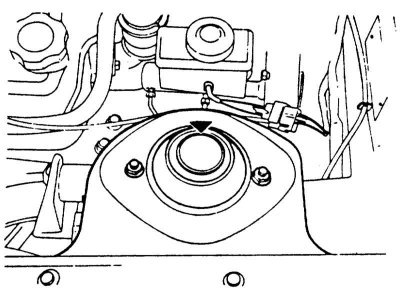


Cars up to 9/89 issue and the «station wagon» model


Cars from 10/89 issue, except for "station wagon" models
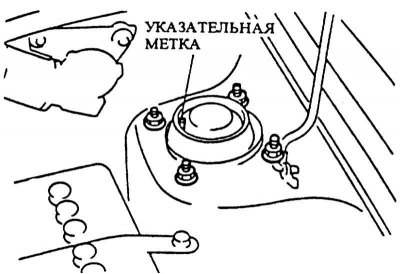


Cars from 10/89 issue, except for «station wagon» models


1. Insert the shock absorber strut from below so that it enters the center of the upper support. The mark on the shock absorber support should be facing inward - toward the center of the car-. If this is not done, it will be impossible to adjust the correct wheel alignment.

2. Screw the nuts onto the studs on the shock absorber support from above. Tighten the nuts with a torque wrench to 30 Nm.

3. Screw the steering knuckle to the shock absorber strut.

Attention! Insert both bolts from front to back, the nuts will be located at the back. Tighten the nuts with a force of 110 Nm.


4. Route the brake line, put the bracket on the brake hose holder.


5. Screw on the wheel, taking into account the marks on the wheel and hub. Lower the car and tighten the nuts crosswise with force 100 Nm.

6. Check the wheel alignment angles as soon as possible and adjust the camber if necessary, see Section Wheel alignment angles.
This article is available at: russian, bulgarian, belarusian, ukrainian, serbian, croatian, romanian, polish, slovak, hungarian
This text was checked by: Evdokia Filimonova
Share with friends on social networks:

Previous
Familia 6 » Front suspension
Next

Description of the front suspension
Disassembling the shock absorber / removing and installing the shock…
Checking the shock absorber
Removal and installation the wishbone / replacing the rubber support
Checking/replacing the wishbone/steering knuckle support
Removal and installation the drive shaft
More articles on repairing other Mazda models
Front strut shock absorber assembly — removal and installation Mazda Capella 3 (1982-1992, petrol)
Removal, checking and installation the front shock absorber and spring Mazda3 BK (2003-2009)
Shock absorber and coil spring Mazda6 GG (2002-2008)
Checking and disposing of the front shock absorber Mazda CX-5KE (2012-2017)
Removal and installation the shock absorber strut Mazda 121 (3) (1996-2003)
Link in different formats to this article
Comments and feedback from visitors
No comments yet


How much will 24 + 24 ?


Familia 6 (1989-1994) 
  • General information
  • Introduction to guide
  • User manual
  • Maintenance
  • Power unit
  • Petrol engines
  • Diesel engines
  • Lubrication system
  • Cooling system
  • Ignition system
  • Supply system
  • Carburetor
  • Injection system
  • Exhaust system
  • Transmission
  • Clutch
  • Car gearbox
  • Chassis
  • Front suspension
  • Rear suspension
  • Steering
  • Brake system
  • Wheels and tires
  • Body
  • Body elements
  • Doors and windows
  • Body Care
  • Electrical equipment
  • Equipment and devices
  • Power devices
  • Heating system
  • Lighting and headlights
  • Windshield wipers and washers
  • Wiring diagrams (since 1987)
  • Wiring diagrams (since 1991)
Familia 5 (1985-1989) 
  • General information
  • Vehicle data
  • Model «E» engine
  • Engine repair
  • Cooling and lubrication system
  • Power and ignition system
  • Model «B» engine
  • Engine repair
  • Cooling and lubrication system
  • Ignition system
  • Power system (carburetor)
  • Power system (injector)
  • Transmission
  • Clutch
  • Mechanical gearbox
  • Automatic gearbox
  • Front wheel drive
  • Chassis
  • Steering
  • Front suspension
  • Rear suspension
  • Brake system
  • Electrical equipment
  • Equipment and devices
  • Electrical circuits
  • Wiring diagrams (station wagon)
MazBook.ru © 2018–2026 · Mobile version · Articles and news · Sitemap: EN BG BY UA RS HR RO PL SK HU · Feedback · Site search · Add to bookmarks Familia 5 (BF) · Familia 6 (BG) · Capella 3 (GC) · Capella 3 and 4 (GC) · Capella 4 (GD) · Capella 5 (GE) · Capella 6 (GF) · Mazda3 BK · Mazda6 GG · CX-5KE · Mazda 121 (3) · Mazda BT-50 (1) ·
By continuing to use the site, you agree to the use of cookies 🔐