MazBook.ru
English Русский
Български
Беларускі
Український
Српски
Hrvatski
Română
Polski
Slovenský
Magyar
• Bookmark • Sitemap • Contacts •   
Cars Opel Cars Ford Cars Volkswagen Cars Audi Cars Kia Cars Renault Cars Peugeot


Familia Capella Mazda3 Mazda6 CX-? Others Articles
Mazda 121 (3) (1996-2003) Mazda BT-50 (1) (2006-2011)

Removal and installation the shock absorber strut (Mazda 121 (3))

  • Home
  • Mazda
  • 121 JASM (1996-2003)
  • Chassis
  • Front suspension
  • Removal and installation the shock absorber strut
0
Contents: Removal ⇓ Installation ⇓ Specially for Ford KA ⇓

Removal


Disconnect the negative cable from the battery with the ignition off.

Caution: This will erase the data from the electronic memory units. See the instructions in the chapter "Electrical equipment".


Mark the position of the front wheels relative to the hubs so that the balanced wheel can be installed in the same position. With the vehicle on the ground, loosen the wheel nuts, lift the vehicle from the front, support it, and remove the front wheel.

Ford Fiesta/Mazda 121: remove steering knuckle.

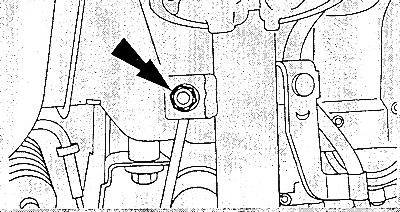
Unscrew the nut and remove the connecting rod from the shock absorber strut.


Unscrew the nut and remove the connecting rod from the shock absorber strut.

Remove the protective cap from the upper nut of the shock absorber or from the shock absorber.

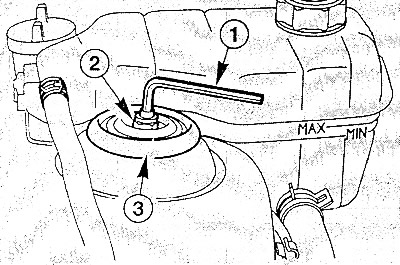
Loosen the upper mounting nut (2) on the shock absorber strut using a 10 mm deep-end wrench, while…


Loosen the upper mounting nut (2) on the shock absorber strut using a 10 mm deep-end wrench, while holding the piston rod with a 6 mm Allen key to prevent it from turning.


Loosen the mounting nut while supporting the shock absorber strut so that it does not fall out.

Remove the shock absorber and holder and pull the shock absorber strut downwards.

Installation


Insert the shock absorber strut from below so that it sits in the middle of its socket.

Align the support, insert the holder and shock absorber and tighten the upper shock absorber strut mounting nut to 50 Nm. Hold the shock absorber rod with a 6 mm Allen key.

Note: A special tool may be required to tighten the nut to the correct torque.


Install the connecting rod on the shock absorber strut and tighten its mounting bolt to a torque of 50 Nm.

Install the steering knuckle.

Install the front wheel so that the marks made during removal match. Lightly lubricate the central hole on the disk with consistent grease. Do not lubricate the threads of the wheel studs. Tighten the wheel nuts, lower the car and tighten the wheel nuts crosswise to a torque of 90 Nm.

Connect the negative cable to the battery.

Set the clock readings.

If necessary, enter the radio codes.

Check the wheel alignment as soon as possible and, if necessary, adjust it in a workshop.

If present, place the protective cap on top of the shock absorber strut.

Specially for Ford KA


Remove the steering knuckle from the shock absorber strut only.

Note: When doing this, support the drive shaft so that it does not hang down after removing the shock absorber strut. To do this, place a suitable support under the shaft, namely next to the rubber boot of the outer CV joint.


For details, see the website www.MAZbook.ru
This article is available at: russian, bulgarian, belarusian, ukrainian, serbian, croatian, romanian, polish, slovak, hungarian
This text was checked by: Evgeny Mereshnikov
Share with friends on social networks:

Previous
Mazda 121 (3) » Front suspension
Next

Front suspension — design description
Disassembling the shock absorber strut, removing and installing the…
Removal and installation the steering knuckle
Drive shafts — design description
Removal and installation drive shafts
Removal and installation drive shaft covers
More articles on repairing other Mazda models
Removal and installation the shock absorber strut Mazda Familia 6 (1989-1994)
Front strut shock absorber assembly — removal and installation Mazda Capella 3 (1982-1992, petrol)
Removal, checking and installation the front shock absorber and spring Mazda3 BK (2003-2009)
Shock absorber and coil spring Mazda6 GG (2002-2008)
Checking and disposing of the front shock absorber Mazda CX-5KE (2012-2017)
Link in different formats to this article
Comments and feedback from visitors
No comments yet


How much will 23 + 27 ?


Mazda BT-50 (1) (2006-2011) 
  • General information
  • Introduction to guide
  • User manual
  • Maintenance
  • Power unit
  • Engine repair (diesel)
  • Cooling and lubrication system
  • Fuel injection system
  • Intake and exhaust system
  • Engine electrical equipment
  • Transmission
  • Clutch
  • Mechanical gearbox
  • All-wheel drive system
  • Transfer case and gearboxes
  • Chassis
  • Front suspension
  • Rear suspension
  • Steering
  • Brake system
  • Body
  • Exterior (external elements)
  • Interior (internal elements)
  • Heating and air conditioning
  • Security system SRS
  • Electrical equipment
  • Equipment and devices
  • Electrical circuits
Mazda 121 (3) (1996-2003) 
  • General information
  • User manual
  • Maintenance
  • Power unit
  • Petrol engine 1.3 l
  • Petrol engine 1.25/1.4 l
  • Diesel engine
  • Lubrication system
  • Cooling system
  • Ignition system
  • Supply system
  • Fuel injection (gasoline)
  • Fuel injection (diesel)
  • Exhaust system
  • Transmission
  • Clutch
  • Car gearbox
  • Chassis
  • Front suspension
  • Rear suspension
  • Steering
  • Brake system
  • Wheels and tires
  • Body
  • Exterior (external elements)
  • Interior (internal elements)
  • Doors, windows and locks
  • Heating system
  • Electrical equipment
  • Troubleshooting
  • Equipment and devices
  • Lighting system
  • Power devices
  • Electrical circuits
MazBook.ru © 2018–2026 · Mobile version · Articles and news · Sitemap: EN BG BY UA RS HR RO PL SK HU · Feedback · Site search · Add to bookmarks Familia 5 (BF) · Familia 6 (BG) · Capella 3 (GC) · Capella 3 and 4 (GC) · Capella 4 (GD) · Capella 5 (GE) · Capella 6 (GF) · Mazda3 BK · Mazda6 GG · CX-5KE · Mazda 121 (3) · Mazda BT-50 (1) ·
By continuing to use the site, you agree to the use of cookies 🔐