
MazBook.ru
English Русский
Български
Беларускі
Український
Српски
Hrvatski
Română
Polski
Slovenský
Magyar
• Bookmark • Sitemap • Contacts •   
Cars Opel Cars Ford Cars Volkswagen Cars Audi Cars Kia Cars Renault Cars Peugeot


Familia Capella Mazda3 Mazda6 CX-? Others Articles
Mazda 121 (3) (1996-2003) Mazda BT-50 (1) (2006-2011)

Removal and installation the trunk lid (Mazda 121 (3))

  • Home
  • Mazda
  • 121 JASM (1996-2003)
  • Body
  • Doors, windows and locks
  • Removal and installation the trunk lid
0
Contents: Removal ⇓ Installation ⇓

Removal


Note: To make it easier to install the electrical wires and hoses, tie a piece of string to the ends of the wires and hoses before removing them. The string remains connected in the removed cover. When removing, the string makes it easier to pull in the wires and hoses.


Disconnect the negative cable from the battery with the ignition off.

Note: This will erase the data from the electronic memory units. See the instructions in the chapter "Electrical equipment".


Remove the interior trim from the trunk.

Remove the boot lid trim. To do this, open the boot lid, unscrew the plastic bolt above the boot lock drive and pry up the sliding clamp with a screwdriver. Use your fingers to pry the trim off the nine clamps around the circumference.

Disconnect the plug in the trunk lid.
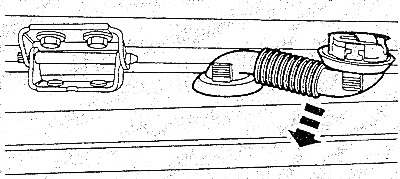
Remove the rubber bushing from the trunk lid and pull out the wiring harness.


Remove the rubber bushing from the trunk lid and pull out the wiring harness.

Squeeze the windshield washer nozzle out of the trunk lid and pull the hose off the nozzle.
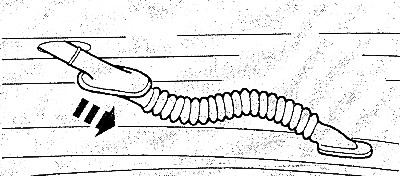
Pry up the rubber bushing and pull out the windshield washer hose.


Pry up the rubber bushing and pull out the windshield washer hose.


Precautions: Before removing the shock absorbers, be sure to support the trunk lid. Otherwise, the trunk lid will fall because it cannot be supported by the shock absorber alone.
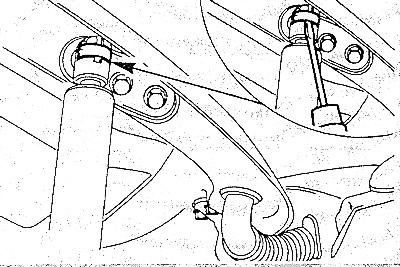

Pull the shock absorber out of the ball head in the trunk lid. To do this, slightly pry the gas…


Pull the shock absorber out of the ball head in the trunk lid. To do this, slightly pry the gas shock absorber clamp with a screwdriver.

Remove the second shock absorber in the same way.
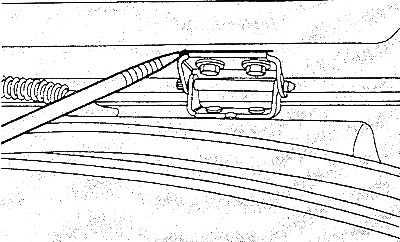
Mark the position of the trunk lid hinges by tracing around the hinges with a felt-tip pen.
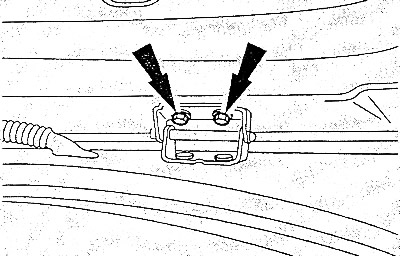

Mark the position of the trunk lid hinges by tracing around the hinges with a felt-tip pen.

Unscrew the four bolts securing the trunk lid and remove it with the help of an assistant.

Unscrew the four bolts securing the trunk lid and remove it with the help of an assistant.


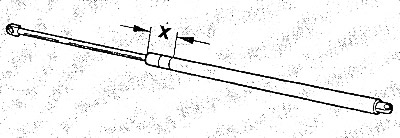
Note: If the gas shock absorber is being replaced, the gas must be released from the old shock…


Note: If the gas shock absorber is being replaced, the gas must be released from the old shock absorber before disposal. To do this, clamp the shock absorber in the area X=50 mm in a vice. Clamp the shock absorber only in this place. Finally, saw the cylinder in the first third from the edge of the piston rod mount.


Precautions: To collect the leaking oil, cover the cut area with a rag. In addition, you must use protective glasses when working.


Installation


Align the trunk lid on the hinges and tighten the bolts to 10 Nm. Support the lid.

Press the gas shock absorber into the round head.

Pull in the hose and electrical wires using the cords left in the lid.

Place the hose onto the washer nozzle.

Connect the plug.

Insert rubber bushings into the trunk lid.

Close the trunk lid without the lock and check the adjustment. If necessary, loosen the fastening nuts and align the lid so that there is a parallel and uniform gap between it and the surrounding parts. Tighten the nuts.

Install the trunk lid trim.

Install the interior trunk trim

Connect the negative cable to the battery.

Set the clock readings and enter codes if necessary.

(For details, see the website: «www.MAZbook.ru»)
This article is available at: russian, bulgarian, belarusian, ukrainian, serbian, croatian, romanian, polish, slovak, hungarian
This text was checked by: Evgeny Mereshnikov
Share with friends on social networks:

Previous
Mazda 121 (3) » Doors, windows and locks
Next

Removal and installation the window regulator
Removal and installation door glass
Removal and installation the inner door handle
Removal and installation door trim
Removal and installation the rear door lock (Ford Fiesta Courier)
Removal and installation the trunk lid lock cylinder
Removal and installation the trunk lid lock
Ford KA: Door Removal and Installation
Ford KA: Removing and installing the outer door handle
Ford KA: Removing and installing the door lock cylinder
More articles on repairing other Mazda models
Trunk lid (if equipped) Mazda Familia 6 (1989-1994)
Trunk lid Mazda Capella 3 (1982-1992, petrol)
Locking/unlocking doors, trunk lid and tailgate Mazda3 BK (2003-2009)
Locking/unlocking doors, trunk lid and tailgate Mazda6 GG (2002-2008)
Removal and installation the trunk floor Mazda CX-5KE (2012-2017)
Link in different formats to this article
Comments and feedback from visitors
No comments yet


How much will 39 + 32 ?


Mazda BT-50 (1) (2006-2011) 
  • General information
  • Introduction to guide
  • User manual
  • Maintenance
  • Power unit
  • Engine repair (diesel)
  • Cooling and lubrication system
  • Fuel injection system
  • Intake and exhaust system
  • Engine electrical equipment
  • Transmission
  • Clutch
  • Mechanical gearbox
  • All-wheel drive system
  • Transfer case and gearboxes
  • Chassis
  • Front suspension
  • Rear suspension
  • Steering
  • Brake system
  • Body
  • Exterior (external elements)
  • Interior (internal elements)
  • Heating and air conditioning
  • Security system SRS
  • Electrical equipment
  • Equipment and devices
  • Electrical circuits
Mazda 121 (3) (1996-2003) 
  • General information
  • User manual
  • Maintenance
  • Power unit
  • Petrol engine 1.3 l
  • Petrol engine 1.25/1.4 l
  • Diesel engine
  • Lubrication system
  • Cooling system
  • Ignition system
  • Supply system
  • Fuel injection (gasoline)
  • Fuel injection (diesel)
  • Exhaust system
  • Transmission
  • Clutch
  • Car gearbox
  • Chassis
  • Front suspension
  • Rear suspension
  • Steering
  • Brake system
  • Wheels and tires
  • Body
  • Exterior (external elements)
  • Interior (internal elements)
  • Doors, windows and locks
  • Heating system
  • Electrical equipment
  • Troubleshooting
  • Equipment and devices
  • Lighting system
  • Power devices
  • Electrical circuits
MazBook.ru © 2018–2026 · Mobile version · Articles and news · Sitemap: EN BG BY UA RS HR RO PL SK HU · Feedback · Site search · Add to bookmarks Familia 5 (BF) · Familia 6 (BG) · Capella 3 (GC) · Capella 3 and 4 (GC) · Capella 4 (GD) · Capella 5 (GE) · Capella 6 (GF) · Mazda3 BK · Mazda6 GG · CX-5KE · Mazda 121 (3) · Mazda BT-50 (1) ·
By continuing to use the site, you agree to the use of cookies 🔐