
MazBook.ru
English Русский
Български
Беларускі
Український
Српски
Hrvatski
Română
Polski
Slovenský
Magyar
• Bookmark • Sitemap • Contacts •   
Cars Opel Cars Ford Cars Volkswagen Cars Audi Cars Kia Cars Renault Cars Peugeot


Familia Capella Mazda3 Mazda6 CX-? Others Articles
Mazda 121 (3) (1996-2003) Mazda BT-50 (1) (2006-2011)

Removal and installation the outside rearview mirror (Mazda 121 (3))

  • Home
  • Mazda
  • 121 JASM (1996-2003)
  • Body
  • Exterior (external elements)
  • Removal and installation the outside rearview mirror
0
Contents: Removal ⇓ Installation ⇓

Removal


Disconnect the negative cable from the battery with the ignition off.

Caution: This will erase the data from the electronic memory units. See the instructions in the chapter "Electrical equipment".


Remove the door trim.
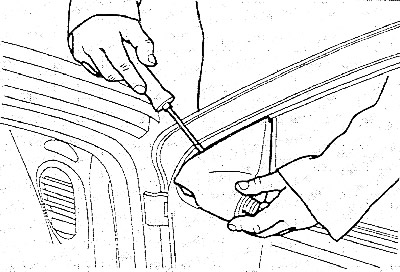
Press the inner cover of the mirror with a screwdriver and remove it. Place a piece of paper under…


Press the inner cover of the mirror with a screwdriver and remove it. Place a piece of paper under the screwdriver to avoid damage.
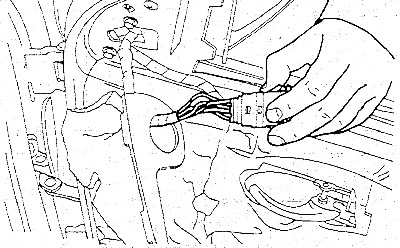
Press the mirror switch out of the cover and pull off the plug.

Press the mirror switch out of the cover and pull off the plug.

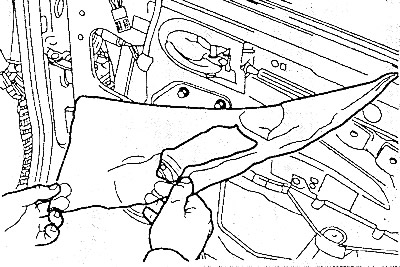
Pull the protective film off the front of the door, fold it back and secure it with adhesive tape.…


Pull the protective film off the front of the door, fold it back and secure it with adhesive tape. Do not stick the adhesive tape on the adhesive layer of the film, so as not to impair its properties.
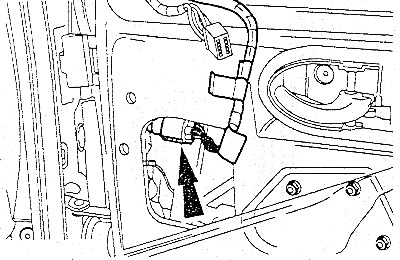


Disconnect the outside mirror wiring harness plug and remove the adhesive tape from the door.
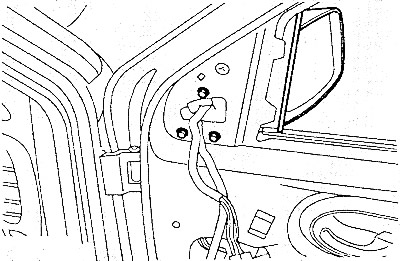

Disconnect the outside mirror wiring harness plug and remove the adhesive tape from the door.

Unscrew the three mirror mounting bolts and remove it. Hold the mirror from the outside so that it…


Unscrew the three mirror mounting bolts and remove it. Hold the mirror from the outside so that it does not fall.

(The original text is published on: «www.mazbook.ru»)

Installation


Insert the mirror from the outside, pull the wire through the hole in the door. Secure the mirror with bolts.

Put on the wire harness plug. Secure the wire to the door with adhesive tape.

Peel back the protective film and stick it to the door.

Note: The film must be applied evenly and without folds, otherwise it will be pulled into the car. Seal small cracks with adhesive tape. In case of major damage, replace the protective foil.


Insert the mirror switch into the cover. Install the mirror cover and secure it.

Install door trim.

Connect the negative cable to the battery.

Set the clock readings and, if necessary, enter the required codes.
This article is available at: russian, bulgarian, belarusian, ukrainian, serbian, croatian, romanian, polish, slovak, hungarian
This text was checked by: Evgeny Mereshnikov
Share with friends on social networks:

Previous
Mazda 121 (3) » Exterior (external elements)
Next

Replacing the decorative strip
Removal and installation the hood
Removal and installation the front wing
Removal and installation the inner parts of the front fenders
Removal and installation the rear bumper
Replacing the mirror glass
Ford KA car body — general information
Ford KA: Removing and installing the front bumper and radiator grille
Ford KA: Removing and installing the rear bumper
Ford KA: Removing and installing the inner part of the front fender
More articles on repairing other Mazda models
Outside mirror Mazda Familia 6 (1989-1994)
Outside rearview mirror Mazda Capella 3 (1982-1992, petrol)
Interior rear view mirror Mazda3 BK (2003-2009)
Interior rear view mirror Mazda6 GG (2002-2008)
Link in different formats to this article
Comments and feedback from visitors
No comments yet


How much will 21 + 26 ?


Mazda BT-50 (1) (2006-2011) 
  • General information
  • Introduction to guide
  • User manual
  • Maintenance
  • Power unit
  • Engine repair (diesel)
  • Cooling and lubrication system
  • Fuel injection system
  • Intake and exhaust system
  • Engine electrical equipment
  • Transmission
  • Clutch
  • Mechanical gearbox
  • All-wheel drive system
  • Transfer case and gearboxes
  • Chassis
  • Front suspension
  • Rear suspension
  • Steering
  • Brake system
  • Body
  • Exterior (external elements)
  • Interior (internal elements)
  • Heating and air conditioning
  • Security system SRS
  • Electrical equipment
  • Equipment and devices
  • Electrical circuits
Mazda 121 (3) (1996-2003) 
  • General information
  • User manual
  • Maintenance
  • Power unit
  • Petrol engine 1.3 l
  • Petrol engine 1.25/1.4 l
  • Diesel engine
  • Lubrication system
  • Cooling system
  • Ignition system
  • Supply system
  • Fuel injection (gasoline)
  • Fuel injection (diesel)
  • Exhaust system
  • Transmission
  • Clutch
  • Car gearbox
  • Chassis
  • Front suspension
  • Rear suspension
  • Steering
  • Brake system
  • Wheels and tires
  • Body
  • Exterior (external elements)
  • Interior (internal elements)
  • Doors, windows and locks
  • Heating system
  • Electrical equipment
  • Troubleshooting
  • Equipment and devices
  • Lighting system
  • Power devices
  • Electrical circuits
MazBook.ru © 2018–2026 · Mobile version · Articles and news · Sitemap: EN BG BY UA RS HR RO PL SK HU · Feedback · Site search · Add to bookmarks Familia 5 (BF) · Familia 6 (BG) · Capella 3 (GC) · Capella 3 and 4 (GC) · Capella 4 (GD) · Capella 5 (GE) · Capella 6 (GF) · Mazda3 BK · Mazda6 GG · CX-5KE · Mazda 121 (3) · Mazda BT-50 (1) ·
By continuing to use the site, you agree to the use of cookies 🔐