
MazBook.ru
English Русский
Български
Беларускі
Український
Српски
Hrvatski
Română
Polski
Slovenský
Magyar
• Bookmark • Sitemap • Contacts •   
Cars Opel Cars Ford Cars Volkswagen Cars Audi Cars Kia Cars Renault Cars Peugeot


Familia Capella Mazda3 Mazda6 CX-? Others Articles
CX-5KE (2012-2017)

Removal and installation the front suspension subframe (Mazda CX-5KE)

  • Home
  • Mazda CX-?
  • CX 5 KE (2012-2017)
  • Chassis
  • Front suspension
  • Removal and installation the front suspension subframe
0
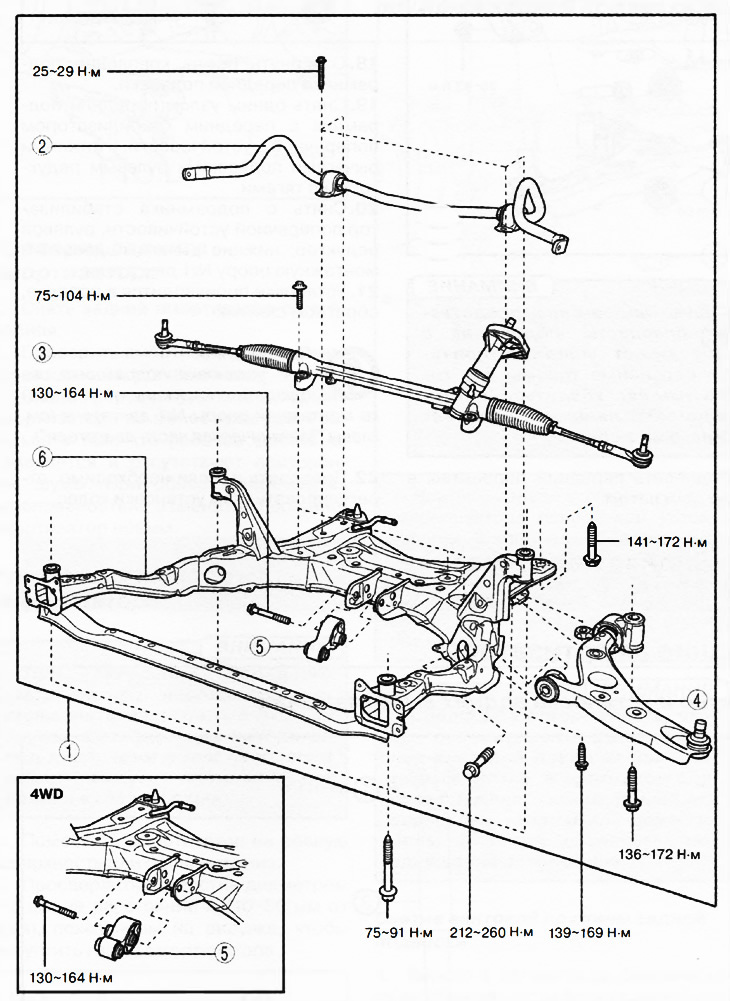
1. Front suspension subframe assembly.

1. Front suspension subframe assembly.
2. Front anti-roll bar.
3. Steering gear with rods.
4. Lower arm of the front suspension.
5. Engine mounting support No.1.
6. Front subframe.


Attention.
  • Performing the following procedure without first removing the front ABS wheel sensor may cause an accidental open circuit in the wiring. Disconnect the front ABS wheel sensor wiring before performing the following procedures (from the drive shaft side) and secure the wiring in a suitable location where it will not be accidentally touched when servicing the vehicle.
  • Fix the steering wheel with tape or wire to prevent the steering shaft from turning after disconnecting. If the steering wheel is turned after the steering shaft is disconnected from the steering gear, the internal parts of the contact disk may be damaged.


1. Remove the hinge cover (see chapter "Steering").

2. Disconnect the intermediate shaft from the steering gear (see chapter "Steering").

3. Disconnect the front ABS wheel sensor wiring from the steering knuckle and move it to the side.
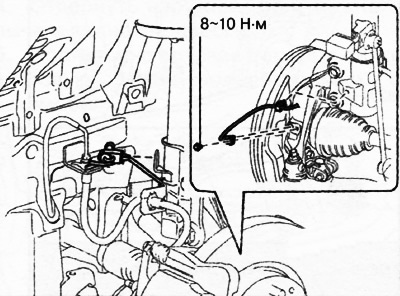
3. Disconnect the front ABS wheel sensor wiring from the steering knuckle and move it to the side.


4. Remove the front protective tray No.2.


5. Remove the front protective tray No.1.

6. Remove the mudguard.

7. Remove the front mudguard from the front subframe and bumper.
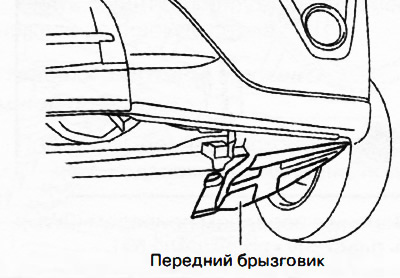
7. Remove the front mudguard from the front subframe and bumper.


8. Disconnect the front subframe extensions.
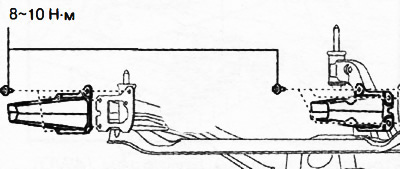
8. Disconnect the front subframe extensions.


9. Disconnect the front anti-roll bar strut (from the stabilizer bar side).
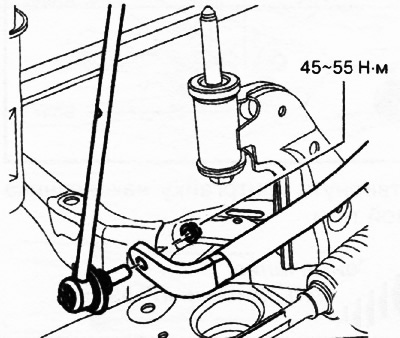
9. Disconnect the front anti-roll bar strut (from the stabilizer bar side).


10. Remove the front subframe insulator.
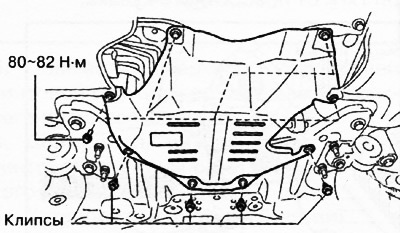
Front-wheel drive versions (2 WD)
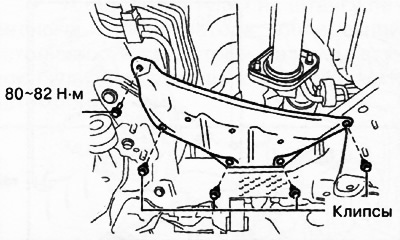
Front-wheel drive versions (2 WD)


All-wheel drive (4WD) versions

All-wheel drive (4WD) versions


11. Disconnect the rubber suspension from the front subframe and set it aside.
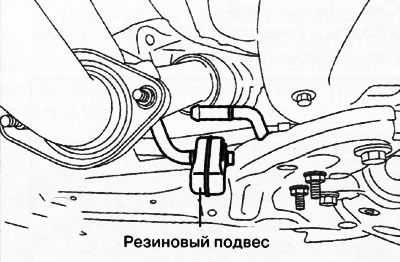


11. Disconnect the rubber suspension from the front subframe and set it aside.


12. Front-wheel drive (2WD) versions: Remove bracket plate #1.
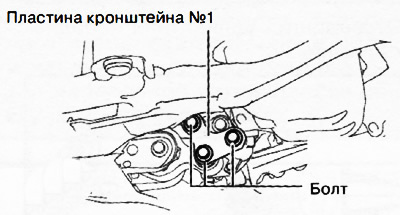
12. Front-wheel drive (2WD) versions: Remove bracket plate #1.


13. 4WD versions: Remove the bracket plate.
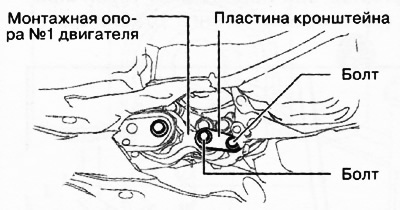
13. 4WD versions: Remove the bracket plate.


14. Loosen the tie rod end lock nut.

Note: Tightening torque: 47-59 Nm.


15. Using a special tool, disconnect the steering rod end from the steering knuckle.
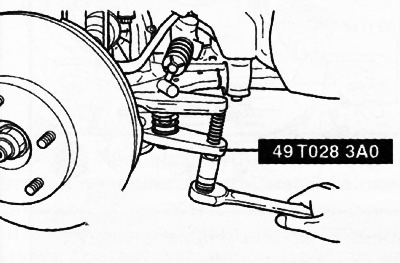
15. Using a special tool, disconnect the steering rod end from the steering knuckle.


16. Disconnect the ball joint of the lower arm of the front suspension.


(The original text can be found on: «Mazbook»)
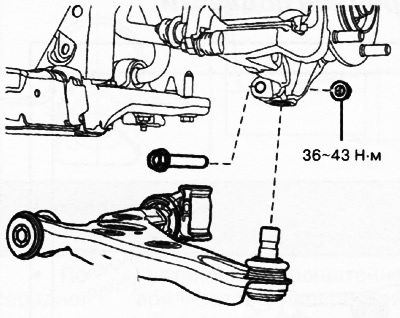
16. Disconnect the ball joint of the lower arm of the front suspension.


Caution: Removing the subframe is dangerous. The subframe assembly may fall and cause serious injury or death. Make sure the jack is securely supporting the subframe assembly.


17. Support the front subframe assembly with a jack.
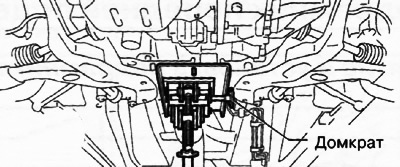
17. Support the front subframe assembly with a jack.


18. Loosen the front suspension subframe mounting bolts.

19. Remove the front subframe with the front anti-roll bar, lower suspension arms and steering gear with rods as one unit.

20. Remove the anti-roll bar, steering gear, lower suspension arms and engine mounting support No.1 from the subframe.

21. Installation is carried out in the reverse order of removal.

Note: When installing the subframe, follow the instructions for installing engine mounting support No.1 (see chapter "Mechanical part of the engine").


22. Check and, if necessary, adjust the wheel alignment angles.
This article is available at: russian, bulgarian, belarusian, ukrainian, serbian, croatian, romanian, polish, slovak, hungarian
This text was checked by: Evgeny Mereshnikov
Share with friends on social networks:

Previous
CX-5KE » Front suspension
Next

Checking the front anti-roll bar struts
Removal and installation the front anti-roll bar
Checking the lower arm of the front suspension
Removal/installing the lower arm of the front suspension
Checking and disposing of the front shock absorber
More articles on repairing other Mazda models
Detailed technical specifications of the front suspension Mazda Familia 5 (1985-1989)
Front suspension strut — removal and repair Mazda Capella 3 (1982-1992, petrol)
Front suspension — description Mazda3 BK (2003-2009)
Light switch for front fog lights Mazda6 GG (2002-2008)
Front suspension — design description Mazda 121 (3) (1996-2003)
Link in different formats to this article
Comments and feedback from visitors
No comments yet


How much will 35 + 28 ?


CX-5KE (2012-2017) 
  • General information
  • Introduction to the guide
  • User manual
  • Maintenance
  • Power unit
  • Petrol engines 2.0 l
  • Petrol engines 2.5 l
  • Diesel engines 2.2 l
  • Cooling system
  • Lubrication system
  • Supply system
  • Control system
  • Intake and exhaust system
  • Engine electrical equipment
  • Transmission
  • Clutch
  • Mechanical gearbox
  • Automatic gearbox
  • Transfer case
  • Drive shafts and cardan
  • Chassis
  • Wheels and tires
  • Front suspension
  • Rear suspension
  • Brake system
  • Steering
  • Body
  • Exterior (external elements)
  • Interior (internal elements)
  • Security systems
  • Heating and air conditioning
  • Electrical equipment
  • Equipment and devices
  • Electrical circuits
MazBook.ru © 2018–2026 · Mobile version · Articles and news · Sitemap: EN BG BY UA RS HR RO PL SK HU · Feedback · Site search · Add to bookmarks Familia 5 (BF) · Familia 6 (BG) · Capella 3 (GC) · Capella 3 and 4 (GC) · Capella 4 (GD) · Capella 5 (GE) · Capella 6 (GF) · Mazda3 BK · Mazda6 GG · CX-5KE · Mazda 121 (3) · Mazda BT-50 (1) ·
By continuing to use the site, you agree to the use of cookies 🔐