
MazBook.ru
English Русский
Български
Беларускі
Український
Српски
Hrvatski
Română
Polski
Slovenský
Magyar
• Bookmark • Sitemap • Contacts •   
Cars Opel Cars Ford Cars Volkswagen Cars Audi Cars Kia Cars Renault Cars Peugeot


Familia Capella Mazda3 Mazda6 CX-? Others Articles
Capella 3 (1982-1992, petrol) Capella 3 and 4 (1982-1992) Capella 4 (1987-1992) Capella 5 (1991-1997) Capella 6 (1997-2005, petrol)

Seats — removal and installation (Mazda Capella GC)

  • Home
  • Mazda Capella
  • Capella GC (1982-1992)
  • Body
  • Interior (internal elements)
  • Seats — removal and installation
0
Contents: Front seat ⇓ Back seat ⇓ Seat heaters ⇓

Front seat


If heated seats are installed, disconnect the negative battery cable.
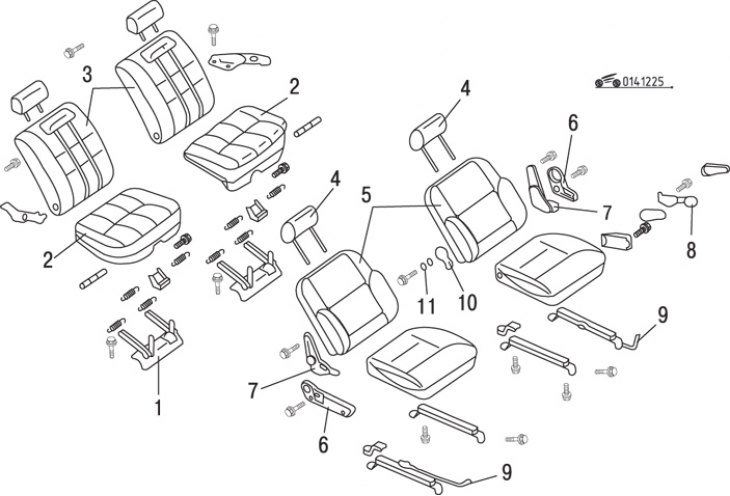
Figure 12.24. Seats: 1 – bracket; 2 – rear seat cushion; 3 – rear seat backs; 4 – headrest; 5 –…

Figure 12.24. Seats: 1 – bracket; 2 – rear seat cushion; 3 – rear seat backs; 4 – headrest; 5 – front seat backs; 6 – lids; 7 – seat angle adjustment mechanism; 8 – seat height adjustment mechanism; 9 – mechanism for adjusting the longitudinal movement of the seat; 10 – lumbar support adjustment mechanism; 11 – side regulator


Move the seat back as far as possible and remove the screws securing the front portions of the vehicle's seat rails to the floor (figure 12.24).

Move the seat forward as far as possible and remove the screws securing the rear portions of the vehicle's seat rails to the floor.

Remove any side trim panels that may make it difficult to remove the seat. Disconnect the connector from the seat heater and remove the seat.
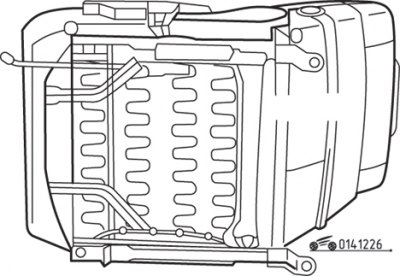
Figure 12.25. Locations (1) for applying grease to the front seat guide rails

Figure 12.25. Locations (1) for applying grease to the front seat guide rails


Information copied from the portal mazbook

Installation is carried out in the reverse order of removal. Lubricate the seat slide rails (figure 12.25).

Back seat


The fixed rear seat cushion can be removed by pushing it down and back. Then remove it from the car. The hinged cushion can be tilted forward, after which the hinge mounting bolts or the hinges can be unscrewed.

Unscrew the seat back hinges or brackets and remove the seat back.

Installation is carried out in the reverse order of removal.

Seat heaters


Some models are equipped with electric heating elements for the front seats. If the system is experiencing any malfunctions or faults, first check the fuses and fuse links.
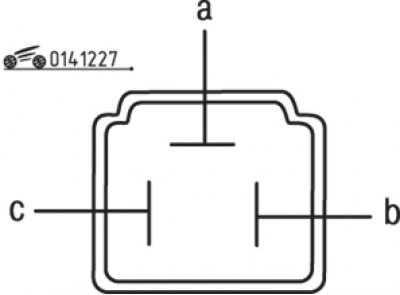
Figure 12.26. Seat heater switch contact identification: a, b, c – contacts

Figure 12.26. Seat heater switch contact identification: a, b, c – contacts


Disconnect the seat heater switch and check for voltage at the switch contacts. When the switch is turned on ("ON") between contacts "b" (green wire) and "s" (blue wire) there must be tension (figure 12.26). If it is missing, replace the switch.
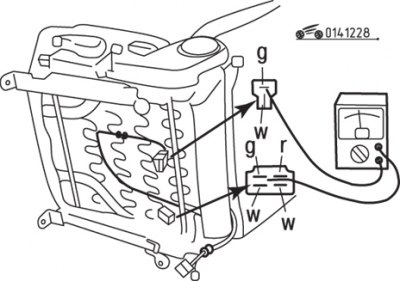
Figure 12.27. Checking the voltage at the front seat cushion heater connector contacts

Figure 12.27. Checking the voltage at the front seat cushion heater connector contacts


Disconnect the connector from the seat cushion heater under the seat. Check the connector for voltage. There should be voltage between the contacts of the two-pin ("W") and four-pin ("B") connectors (figure 12.27). If there is no voltage, the heater or heater wiring is faulty.
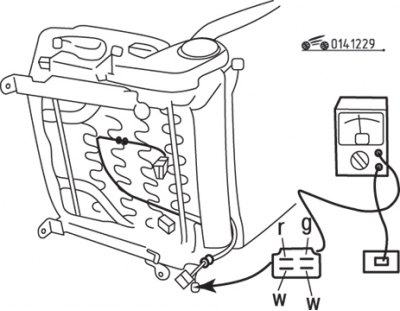
Figure 12.28. Checking the voltage at the front seat back heater connector contacts

Figure 12.28. Checking the voltage at the front seat back heater connector contacts


Check the seat back heater connector for voltage. Between contact "Y" (figure 12.28) there should be voltage between the single-pin connector and the "B" contact of the four-pin connector. If there is no voltage, the heater or heater wiring is faulty.

The heaters can only be replaced together with the seat cushion or backrest.
This article is available at: russian, bulgarian, belarusian, ukrainian, serbian, croatian, romanian, polish, slovak, hungarian
This text was checked by: Georgy Afanasyev
Share with friends on social networks:

Previous
Capella 3 and 4 » Interior (internal elements)
Next

Instrument panel — removal and installation
Center console — removal and installation
Central lock
Door trim — removal and installation
Repair and replacement of plastic elements (since 1984)
Door trim (since 1984)
Instrument panel — removal and installation (since 1984)
More articles on repairing other Mazda models
Grinding of valve seats and valves Mazda Familia 5 (1985-1989)
Adjusting the longitudinal position of the seats Mazda3 BK (2003-2009)
Adjusting the longitudinal position of the seats Mazda6 GG (2002-2008)
Seats — adjustment Mazda BT-50 (1) (2006-2011)
Link in different formats to this article
Comments and feedback from visitors
No comments yet


How much will 48 + 21 ?


Capella 6 (1997-2005, petrol) 
  • General information
  • Introduction to guide
  • User manual
  • Troubleshooting
  • Maintenance
  • Power unit
  • 4-cylinder engines
  • 6-cylinder engines
  • Engine overhaul
  • Cooling and ventilation
  • Power and exhaust systems
  • Engine electrics
  • Control system
  • Transmission
  • Mechanical gearbox
  • Automatic gearbox
  • Clutch and drive shafts
  • Chassis
  • Brake system
  • Car suspension
  • Steering
  • Body
  • Exterior (external elements)
  • Interior (internal elements)
  • Doors, windows and locks
  • Electrical equipment
  • Equipment and devices
  • Electrical circuits
Capella 5 (1991-1997) 
  • General information
  • User manual
  • Maintenance
  • Helpful hints
  • Power unit
  • Petrol engines 1.6 and 1.8
  • Petrol engines 2.0
  • 2.5 petrol engines
  • Overhaul engines 1.6 and 1.8
  • Overhaul engines 2.0 and 2.5
  • Diesel engine 2.0
  • Engine electrics
  • Cooling system
  • Air conditioner
  • Carburetor Nikki 30/34
  • Power system (1.6 and 1.8)
  • Power system (2.0 and 2.5)
  • Control system
  • Transmission
  • Mechanical gearbox
  • Automatic gearbox
  • Clutch and axles
  • Chassis
  • Brake system
  • Suspension and wheels
  • Steering
  • Body
  • Exterior (external elements)
  • Interior (internal elements)
  • Doors and windows
  • Electrical equipment
  • Equipment and devices
  • Electrical circuits
Capella 4 (1987-1992) 
  • General information
  • Introduction to manual
  • Vehicle specifications
  • Power unit
  • Engine repair
  • Lubrication system
  • Cooling system
  • Fuel system (carburetor)
  • Fuel injection (FE)
  • Fuel injection (DOHC)
  • Fuel system (diesel)
  • Ignition system
  • Transmission
  • Clutch
  • Gearbox
  • Drive shafts
  • Chassis
  • Front suspension
  • Rear suspension
  • Steering system
  • Brake system
  • Electrical equipment
  • Equipment and devices
  • Electrical circuits
Capella 3 and 4 (1982-1992) 
  • General information
  • User manual
  • Maintenance
  • Power unit
  • Gasoline engine
  • Engine overhaul (gasoline)
  • Diesel engine
  • Cooling and heating
  • Supply system
  • Ignition system
  • Emission reduction
  • Transmission
  • Clutch
  • Mechanical gearbox
  • Automatic gearbox
  • Drive shafts
  • Chassis
  • Brake system
  • Suspension and wheels
  • Steering
  • Body
  • Exterior (external elements)
  • Interior (internal elements)
  • Electrical equipment
  • Equipment and devices
  • Power devices
  • Electrical circuits
Capella 3 (1982-1992, petrol) 
  • General information
  • User manual
  • Maintenance
  • Troubleshooting
  • Late models
  • Power unit
  • Engine in car
  • Engine overhaul
  • Cooling and heating system
  • Fuel and exhaust system
  • Engine electrical system
  • Emission control system
  • Transmission
  • Mechanical gearbox
  • Automatic gearbox
  • Clutch and drive shafts
  • Chassis
  • Brake system
  • Suspension and wheels
  • Steering
  • Body
  • Exterior (external elements)
  • Interior (internal elements)
  • Electrical equipment
  • Equipment and devices
  • Lighting and lamps
  • Electrical circuits
MazBook.ru © 2018–2026 · Mobile version · Articles and news · Sitemap: EN BG BY UA RS HR RO PL SK HU · Feedback · Site search · Add to bookmarks Familia 5 (BF) · Familia 6 (BG) · Capella 3 (GC) · Capella 3 and 4 (GC) · Capella 4 (GD) · Capella 5 (GE) · Capella 6 (GF) · Mazda3 BK · Mazda6 GG · CX-5KE · Mazda 121 (3) · Mazda BT-50 (1) ·
By continuing to use the site, you agree to the use of cookies 🔐