
MazBook.ru
English Русский
Български
Беларускі
Український
Српски
Hrvatski
Română
Polski
Slovenský
Magyar
• Bookmark • Sitemap • Contacts •   
Cars Opel Cars Ford Cars Volkswagen Cars Audi Cars Kia Cars Renault Cars Peugeot


Familia Capella Mazda3 Mazda6 CX-? Others Articles
Capella 3 (1982-1992, petrol) Capella 3 and 4 (1982-1992) Capella 4 (1987-1992) Capella 5 (1991-1997) Capella 6 (1997-2005, petrol)

Door trim — removal and installation (Mazda Capella GC)

  • Home
  • Mazda Capella
  • Capella GC (1982-1992)
  • Body
  • Interior (internal elements)
  • Door trim — removal and installation
0
Turn off the ignition and disconnect the cable from the negative battery terminal.

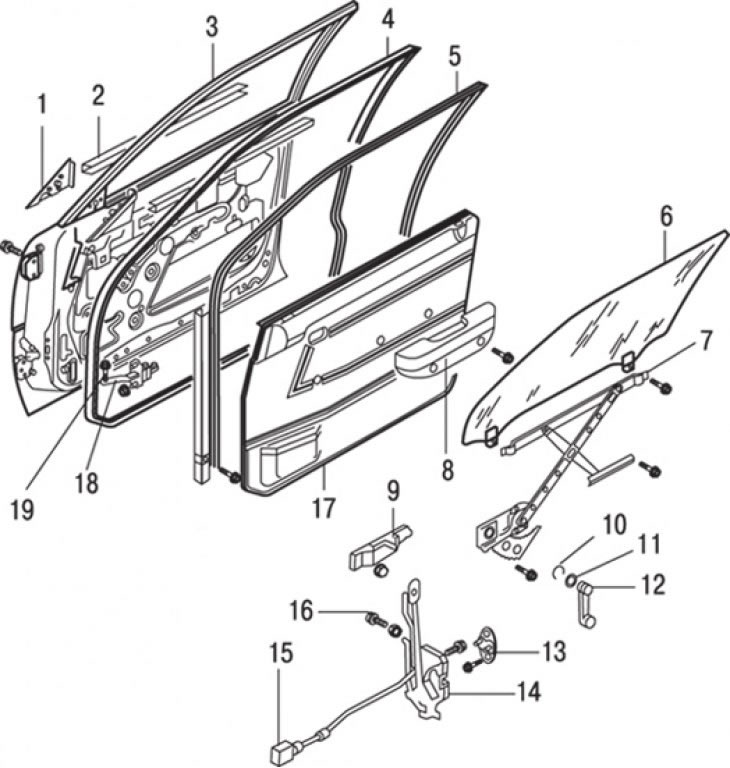
Figure 12.7. Front door: 1 – external decorative cover; 2 – molding; 3 – front door; 4 – seal; 5 –…

Figure 12.7. Front door: 1 – external decorative cover; 2 – molding; 3 – front door; 4 – seal; 5 – glass seal; 6 – glass; 7 – window lifter; 8 – armrest; 9 – outer door handle; 10 – thrust ring; 11 – ring; 12 – window lift handle; 13 – impact plate; 14 – door lock; 15 – inner door handle; 16 – door lock cylinder; 17 – door trim; 18 – door opening limiter; 19 – limiter pin
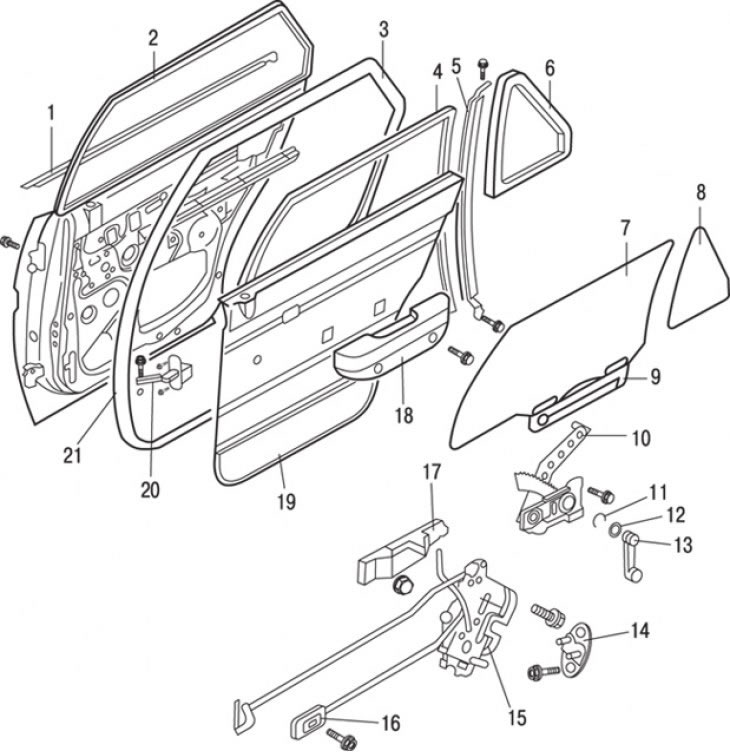

Figure 12.8. Rear door: 1 – molding; 2 – rear door; 3 – seal; 4 – glass seal; 5 – central pillar; 6…

Figure 12.8. Rear door: 1 – molding; 2 – rear door; 3 – seal; 4 – glass seal; 5 – central pillar; 6 – seal of the triangular window of the passenger compartment; 7 – glass; 8 – triangular cabin window; 9 – glass support; 10 – window lifter; 11 – thrust ring; 12 – ring; 13 – window lift handle; 14 – impact plate; 15 – door lock; 16 – inner door handle; 17 – outer door handle; 18 – armrest; 19 – door trim; 20 – door opening limiter; 21 – limiter pin


Remove the window lift handle (manually operated window) or switch (electric window) (figure 12.7, 12.8). The retaining ring that secures the window handle can be released by placing a clean cloth between the handle and the door trim and, by pulling the cloth against the ends of the retaining ring, hooking the retaining ring and releasing it. In this case, you need to pull the handle towards you so that after releasing the thrust ring, it comes off the window regulator splines.

Remove the inner door handle cover.

Remove the armrest mounting locking screws.

Using a wide-blade screwdriver, release the clips around the perimeter and separate the door trim from the door. The clips are very tightly fitted, so care must be taken not to break them during removal.

Remove the door trim by unhooking it from the door lock handle and sliding it upward.

Carefully remove the film protecting the door from water ingress.

Installation is carried out in the reverse order of removal, taking into account the following.

Carefully install the film that protects the door from water ingress in its original position, installing it without folds or tears.

Before installation, check and, if necessary, replace any clips that were broken when removing the door trim.

When installing the door trim, position the top of the trim over the door lock handle and press it into place.

Pressing sharply on the upholstery where the fasteners are located, secure the upholstery to the door.

Upholstery fastening elements


A plastic fastener that resembles a self-tapping screw and is widely used for attaching various upholstery elements. Although this connector appears to be a screw, it is actually a combination of a self-tapping screw and a fastener. The split base of the connector expands when a screw is screwed into it.


To remove the connector, hold the base of the connector with your fingers and use a Phillips screwdriver to remove the screw, then use a flat-head screwdriver to pry the base out.

To insert the connector, position the base in the desired position and use a screwdriver to screw the screw into it.
This article is available at: russian, bulgarian, belarusian, ukrainian, serbian, croatian, romanian, polish, slovak, hungarian
This text was checked by: Georgy Afanasyev
Share with friends on social networks:

Previous
Capella 3 and 4 » Interior (internal elements)
Next

Central lock
Center console — removal and installation
Instrument panel — removal and installation
Seats — removal and installation
Repair and replacement of plastic elements (since 1984)
More articles on repairing other Mazda models
Door trim / window lifter / door glass Mazda Familia 6 (1989-1994)
Blocking rear door locks from opening from inside the car Mazda3 BK (2003-2009)
Door lock control system Mazda6 GG (2002-2008)
Removal and installation the front door sill trim Mazda CX-5KE (2012-2017)
Removal and installation door trim Mazda 121 (3) (1996-2003)
Link in different formats to this article
Comments and feedback from visitors
No comments yet


How much will 34 + 21 ?


Capella 6 (1997-2005, petrol) 
  • General information
  • Introduction to guide
  • User manual
  • Troubleshooting
  • Maintenance
  • Power unit
  • 4-cylinder engines
  • 6-cylinder engines
  • Engine overhaul
  • Cooling and ventilation
  • Power and exhaust systems
  • Engine electrics
  • Control system
  • Transmission
  • Mechanical gearbox
  • Automatic gearbox
  • Clutch and drive shafts
  • Chassis
  • Brake system
  • Car suspension
  • Steering
  • Body
  • Exterior (external elements)
  • Interior (internal elements)
  • Doors, windows and locks
  • Electrical equipment
  • Equipment and devices
  • Electrical circuits
Capella 5 (1991-1997) 
  • General information
  • User manual
  • Maintenance
  • Helpful hints
  • Power unit
  • Petrol engines 1.6 and 1.8
  • Petrol engines 2.0
  • 2.5 petrol engines
  • Overhaul engines 1.6 and 1.8
  • Overhaul engines 2.0 and 2.5
  • Diesel engine 2.0
  • Engine electrics
  • Cooling system
  • Air conditioner
  • Carburetor Nikki 30/34
  • Power system (1.6 and 1.8)
  • Power system (2.0 and 2.5)
  • Control system
  • Transmission
  • Mechanical gearbox
  • Automatic gearbox
  • Clutch and axles
  • Chassis
  • Brake system
  • Suspension and wheels
  • Steering
  • Body
  • Exterior (external elements)
  • Interior (internal elements)
  • Doors and windows
  • Electrical equipment
  • Equipment and devices
  • Electrical circuits
Capella 4 (1987-1992) 
  • General information
  • Introduction to manual
  • Vehicle specifications
  • Power unit
  • Engine repair
  • Lubrication system
  • Cooling system
  • Fuel system (carburetor)
  • Fuel injection (FE)
  • Fuel injection (DOHC)
  • Fuel system (diesel)
  • Ignition system
  • Transmission
  • Clutch
  • Gearbox
  • Drive shafts
  • Chassis
  • Front suspension
  • Rear suspension
  • Steering system
  • Brake system
  • Electrical equipment
  • Equipment and devices
  • Electrical circuits
Capella 3 and 4 (1982-1992) 
  • General information
  • User manual
  • Maintenance
  • Power unit
  • Gasoline engine
  • Engine overhaul (gasoline)
  • Diesel engine
  • Cooling and heating
  • Supply system
  • Ignition system
  • Emission reduction
  • Transmission
  • Clutch
  • Mechanical gearbox
  • Automatic gearbox
  • Drive shafts
  • Chassis
  • Brake system
  • Suspension and wheels
  • Steering
  • Body
  • Exterior (external elements)
  • Interior (internal elements)
  • Electrical equipment
  • Equipment and devices
  • Power devices
  • Electrical circuits
Capella 3 (1982-1992, petrol) 
  • General information
  • User manual
  • Maintenance
  • Troubleshooting
  • Late models
  • Power unit
  • Engine in car
  • Engine overhaul
  • Cooling and heating system
  • Fuel and exhaust system
  • Engine electrical system
  • Emission control system
  • Transmission
  • Mechanical gearbox
  • Automatic gearbox
  • Clutch and drive shafts
  • Chassis
  • Brake system
  • Suspension and wheels
  • Steering
  • Body
  • Exterior (external elements)
  • Interior (internal elements)
  • Electrical equipment
  • Equipment and devices
  • Lighting and lamps
  • Electrical circuits
MazBook.ru © 2018–2026 · Mobile version · Articles and news · Sitemap: EN BG BY UA RS HR RO PL SK HU · Feedback · Site search · Add to bookmarks Familia 5 (BF) · Familia 6 (BG) · Capella 3 (GC) · Capella 3 and 4 (GC) · Capella 4 (GD) · Capella 5 (GE) · Capella 6 (GF) · Mazda3 BK · Mazda6 GG · CX-5KE · Mazda 121 (3) · Mazda BT-50 (1) ·
By continuing to use the site, you agree to the use of cookies 🔐