MazBook.ru
English Русский
Български
Беларускі
Український
Српски
Hrvatski
Română
Polski
Slovenský
Magyar
• Bookmark • Sitemap • Contacts •   
Cars Opel Cars Ford Cars Volkswagen Cars Audi Cars Kia Cars Renault Cars Peugeot


Familia Capella Mazda3 Mazda6 CX-? Others Articles
Mazda 121 (3) (1996-2003) Mazda BT-50 (1) (2006-2011)

Assembly of the piston-connecting rod unit of the cylinder block (Mazda BT-50 (1))

  • Home
  • Mazda
  • BT-50 J97M (2006-2011)
  • Power unit
  • Engine repair (diesel)
  • Assembly of the piston-connecting rod unit of the cylinder block
0
1. Assemble the connecting rod and piston group.

a) Apply a small amount of engine oil to the piston pin and into the piston boss holes.

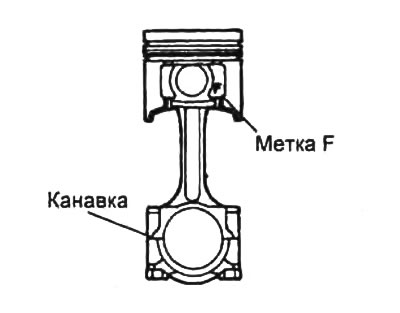
b) Place the piston pin on the piston side marked "F".

c) Assemble the connecting rod and piston group as shown in the figure.
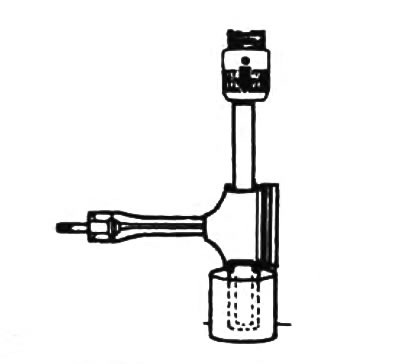
c) Assemble the connecting rod and piston group as shown in the figure.

d) Press the piston pin into the piston.

Note: If the piston pin enters the piston with great interference, heat the piston to 50 - 70°C.


d) Install the retaining rings.

2. Install the piston rings.

Attention:
  • Apply a generous amount of engine oil during installation.
  • Install the lower compression ring with the "R" mark facing up.
  • Install the top compression ring with the tapered side facing up.
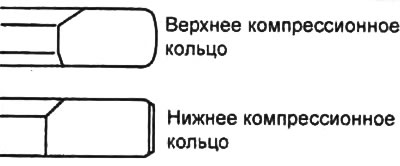

Install the top compression ring with the tapered side facing up.


a) Install the expander and two oil scraper ring scrapers.


b) Using a piston ring expander, install two compression rings.

c) Install the piston rings in the grooves so that their locks are located as shown in the figure.
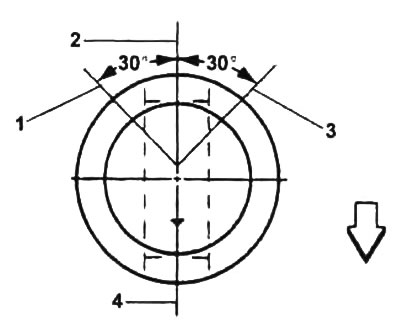
1 - upper scraper of the oil scraper ring,

1 - upper scraper of the oil scraper ring,
2 - compression ring No.1,
3 - lower scraper of the oil scraper ring,
4 - oil scraper ring expander and compression ring No.2.


d) Install the connecting rod and piston group so that the marks on the pistons are directed forward.

3. Install the connecting rod bearing shells.

a) Align the bearing shell projection with the recess in the lower connecting rod head and with its cover.

b) Insert the liners into the lower connecting rod head and into the connecting rod cap.
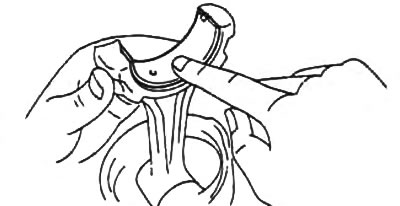
b) Insert the liners into the lower connecting rod head and into the connecting rod cap.
This article is available at: russian, bulgarian, belarusian, ukrainian, serbian, croatian, romanian, polish, slovak, hungarian
This text was checked by: Vladimir Bazhenov
Share with friends on social networks:

Previous
Mazda BT-50 (1) » Engine repair (diesel)
Next

Checking and repairing the crankshaft
Checking the condition of the piston and connecting rod
Disassembling the piston-connecting rod unit of the cylinder block
Cylinder Block — Checking, Cleaning and Repairing
Cylinder Block — Disassembly
Cylinder Block — Assembly
More articles on repairing other Mazda models
Technical characteristics of the cylinder block Mazda Familia 5 (1985-1989)
Cylinder block, crankshaft, bearings and connecting rod parts Mazda Capella 3 (1982-1992, petrol)
Cylinder Block — Description Mazda3 BK (2003-2009)
Cylinder block Mazda6 GG (2002-2008)
Assembly of the cylinder block and connecting rod and piston group Mazda CX-5KE (2012-2017)
Link in different formats to this article
Comments and feedback from visitors
No comments yet


How much will 20 + 13 ?


Mazda BT-50 (1) (2006-2011) 
  • General information
  • Introduction to guide
  • User manual
  • Maintenance
  • Power unit
  • Engine repair (diesel)
  • Cooling and lubrication system
  • Fuel injection system
  • Intake and exhaust system
  • Engine electrical equipment
  • Transmission
  • Clutch
  • Mechanical gearbox
  • All-wheel drive system
  • Transfer case and gearboxes
  • Chassis
  • Front suspension
  • Rear suspension
  • Steering
  • Brake system
  • Body
  • Exterior (external elements)
  • Interior (internal elements)
  • Heating and air conditioning
  • Security system SRS
  • Electrical equipment
  • Equipment and devices
  • Electrical circuits
Mazda 121 (3) (1996-2003) 
  • General information
  • User manual
  • Maintenance
  • Power unit
  • Petrol engine 1.3 l
  • Petrol engine 1.25/1.4 l
  • Diesel engine
  • Lubrication system
  • Cooling system
  • Ignition system
  • Supply system
  • Fuel injection (gasoline)
  • Fuel injection (diesel)
  • Exhaust system
  • Transmission
  • Clutch
  • Car gearbox
  • Chassis
  • Front suspension
  • Rear suspension
  • Steering
  • Brake system
  • Wheels and tires
  • Body
  • Exterior (external elements)
  • Interior (internal elements)
  • Doors, windows and locks
  • Heating system
  • Electrical equipment
  • Troubleshooting
  • Equipment and devices
  • Lighting system
  • Power devices
  • Electrical circuits
MazBook.ru © 2018–2026 · Mobile version · Articles and news · Sitemap: EN BG BY UA RS HR RO PL SK HU · Feedback · Site search · Add to bookmarks Familia 5 (BF) · Familia 6 (BG) · Capella 3 (GC) · Capella 3 and 4 (GC) · Capella 4 (GD) · Capella 5 (GE) · Capella 6 (GF) · Mazda3 BK · Mazda6 GG · CX-5KE · Mazda 121 (3) · Mazda BT-50 (1) ·
By continuing to use the site, you agree to the use of cookies 🔐