MazBook.ru
English Русский
Български
Беларускі
Український
Српски
Hrvatski
Română
Polski
Slovenský
Magyar
• Bookmark • Sitemap • Contacts •   
Cars Opel Cars Ford Cars Volkswagen Cars Audi Cars Kia Cars Renault Cars Peugeot


Familia Capella Mazda3 Mazda6 CX-? Others Articles
Mazda 121 (3) (1996-2003) Mazda BT-50 (1) (2006-2011)

Checking the condition of the piston and connecting rod (Mazda BT-50 (1))

  • Home
  • Mazda
  • BT-50 J97M (2006-2011)
  • Power unit
  • Engine repair (diesel)
  • Checking the condition of the piston and connecting rod
0
1. Clean the piston.

a) Check the outer surface.

b) Use a scraper to remove carbon deposits and other carbon deposits from the piston crown.

c) Clean the piston grooves from deposits using a part of the broken ring.
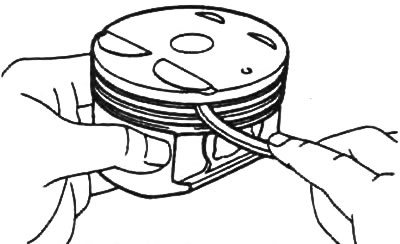
c) Clean the piston grooves from deposits using a part of the broken ring.


d) Using a soft brush and solvent, thoroughly clean the piston.

Note: Do not use a wire brush.


2. Check the piston and piston rings.

A. Check the clearance between the piston and the cylinder.

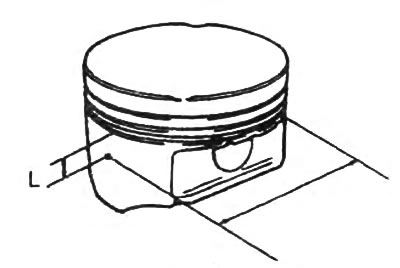
a) Using a micrometer, measure the diameter of the piston skirt in the direction perpendicular to the axis of the piston pin, as shown in the figure.
  • Distance "L" - 20 mm

Piston diameter:
  • nominal size - 92.918 - 92.944 mm

repair size:
  • (0.25) — 93.153-93.179 mm
  • (0.50) — 93.403 - 93.429 mm

(0.50) — 93.403 - 93.429 mm


b) Find the difference between the diameters of the piston and the cylinder. Determine the size of the gap.


  • Nominal clearance - 0.071 - 0.089 mm
  • Maximum gap - 0.15 mm

Maximum gap - 0.15 mm


If the clearance is greater than the maximum, replace all pistons. If necessary, replace the cylinder block.

Note: When replacing pistons, piston rings must also be replaced.


B. Check the piston ring to piston groove end clearance by measuring it with a flat feeler gauge as shown in the figure.

Nominal clearance:
  • compression ring No.1 - 0.06 -0.10 mm
  • compression ring No.2 - 0.04 - 0.08 mm
  • oil scraper ring - 0.02 - 0.06 mm

Maximum gap - 0.15 mm
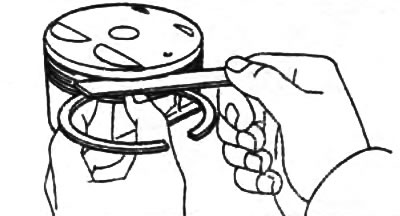
Maximum gap - 0.15 mm


If the clearance is greater than the permissible limit, replace the piston and piston rings.

B. Check the piston ring gap.

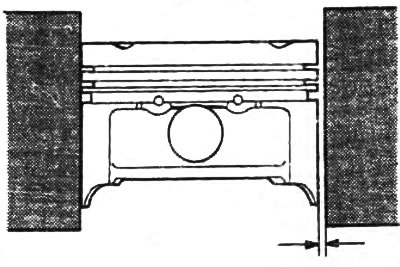
a) Insert the piston ring into the cylinder.

b) Use the piston to push the ring away from the cylinder block surface as shown in the figure.
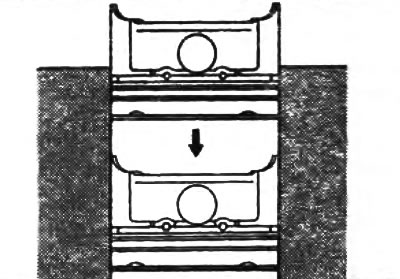


b) Use the piston to push the ring away from the cylinder block surface as shown in the figure.


c) Use a flat feeler gauge to measure the gap in the ring lock.

Nominal clearance:
  • compression ring No.1 - 0.22 - 0.32 mm
  • compression ring #2 - 0.49 - 0.64 mm
  • oil scraper ring - 0.22 - 0.52 mm

Maximum clearance - 1.00 mm
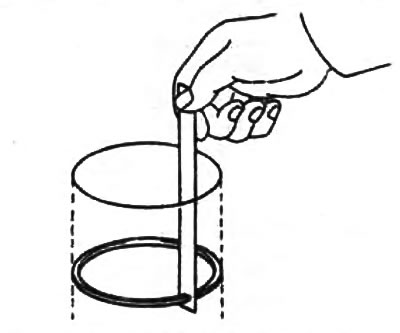
Maximum clearance - 1.00 mm


If the gap in the lock is greater than the maximum, replace the piston ring and repeat the check again. If the gap is still greater than the maximum, replace the cylinder block.

3. Check the alignment of the connecting rod heads.

A. Using the special tool and a flat feeler gauge, check the connecting rod bend as shown in the illustration.
  • Maximum allowable bending per 50 mm of length is 0.075 m/m
  • Maximum permissible twisting per 50 mm of length is 0.18 mm
  • Connecting rod length - 162.96 - 163.04 mm
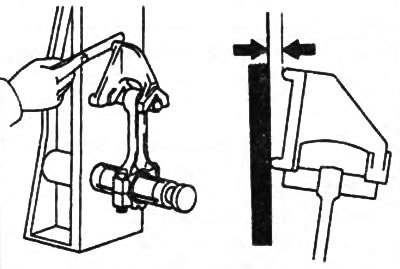
Connecting rod length - 162.96 - 163.04 mm


If the bending or twisting is greater than the allowable limit, replace the connecting rod together with the connecting rod cap.


B. Check the distance between the piston pin axis and the connecting rod journal axis.
  • Center distance - 162.96-163.03 mm

B. Check the piston pin oil clearance.

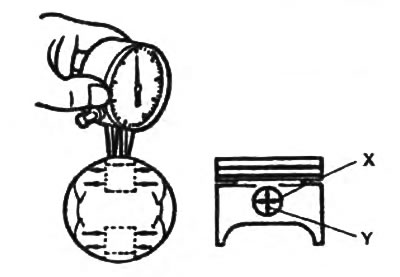
a) Using a micrometer, measure the piston pin diameter in the "X" and "Y" directions as shown in the figure.
  • Nominal piston pin diameter - 33.994 - 34.000 mm
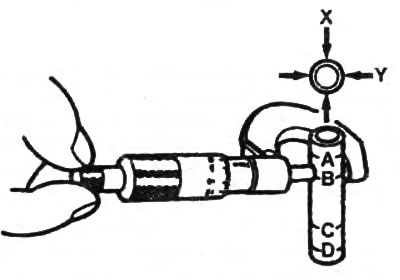
Nominal piston pin diameter - 33.994 - 34.000 mm


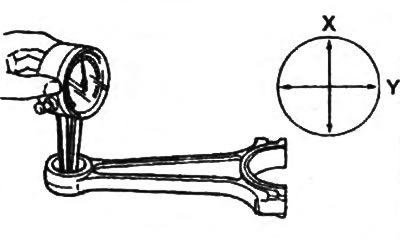
b) Using a bore gauge, measure the inner diameter of the connecting rod upper head in the "X" and "Y" directions as shown in the figure.
  • Nominal diameter - 34.012 - 34.033 mm

Nominal diameter - 34.012 - 34.033 mm


c) Determine the oil clearance: subtract the piston pin diameter from the inner diameter of the connecting rod upper head.
  • Nominal clearance - 0.012 - 0.039 mm

Replace the connecting rod or piston pin if necessary.

4. Check the piston pin oil clearance and the piston pin holes in the piston boss.


a) Measure the diameter of the piston pin hole in the piston boss.

The article is reprinted from the portal: MazBook.ru
  • Nominal diameter - 33.997 - 34.007 mm

Nominal diameter - 33.997 - 34.007 mm


b) Find the difference between the diameters of the piston pin and the hole for the piston pin.
  • Oil clearance - 0.003 - 0.013 mm

Replace piston and/or piston pin if necessary.
This article is available at: russian, bulgarian, belarusian, ukrainian, serbian, croatian, romanian, polish, slovak, hungarian
This text was checked by: Vladimir Bazhenov
Share with friends on social networks:

Previous
Mazda BT-50 (1) » Engine repair (diesel)
Next

Disassembling the piston-connecting rod unit of the cylinder block
Cylinder Block — Checking, Cleaning and Repairing
Cylinder Block — Disassembly
Cylinder head — inspection, cleaning and repair
Cylinder head — disassembly
Checking and repairing the crankshaft
Assembly of the piston-connecting rod unit of the cylinder block
Cylinder Block — Assembly
More articles on repairing other Mazda models
Checking the technical condition of parts Mazda Familia 5 (1985-1989)
Piston/connecting rod assembly — installation and checking of bearing… Mazda Capella 3 (1982-1992, petrol)
Checking the connecting rod side clearance Mazda3 BK (2003-2009)
Checking the connecting rod side clearance Mazda6 GG (2002-2008)
Checking the piston with connecting rod in the cylinder block assembly Mazda CX-5KE (2012-2017)
Link in different formats to this article
Comments and feedback from visitors
No comments yet


How much will 24 + 21 ?


Mazda BT-50 (1) (2006-2011) 
  • General information
  • Introduction to guide
  • User manual
  • Maintenance
  • Power unit
  • Engine repair (diesel)
  • Cooling and lubrication system
  • Fuel injection system
  • Intake and exhaust system
  • Engine electrical equipment
  • Transmission
  • Clutch
  • Mechanical gearbox
  • All-wheel drive system
  • Transfer case and gearboxes
  • Chassis
  • Front suspension
  • Rear suspension
  • Steering
  • Brake system
  • Body
  • Exterior (external elements)
  • Interior (internal elements)
  • Heating and air conditioning
  • Security system SRS
  • Electrical equipment
  • Equipment and devices
  • Electrical circuits
Mazda 121 (3) (1996-2003) 
  • General information
  • User manual
  • Maintenance
  • Power unit
  • Petrol engine 1.3 l
  • Petrol engine 1.25/1.4 l
  • Diesel engine
  • Lubrication system
  • Cooling system
  • Ignition system
  • Supply system
  • Fuel injection (gasoline)
  • Fuel injection (diesel)
  • Exhaust system
  • Transmission
  • Clutch
  • Car gearbox
  • Chassis
  • Front suspension
  • Rear suspension
  • Steering
  • Brake system
  • Wheels and tires
  • Body
  • Exterior (external elements)
  • Interior (internal elements)
  • Doors, windows and locks
  • Heating system
  • Electrical equipment
  • Troubleshooting
  • Equipment and devices
  • Lighting system
  • Power devices
  • Electrical circuits
MazBook.ru © 2018–2026 · Mobile version · Articles and news · Sitemap: EN BG BY UA RS HR RO PL SK HU · Feedback · Site search · Add to bookmarks Familia 5 (BF) · Familia 6 (BG) · Capella 3 (GC) · Capella 3 and 4 (GC) · Capella 4 (GD) · Capella 5 (GE) · Capella 6 (GF) · Mazda3 BK · Mazda6 GG · CX-5KE · Mazda 121 (3) · Mazda BT-50 (1) ·
By continuing to use the site, you agree to the use of cookies 🔐