MazBook.ru
English Русский
Български
Беларускі
Український
Српски
Hrvatski
Română
Polski
Slovenský
Magyar
• Bookmark • Sitemap • Contacts •   
Cars Opel Cars Ford Cars Volkswagen Cars Audi Cars Kia Cars Renault Cars Peugeot


Familia Capella Mazda3 Mazda6 CX-? Others Articles
Mazda 121 (3) (1996-2003) Mazda BT-50 (1) (2006-2011)

Cylinder Block — Assembly (Mazda BT-50 (1))

  • Home
  • Mazda
  • BT-50 J97M (2006-2011)
  • Power unit
  • Engine repair (diesel)
  • Cylinder Block — Assembly
0
Note:
  • Thoroughly clean all parts to be assembled.
  • Before assembly, lubricate all parts that form rotating or sliding units with fresh engine oil.
  • Apply a generous amount of motor oil to the cylinder walls, piston and rings.
  • Replace all gaskets, O-rings and seals with new ones.


1. Install the main bearing shells.

2. Apply a layer of engine oil to the thrust half ring and install it into the middle main bearing.

Caution: Install the thrust half ring so that the working surface faces the crankshaft cheek.
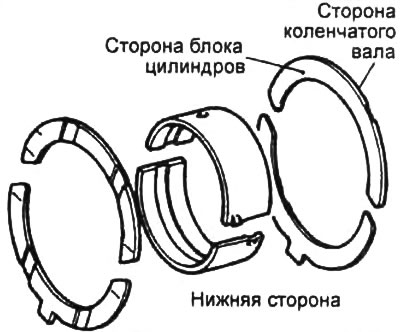

Caution: Install the thrust half ring so that the working surface faces the crankshaft cheek.


3. Place the crankshaft into the cylinder block.

4. Install the main bearing caps.

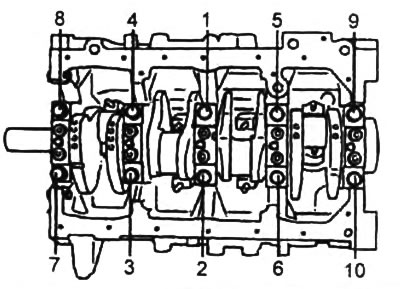
5. Tighten the main bearing cap bolts.

a) Apply engine oil to the threads and under the heads of the mounting bolts.

b) Tighten the mounting bolts in several passes in the sequence shown in the figure.

Tightening torque:
  • stage 1 - 14 - 34 Nm
  • stage 2 - 74 - 82 Nm
  • step 3 - Loosen the bolts (0 Nm)
  • stage 4 - 14 - 34 Nm
  • stage 5 - 42 - 45 Nm

stage 5 - 42 - 45 Nm


c) Mark the heads of the main bearing cap bolts.


d) Using the marks as a guide, tighten the mounting bolts by 90 - 105° in the sequence shown in the previous figure.
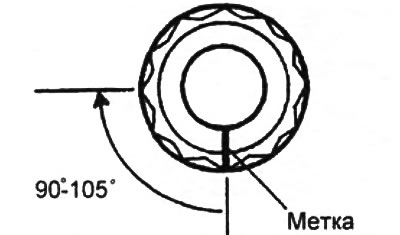
d) Using the marks as a guide, tighten the mounting bolts by 90 - 105° in the sequence shown in the…


6. Make sure the crankshaft rotates smoothly.

7. Install the piston and connecting rod assembly.

a) Install the connecting rod and piston group so that the "F" marks on the pistons are facing forward.
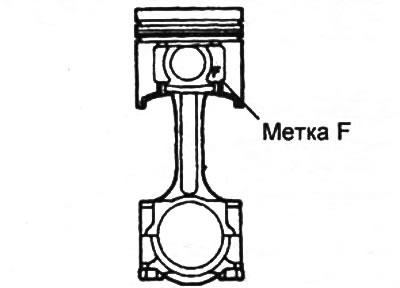
a) Install the connecting rod and piston group so that the «F» marks on the pistons are facing…


b) Using light taps, drive the piston into the cylinder.
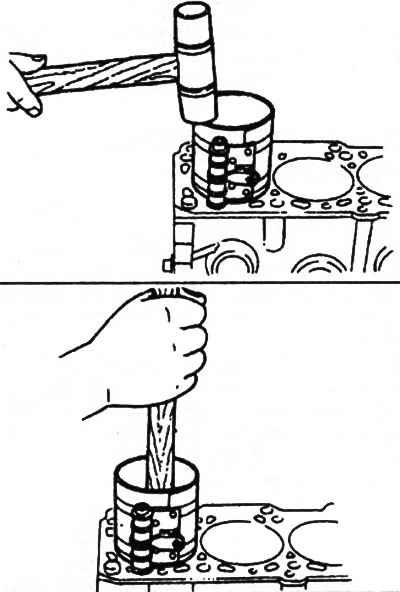
b) Using light taps, drive the piston into the cylinder.


8. Install the connecting rod lower head caps.


Note: If the connecting rod caps have dowel pins, they must be aligned with the holes in the connecting rod.


a) Install the connecting rod lower head caps onto the connecting rods.

b) Check that the numbering of the connecting rod bearing caps and connecting rods matches.

c) Apply engine oil to the threads and under the heads of the mounting bolts.

d) Tighten the connecting rod lower head cap bolts evenly and alternately.
  • Tightening torque - 46-51 Nm

d) Apply marks to the mounting bolts.

e) Tighten the mounting bolts by 83 - 98°.
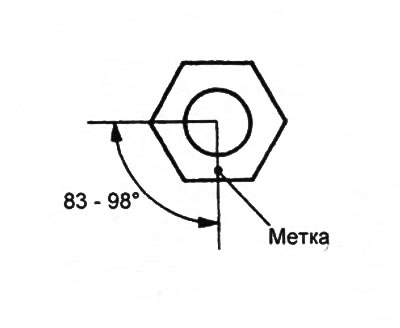
e) Tighten the mounting bolts by 83 - 98°.


9. Using a dial indicator, measure the end play as the connecting rod moves back and forth (see above).

10. Insert each piston and connecting rod into the cylinder block using the piston inserter.
This article is available at: russian, bulgarian, belarusian, ukrainian, serbian, croatian, romanian, polish, slovak, hungarian
This text was checked by: Vladimir Bazhenov
Share with friends on social networks:

Previous
Mazda BT-50 (1) » Engine repair (diesel)
Next

Assembly of the piston-connecting rod unit of the cylinder block
Checking and repairing the crankshaft
Checking the condition of the piston and connecting rod
Disassembling the piston-connecting rod unit of the cylinder block
Cylinder Block — Checking, Cleaning and Repairing
More articles on repairing other Mazda models
Technical characteristics of the cylinder block Mazda Familia 5 (1985-1989)
Location of cylinder block parts Mazda Capella 3 (1982-1992, petrol)
Cylinder Block — Description Mazda3 BK (2003-2009)
Cylinder block Mazda6 GG (2002-2008)
Assembly of the cylinder block and connecting rod and piston group Mazda CX-5KE (2012-2017)
Link in different formats to this article
Comments and feedback from visitors
No comments yet


How much will 46 + 50 ?


Mazda BT-50 (1) (2006-2011) 
  • General information
  • Introduction to guide
  • User manual
  • Maintenance
  • Power unit
  • Engine repair (diesel)
  • Cooling and lubrication system
  • Fuel injection system
  • Intake and exhaust system
  • Engine electrical equipment
  • Transmission
  • Clutch
  • Mechanical gearbox
  • All-wheel drive system
  • Transfer case and gearboxes
  • Chassis
  • Front suspension
  • Rear suspension
  • Steering
  • Brake system
  • Body
  • Exterior (external elements)
  • Interior (internal elements)
  • Heating and air conditioning
  • Security system SRS
  • Electrical equipment
  • Equipment and devices
  • Electrical circuits
Mazda 121 (3) (1996-2003) 
  • General information
  • User manual
  • Maintenance
  • Power unit
  • Petrol engine 1.3 l
  • Petrol engine 1.25/1.4 l
  • Diesel engine
  • Lubrication system
  • Cooling system
  • Ignition system
  • Supply system
  • Fuel injection (gasoline)
  • Fuel injection (diesel)
  • Exhaust system
  • Transmission
  • Clutch
  • Car gearbox
  • Chassis
  • Front suspension
  • Rear suspension
  • Steering
  • Brake system
  • Wheels and tires
  • Body
  • Exterior (external elements)
  • Interior (internal elements)
  • Doors, windows and locks
  • Heating system
  • Electrical equipment
  • Troubleshooting
  • Equipment and devices
  • Lighting system
  • Power devices
  • Electrical circuits
MazBook.ru © 2018–2026 · Mobile version · Articles and news · Sitemap: EN BG BY UA RS HR RO PL SK HU · Feedback · Site search · Add to bookmarks Familia 5 (BF) · Familia 6 (BG) · Capella 3 (GC) · Capella 3 and 4 (GC) · Capella 4 (GD) · Capella 5 (GE) · Capella 6 (GF) · Mazda3 BK · Mazda6 GG · CX-5KE · Mazda 121 (3) · Mazda BT-50 (1) ·
By continuing to use the site, you agree to the use of cookies 🔐