
Check and adjustment
1. Check the clutch pedal travel.
Depress the clutch pedal and measure the pedal travel.
- Pedal travel - 152 mm
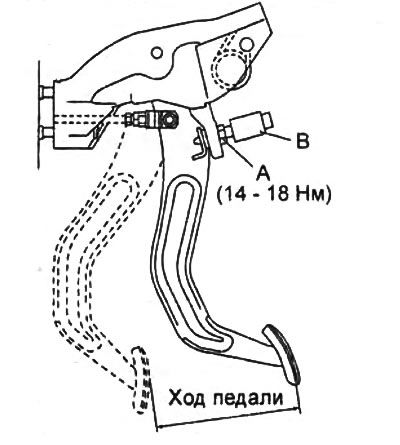
Adjust pedal travel if necessary. Loosen locknut (A) and turning/unscrewing the switch (IN) adjust the clutch pedal.
2. Slightly pressing the clutch pedal by hand until there is resistance to pressing, measure the free play of the clutch pedal.
- Clutch pedal free play - 5-15 mm
- Free travel of the push rod - 0.1-3.5 mm

If the measured distance is not correct, adjust.
A) Loosen locknut "WITH".
b) Rotating stem "D", adjust the gap.

V) Tighten locknut "WITH".
- Tightening torque - 12-17 Nm
If, when measuring, the free play of the pedal does not correspond to the nominal value, loosen the lock nut "WITH" and re-adjust.
3. Check up a course of switching off of coupling.
A) Apply the parking brake and place wheel chocks under the wheels.
b) Start the engine at idle.
V) Without depressing the clutch pedal, slowly move the shift lever towards the reverse gear position until a sound of gear contact is heard.
G) Gradually depressing the clutch pedal, measure the stroke (A) pedaling from the point where gear noise disappears (switch-off point), until the pedal is not depressed.
- Rated distance "A" — 110-125 mm
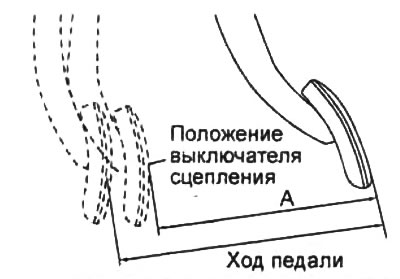
Note: if the measured distance does not correspond to the nominal one, bleed the clutch hydraulic actuator.
Removal and installation (Ford Ranger)
The clutch pedal is made as a single unit with the brake and accelerator pedals. For removal and installation procedures for pedals, see chapter "fuel injection system".
Removal and installation (Mazda VT-50)
Note:
- When removing and installing, follow the assembly drawing "Removing and installing the brake pedal (Mazda VT-50) ".
- Installation is made in an order, the return to removal.
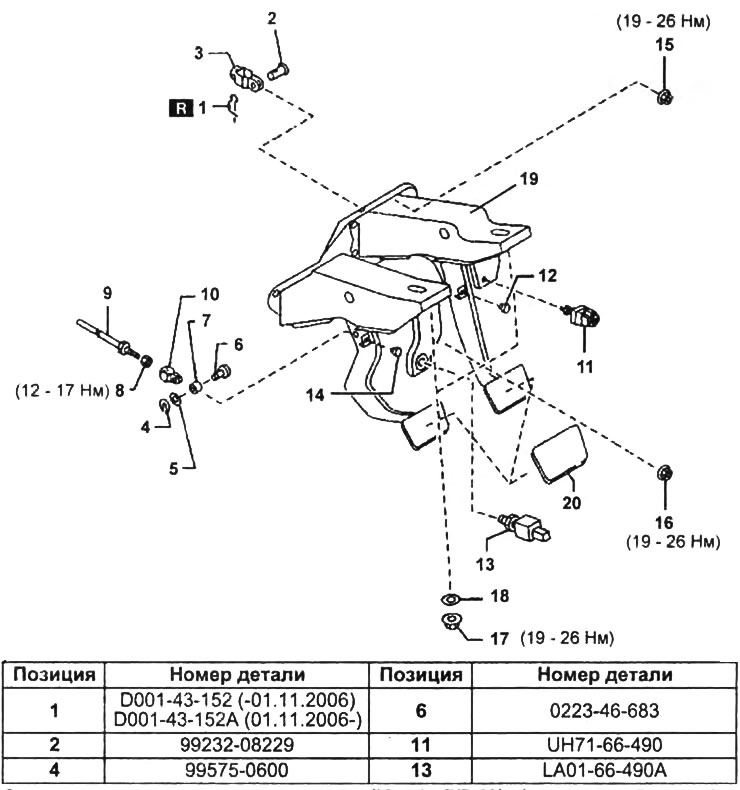
Removing and installing the brake pedal (Mazda VT-50).
1 - cotter pin,
2 - pin,
3 - brake pedal fork,
4 - retaining ring,
5 - washer,
6 - pin,
7 - bushing,
8 - locknut,
9 - clutch master cylinder rod,
10 - clutch pedal fork,
11 - brake light switch,
12 - limiter,
13 - switch on the clutch pedal,
14 - limiter,
15 - nut (6 pcs.),
16 - nut,
17 - nut (2 pcs.),
18 - puck (2 pcs.),
19 - pedal assembly,
20 - pedal pad.
1. Remove cotter pin (1) and remove the pin (2). Disconnect the plug (3) from the brake pedal.
2. Remove retaining ring (4) and puck (5).
3. Remove pin (6) and disconnect the plug (10) from the clutch pedal.
Note: when removing, be careful, the sleeve (7) may fall out and be lost.
4. Disconnect the connectors from the brake light switch (11) and clutch pedal switch (13).
5. Loosen the nuts (15, 16, 17) pedal mounts, remove washers (18).
6. Remove the pedal assembly (19) assembled.
Checking the switch on the clutch pedal
1. Disconnect a wire from the negative plug of the storage battery.
2. Disconnect the connector from the switch on the clutch pedal.
3. Make sure there is continuity between the terminals of the connector when the clutch pedal is depressed and no continuity when the pedal is not depressed.
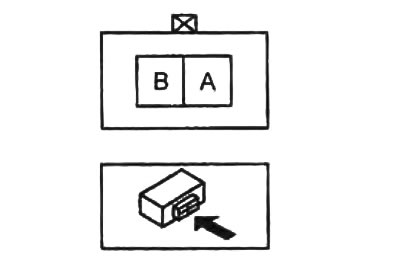
If necessary, replace the switch on the clutch pedal.