


Contents: Driver's seat ⇓ Getting into the rear seats ⇓ Reclining the seat backs ⇓ Folding rear seat ⇓
Correct installation of seats is necessary to ensure:
- easy access to controls;
- high travel comfort;
- maximum effectiveness of seat belts and airbags.
Driver's seat
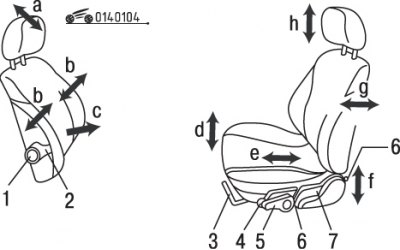
Figure 1.4. Directions for adjusting the driver's seat position: 1 – support projection adjustment handle; 2 – lumbar support adjustment lever; 3 – seat longitudinal position adjustment lever; 4 – lever for adjusting the height of the front part of the seat cushion; 5 – lever for adjusting the height of the rear part of the seat cushion; 6 – seat back position maintenance lever; 7 – seat back tilt adjustment lever; a – direction of headrest tilt; b – direction of movement of the support projection; c – direction of movement of the lumbar support; d – direction of movement of the front part of the seat cushion; e – direction of longitudinal movement of the seat; f – direction of movement of the rear part of the seat cushion; g – direction of seat back tilt; h – direction of headrest movement
The driver's seat position can be adjusted in several different directions (figure 1.4).
It is recommended to install the driver's seat as follows:
- adjust the longitudinal position of the seat so that the pedals can be fully pressed with slightly bent knees;
- adjust the position of the seat back so that the back is completely against the driver's back, and the top of the steering wheel can be reached with slightly bent arms.
To ensure safety, seats should only be adjusted when the vehicle is stationary.
(The article is reprinted from the portal mazbook)
Fine adjustment of the seat back position
Press the lever down or pull it up and tilt the backrest forward or backward.
Caution! Do not recline the seatback too far while driving, as this significantly reduces the effectiveness of the seat belts.
Adjusting lumbar support
Use the lever on the inside of the seat to adjust the position of the lumbar support. It can be installed in three different positions.
Adjusting the height of the front part of the seat cushion
The height of the front part of the seat cushion can be adjusted as follows:
- to raise the front of the seat cushion, pull the lever and press lightly on the seat back with your torso;
- to lower the front of the seat cushion, pull the lever and press lightly on the front of the cushion with your torso.
Adjusting the height of the rear part of the seat cushion
The height of the rear part of the seat cushion can be adjusted using a lever.
Adjusting the seat position in the longitudinal direction
Pull the lever up and slide the seat. Then release the lever and move the seat a little further until the lock engages.
Caution! Do not place any objects under the front seats, as this may prevent the seat from locking properly.
Adjusting the headrest tilt
The position of the headrest can be adjusted by tilting it forward or backward.
Adjusting the support protrusions
The side support bolsters can be adjusted using the handle located on the inside side of the seat back.
Maintaining the position of the seatback
If the storage lever is set to a preferred seat back position within the storage zone, that seat back position is stored and the previously stored seat back position is cancelled.
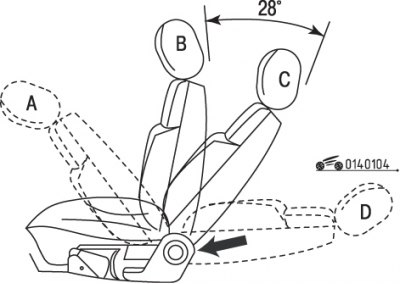
Figure 1.5. Provisions (A, B, C, D) preserving the seat back
If the storage lever is set to the seatback position "A", the seatback can be reclined up to and including position "C" (figure 1.5). The seat back positions in the area between "C" and "B" can be stored.
If the save lever is operated outside this zone, the "C" position is always saved.
Caution! Make sure that passengers in the rear seat do not accidentally step on the storage lever.
Getting into the rear seats
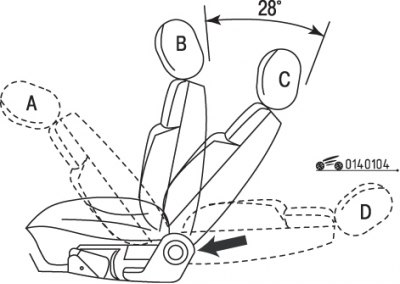
Figure 1.6. Location of the lever and pedal for folding the front passenger seat back and moving the seat forward
The front passenger seatback reclines forward and the seat automatically moves forward when the lever is pulled up or the pedal is pressed (figure 1.6). After boarding or disembarking passengers, move the seat back until it is securely locked.
Caution! While driving, passengers sitting in the back seat must not press the pedal.
Front seat heating system
The driver's and front passenger's seats are equipped with their own heating switches, which can only be switched on when the key in the ignition switch is in the "ON" ("II") position. The thermostat in the seat heating system turns the heating on at less than 12°C and off at 32°C.
Individually folding rear seat backrests
To increase the luggage compartment capacity, the rear seat backrests can be folded down individually.
Reclining the seat backs
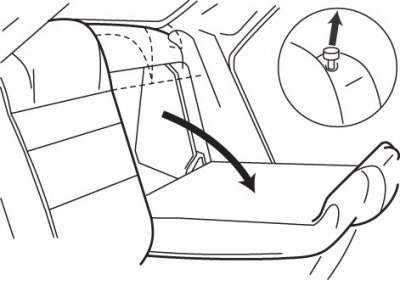
Figure 1.7. Directions for pulling the locking button and folding the rear seatback
Pull the lock button and move the seat back down (figure 1.7).
Tilt the seatback up and push it down until it engages in the latch.
Folding rear seat
The rear seat can be fully folded down as follows.
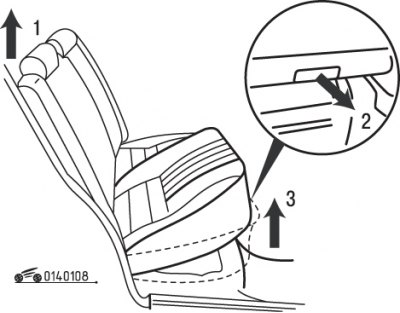
Figure 1.8. The first three stages of folding the rear seat: 1 – direction of headrest removal; 2 – direction of movement of the seat cushion locking lever; 3 – direction of lifting the seat cushion
1. Remove the headrest (figure 1.8).
2. Pull the seat cushion release lever.
3. Lift the seat cushion up by the front edge.
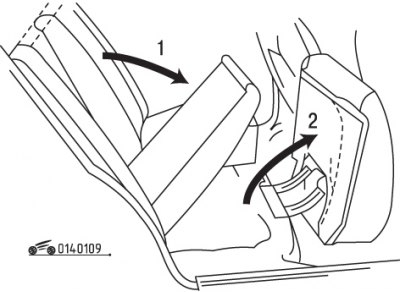
Figure 1.9. The last two stages of folding the rear seat: 1 – direction of seat cushion folding; 2 – direction of seat back reclining
4. Fold the seat cushion forward (figure 1.9).
5. Pull the lock button and fold the seat back down.
When returning the cushion to its original position, pull the seat cushion locking lever and press the cushion down.
After installing the seat back, pull it forward to ensure it is securely locked in place.
Caution: When folding the seat cushion back to its original position, place the seat belts on the seat so that they can be used at any time.
Warning! When the rear seatback is folded down, do not store luggage above the level of the front seatback. Luggage must be securely fastened so that in the event of sudden braking or an accident it cannot shift forward and thereby create a dangerous situation.