
Maintenance technique
When servicing and repairing a car, there are typical situations that require certain methods for their implementation. In this book, such situations will often be repeated. Knowing these techniques will allow the home mechanic to properly organize the work and complete it carefully and to the end.
Fasteners
Fasteners are bolts, screws, nuts and studs, which are intended for interconnecting two or more parts. When working with fasteners, there are a few things to keep in mind. Almost all fasteners are equipped with means to prevent self-unscrewing. This can be a lock nut, a folding or spring washer, or a compound against self-unscrewing, which is applied to the thread before assembly. Fasteners before assembly must be clean and serviceable - not deformed, with undamaged threads and edges of the turnkey head. Make it a rule to replace all damaged fasteners during assembly. Special self-locking nuts with nylon or fiber insert can only be tightened once. When unscrewed, they lose their stacking qualities and must be replaced.
When loosening rusted bolts and nuts, use a highly wetting fluid that can penetrate the threaded connection and make loosening easier. Some mechanics use turpentine for this purpose, which fully justifies its use. After wetting the joint with liquid, let it work for a few minutes so that it has time to penetrate into the rusty joint. If the liquid does not help, then sometimes such a connection has to be cut down or cut down with a chisel. There is a device that cuts the nut lengthwise.
If the pin is broken and remains in the body of the part (e.g. in the cylinder block), it must be drilled and removed with a special tool that can be purchased at tool stores. Most service stations can also fix such a breakdown.
Flat spring washers should be replaced with the same ones. Do not use spring washers on soft surfaces such as aluminium, plastic or thin parts.
Fastener dimensions
Manufacturers are increasingly using fasteners with metric threads. However, vehicles made in the US or intended for the US market may have inch-thread fasteners. Consider the main differences between these types of fasteners.
Bolt designations, regardless of thread type, include thread OD, thread pitch, and bolt length. For example, an M12x1.75x25 bolt has a 12mm metric thread with a 1.75mm pitch and a length of 25mm. The 1/2-13x1 bolt has a 1/2" thread with 13 threads per inch and is 1" long. Both bolts are almost the same in appearance and easy to mix up, but they are not interchangeable (pic. 0.4).
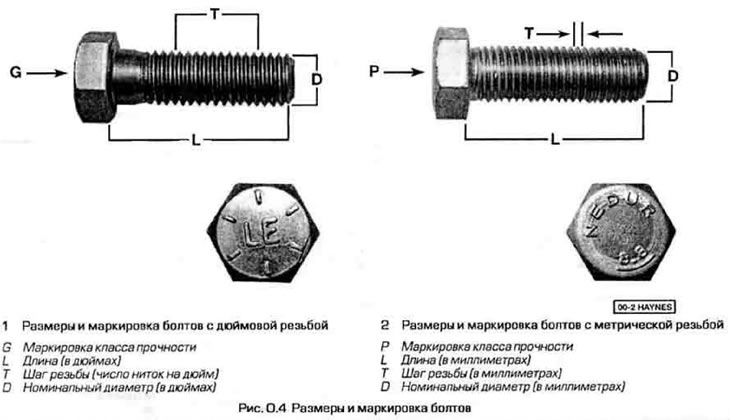
In addition to the outer diameter and thread pitch, inch and metric bolts also differ in heads. For inch bolts, wrench size (those. distance between opposite and faces) is measured in inches, while metric is measured in millimeters. The same applies to nuts. In this regard, the wrenches for metric and inch bolts and nuts differ in size. A wrench for metric fasteners cannot be used for inch fasteners, and vice versa.
Another difference is that not the heads of inch bolts, as a rule, several radial cuts are applied, the number of which indicates the strength class of the bolt, which can be used to judge what torque this bolt can be tightened. The more slots, the stronger the bolt. In vehicles, bolts Q are used with strength classes from 0 to 5 (pic. 0.5).
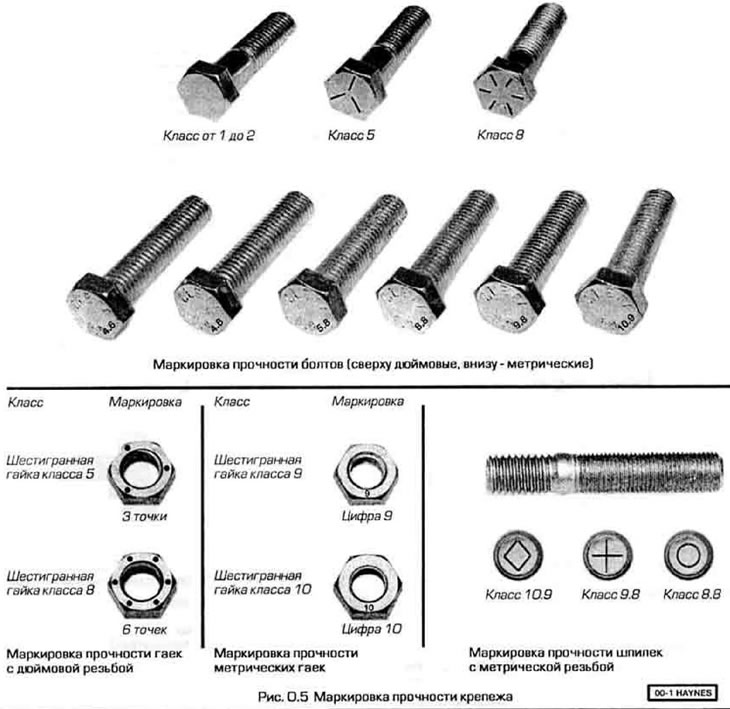
Metric bolts are also marked with a strength class, but this marking is indicated by two numbers through a dot, stamped on the end of the head. The first number multiplied by 10 determines the value of the tensile strength in kg/mm2. The second number, multiplied by 10, determines the ratio of the yield strength to the tensile strength in%. The product of the numbers defines the yield strength of the bolt material in kg/mm2. Thus, the larger the number, the higher the strength of the bolt. In automobiles, bolts with strength classes 8.8, 9.8 and 10.9 are most commonly used.
Strength class markings also distinguish between metric and inch nuts. The strength class on nuts with inch threads is indicated by the number of dots on the face of the nut, while on nuts with metric threads the strength class is indicated by a number. The more dots or the number, the higher the strength of the nut, (The strength class multiplied by 10 gives the value of the test stress in kg/mm2).
Metric studs also have a grade marking on the top end. Large studs are marked with the same markings as metric bolts. Small studs are marked with geometric shapes.
It should be noted that a large number of fasteners, especially small strength classes (consumer goods), do not have markings. In order to distinguish in this case an inch bolt from a metric one, the only way is to carefully measure the thread. To measure metric and inch threads, there are special templates - thread gauges.
Since fasteners of the same size may differ in strength class, then make sure that during assembly, bolts and nuts do not return to the place they occupied before disassembly. If you need to replace fasteners when reassembling an assembly, make sure that new bolts and nuts have a strength class not lower than those being replaced.
Approximate tightening torques for threaded connections

Thread tightening procedure
Most fasteners (bolts and nuts) required to be tightened to a specified torque. Overtightening the joint can loosen and even break the bolt, while a loose joint will not serve its intended purpose (for example, will pass gas or liquid), and quickly weaken. Depending on the material and dimensions of the bolt, the torque required to tighten the connection is calculated by the constructors and indicated in the Technical Data at the beginning of each chapter. Carefully follow the recommended tightening torques. For connections that are not very critical, for which the tightening torque is not regulated, you can follow the recommendations indicated in the table below. The torque values given in the table are based on dry (not lubricated) bolts into a steel or cast iron part (not in aluminum). As stated above, the torque that can be applied to a bolt or nut depends on their property classes. The torque values given in the table are based on fasteners of strength classes 2 and 3. For fasteners of higher strength classes, the moment values can be increased.
When separating and connecting parts. having a large mating surface, such as a cylinder head. engine oil pan differential cover, etc. a certain sequence of loosening and tightening the fasteners connecting them is required to avoid deformation of the mating parts. Such a sequence. if necessary. will be indicated in the relevant chapters of the manual. This sequence must be followed. If the tightening sequence is not indicated, then the following and recommendations can be followed.
First screw in the bolts or tighten the nuts only by hand. Then turn them in turn with a wrench one turn in a zigzag or diagonal sequence from the middle to the ends of the parts to be joined. Then go back to the first bolt again (nut) and tighten all fasteners in the same diagonal sequence for another half turn. Go through ace bolts again (nuts) and tighten another quarter turn. So continue until the fasteners are tightened to the regulated moment. When releasing and unscrewing fasteners, the order should be reversed.
Disassembly of nodes
Disassemble the nodes carefully. so that they can be reassembled. Always memorize or write down the disassembly sequence. Make notes on parts that can be installed in various ways. For example. convex washer on the bolt. sprocket on the shaft, etc. If possible. lay out the parts of the assembly on a clean surface and in the order in which they were removed. Before disassembling a node, it is useful to make a sketch or photograph of it.
When unscrewing the fasteners, remember their location. After removing the part, screw the bolts in place with the washers and screw the nuts back to where they were before disassembly. This will help keep the fasteners and not confuse them during assembly. If it is not possible to return the bolts and nuts to their original places, then at least store them in separate boxes. Tin cans work well for this purpose. You can take a large box and divide it into cells with partitions. Such a container is very convenient when disassembling assemblies consisting of a large number of small parts, such as a carburetor. valves. generator. dashboard, etc. The cells can be marked with paint or fixed with adhesive tape.
When disconnecting electrical connectors, it is recommended to mark the connector halves with numbers or adhesive tape so that they can be reconnected without error.
Surfaces for laying
Gaskets are widely used on all vehicles to seal two flat surfaces against gas, liquid or vacuum leaks.
Many times during bulkheads these gaskets are coated with liquid or paste sealants. Over time, under the action of heat and pressure, the sealing surfaces adhere to each other so that it can be difficult to separate them. In such cases, tapping the mating parts along the joint surface with a soft-faced hammer helps. You can also use an ordinary hammer if the blows are not applied directly to the details. through a wooden block. Do not hammer on cast parts, especially those made of cast iron, or parts made of soft material such as aluminium. If the part does not separate, check first. Have you removed all the bolts?
Do not use a screwdriver or pry bar to separate the surfaces as the surfaces are easily damaged. If you still can’t separate the surface without forcing, use a wooden wedge, but keep in mind that in the future it will be necessary to clean the knot from chips and wood fibers.
After separating the surfaces, carefully scrape off the remnants of adhering gasket from them and rinse the surfaces. A dried gasket can be soaked with some liquid with good penetrating power or a suitable solvent. It is better to make a scraper for removing the gasket from copper, for example, from a copper tube, if you saw it along, turn it into a plane and straighten it with a hammer. Copper is recommended because it is generally softer than the machined surfaces, but harder than the gasket that needs to be scraped off. Some gaskets can be removed with a wire brush. But regardless of the method used, the surface must remain intact, flat and clean. If there are still scratches on the surfaces under the gasket, then during assembly the gasket should be covered with a layer of sealant, which will fill the scratches and ensure the tightness of the joint
How to remove an old hose
Attention! If the vehicle is equipped with an air conditioning system, do not disconnect the system piping unless the refrigerant has been removed from the system first. This operation must be carried out by a workshop specialist.
The precautions for disconnecting the hoses are about the same. as when removing the gaskets. Take care not to dent or scratch the surfaces that the hose is attached to, otherwise the connection may leak. Be especially careful with radiator hoses. Due to chemical reactions, high temperature and pressure, the hoses stick to the nozzles and it can be very difficult to remove them.
Before you start removing the hose, loosen its clamps. Then grab the end of the hose and try to rotate it relative to the nozzle. Turn it back and forth until you feel that it turns freely and can be pulled off the nozzle.
If the hose has stuck to the nozzle so much that it is impossible to remove it, the last way remains: cut the hose along the nozzle with a sharp knife, after which it will not be difficult to remove it. Naturally, such a hose will have to be replaced with a new one. Take care not to scratch the tube while doing this.
If the hose clamp is damaged or broken, replace it. The most reliable clamp is a worm type.
Damaged Thread Repair
Sometimes the internal threads of nuts or bolt holes are stripped or bent. Most often this happens due to excessive tightening efforts. It is easiest to strip the threads in aluminum parts, since aluminum is a soft material and does not withstand heavy loads.
Usually, the internal and external threads are only partially stripped or crushed. If you drive the thread with a die or tap, then it becomes quite suitable for further use. But sometimes the thread is damaged so seriously that it cannot be restored in this way. In this case, you have three options.
1. Ream the hole to the next thread size and cut a new thread with a tap.
2. Ream and cut the hole to a size that allows the screw plug to be screwed into it. Screw in the plug, drill and cut the thread in it to the previous size. Sometimes you can buy a plug with a ready-made threaded hole. In this case, drill and cut a hole for the cork. Then screw a bolt with a lock nut into the plug and screw the plug into the hole with this bolt, then unscrew the lock nut and unscrew the bolt.
3. The third method involves the use of proprietary blind and through hole repair kits such as Heli-Coil or Slimset. If you managed to purchase such a kit, be guided by the instructions attached to it.
Regardless of the method used, do this work slowly and carefully. Any oversight can nullify all your work and finally render the repaired part unusable.
Workplace
Speaking of tools, we should not forget about the workplace. If the work to be performed is outside the scope of normal maintenance, then a good workplace is essential.
We understand that many motorists, due to circumstances, are forced to remove the engine or similar units from the car in conditions that are not as favorable as those available in the repair shop. Such work should always be carried out under a roof.
Wherever possible, any disassembly should be done on a clean and flat bench or table of suitable height.
The workbench should be equipped with a vise with a jaw opening of less than 100 mm, which is suitable for most jobs. As mentioned above, it is necessary to provide a dry and clean place for storing tools, as well as for all kinds of lubricants, liquids, touch-up paint, etc.
One of the most popular tools in the garage is an electric drill with a drill chuck up to at least 8 mm in diameter, which can be used for a wide variety of jobs. Such a drill, as well as a large set of drills, are absolutely necessary when installing various auxiliary equipment.
Last but not least, always keep some old newspapers, paper towels, and clean, lint-free rags in your work area and keep your work area clean.